Skip to content
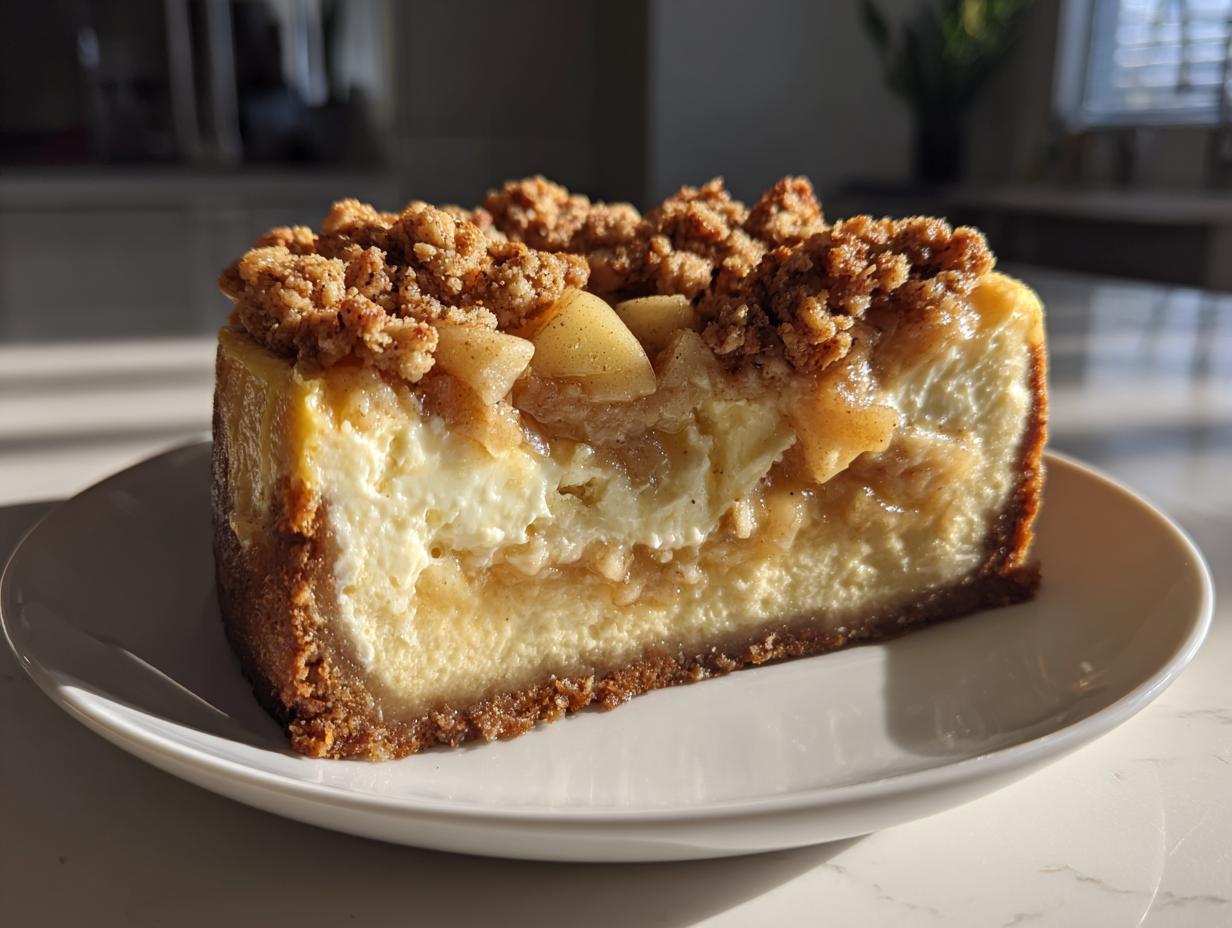
Picture this: It’s Thanksgiving 2018, and I’m desperately trying to impress my new in-laws by making dessert. The problem? My baking skills were… well, let’s just say “experimental” at best. That’s when inspiration struck – why choose between my two favorite desserts when I could mash them together? And thus, my now-famous apple crisp cheesecake was born after what felt like a million test batches!
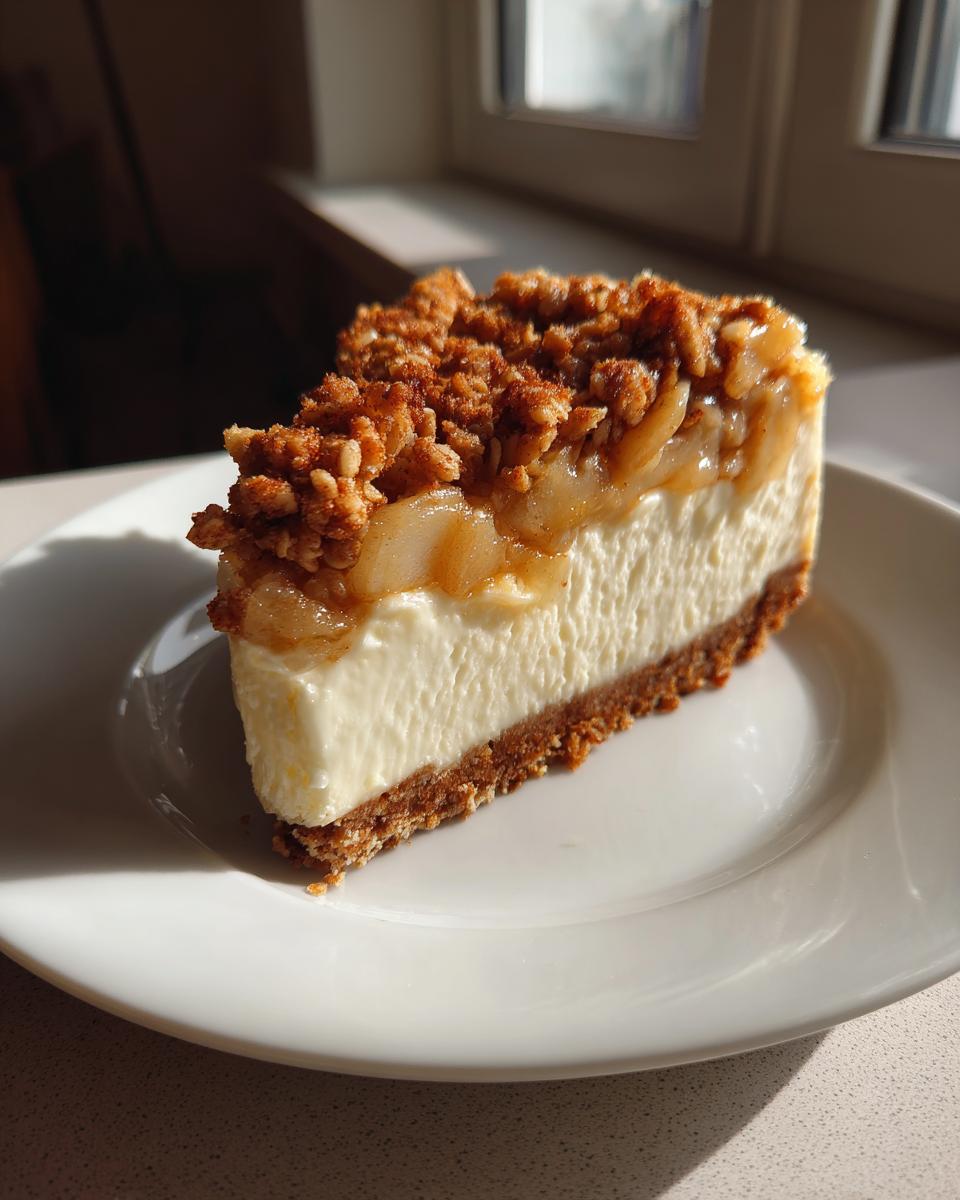
This magical dessert combines everything we love about classic cheesecake – that rich, creamy texture – with the cozy, nostalgic flavors of apple crisp. The first time I pulled this beauty out of the oven, watching the oat topping turn golden while the cinnamon-spiced apples bubbled underneath, I knew I’d created something special. My mother-in-law (who’s notoriously hard to please) actually asked for seconds – and the recipe!
What makes this apple crisp cheesecake truly stand out is how each element complements the others. The graham cracker crust gives that perfect crunch, the velvety cheesecake filling balances the tart apples, and that buttery oat topping? Absolute perfection. It’s become my go-to dessert for everything from holiday dinners to casual weekend treats – and I can’t wait for you to try it!
Why You’ll Love This Apple Crisp Cheesecake
Let me tell you why this dessert became my signature dish – it’s got everything you could possibly want in one glorious bite:
- The texture contrast is pure magic – creamy cheesecake meets crunchy oat topping with tender apples in between
- Perfectly balanced flavors – not too sweet, with just the right amount of cinnamon warmth
- Always a crowd-pleaser that looks fancy but is secretly easy to make
- Smells like fall while it bakes – your kitchen will be filled with the coziest aromas
- Leftovers (if you have any!) taste even better the next day
Key Features That Make It Special
Three things set this apple crisp cheesecake apart from ordinary desserts:
1. That irresistible crispy topping: The oat crumble gets perfectly golden in the oven, giving you that satisfying crunch with every forkful. I always make extra because – confession time – I sometimes snack on it before baking!
2. The dreamiest creamy filling: When you nail that smooth, velvety cheesecake layer? Absolute perfection. The secret is taking your time mixing and using room-temperature ingredients.
3. Seasonal apple goodness: Tart apples hold their shape during baking and pair beautifully with the rich cheesecake. The cinnamon-brown sugar mixture makes them taste like autumn in dessert form.
Apple Crisp Cheesecake Ingredients
Here’s everything you’ll need to make this dreamy dessert come to life – and trust me, every ingredient plays a crucial role!
- Graham Cracker Crust: 2 cups graham cracker crumbs (about 16 full sheets) + 1/2 cup melted butter
- Cheesecake Filling: 24 oz (three 8-oz blocks) cream cheese at room temperature, 3/4 cup granulated sugar, 1 tsp pure vanilla extract, 3 large eggs at room temperature
- Apple Layer: 2 medium apples (peeled and diced into 1/2-inch pieces), 1/2 cup packed brown sugar, 1 tsp ground cinnamon
- Crisp Topping: 1/2 cup old-fashioned rolled oats, 1/4 cup all-purpose flour, 1/4 cup cold butter cubed into small pieces
Ingredient Notes & Substitutions
No graham crackers? No problem! You can use:
- Gluten-free graham-style crackers for dietary needs
- Digestive biscuits for a British twist
- Vanilla wafers for extra sweetness
For the apples, I swear by Granny Smith’s tartness, but any firm baking apple works:
- Honeycrisp for natural sweetness
- Braeburn for balanced flavor
- Pink Lady if you prefer softer texture
And a pro tip: That “packed” brown sugar measurement really matters – press it firmly into your measuring cup for the perfect caramel flavor in every bite!
Equipment You’ll Need
Now let’s talk tools! Don’t worry – you don’t need fancy equipment to make this apple crisp cheesecake shine. These are my absolute must-haves that I reach for every single time:
- 9-inch springform pan: This is non-negotiable, friends. The removable sides make serving so much easier. Mine’s a little dented from years of use, but that just adds character!
- Electric mixer: A hand mixer works great, though I sometimes use my stand mixer when I’m feeling fancy. Just don’t overmix – we want creamy, not fluffy.
- Mixing bowls: You’ll need at least two medium/large ones – one for the crust, one for the filling. Glass or stainless steel are my go-tos.
- Box grater: Wait, no! Just kidding. Put that away – we’re using peeled, diced apples for this recipe. (I made that mistake once and… let’s not talk about it.)
- Pastry cutter or fork: For that perfect crumbly oat topping. I’ve used clean hands in a pinch though – whatever works!
- Measuring cups and spoons: Baking is science, people. My grandma’s old metal set has never failed me.
Bonus item that’s not essential but oh-so-helpful: A little offset spatula for smoothing the filling. Though honestly, I usually just use the back of a spoon and call it “rustic charm.”
How to Make Apple Crisp Cheesecake
Alright, let’s get baking! This apple crisp cheesecake comes together in stages, but each step is surprisingly simple. Follow along closely – I’ve learned these techniques through lots of trial and error (and a few hilarious kitchen disasters).
Preparing the Crust
First things first: Preheat that oven to 325°F (165°C) – this gives your cheesecake the gentle, even heat it needs. Now for the crust:
- Mix graham cracker crumbs with melted butter until it resembles wet sand. No dry spots!
- Press firmly into your springform pan using the bottom of a measuring cup. Start from the center and work outward, building up the sides about 1 inch high.
- Pro tip: For an extra-crispy base, bake the crust alone for 8 minutes before adding filling. Totally optional but oh-so-worth it!
Making the Cheesecake Filling
This is where the magic happens – but only if your cream cheese is properly softened (cold cheese = lumpy filling = sad baker).
- Beat cream cheese on medium until perfectly smooth, about 2 minutes. Scrape the bowl often!
- Add sugar and vanilla, mixing just until combined. Overbeating incorporates too much air.
- Add eggs one at a time, mixing after each until barely incorporated. The batter should look satiny.
- Pour over your prepared crust, smoothing the top gently. Resist the urge to tap the pan!
Creating the Apple Crisp Topping
Now for the pièce de résistance – that glorious crunchy topping we all love:
- Toss diced apples with brown sugar and cinnamon until evenly coated.
- In a separate bowl, combine oats and flour. Cut in cold butter until pea-sized crumbs form.
- Scatter apples evenly over cheesecake batter, then sprinkle oat mixture on top.
- Bake for 50-60 minutes until edges are set but center still jiggles slightly.
- Cool completely in the pan (this takes patience but prevents cracks!), then chill overnight for ideal texture.
Watching that golden topping darken as the apples bubble underneath? Pure baking bliss.
Tips for Perfect Apple Crisp Cheesecake
After making this recipe more times than I can count (and learning from all my mistakes), here are my hard-won secrets for apple crisp cheesecake perfection:
- The chill factor: I know it’s tempting to dig in right away, but resist! That overnight chill in the fridge lets the flavors marry and gives you that signature dense, creamy texture.
- Doneness test: Your cheesecake is ready when the edges look set but the center still has a slight jiggle – like Jell-O. It’ll firm up as it cools. Overbaking leads to cracks!
- Crack prevention: Avoid sudden temperature changes. Let the baked cheesecake cool gradually in the turned-off oven with the door slightly ajar for about an hour.
- Apple prep: Pat diced apples dry with paper towels before mixing with sugar – this prevents excess moisture from making the crust soggy.
- Room temp ingredients: I can’t stress this enough – cold cream cheese and eggs create lumps. Take them out at least 2 hours before baking.
Follow these tips, and you’ll get rave reviews every time – promise!
Serving and Storage
Alright, here’s where the real fun begins! After patiently waiting (and resisting the urge to peek in the fridge every five minutes), your apple crisp cheesecake is ready to shine. Let me walk you through my favorite way to serve and store this beauty.
Presentation perfection: Run a thin knife around the edge of your springform pan before releasing the sides. For a restaurant-worthy touch, I like to transfer the whole cheesecake to a pretty cake stand using two large spatulas. The contrast of that golden oat topping against the creamy filling? Absolute showstopper!
Serving suggestions: While delicious on its own, I sometimes add:
- A dusting of powdered sugar for simple elegance
- A scoop of vanilla ice cream that melts into the warm apples
- A drizzle of caramel sauce for extra indulgence (my husband’s favorite)
- A dollop of whipped cream with a sprinkle of cinnamon
Storage secrets: If by some miracle you have leftovers (we rarely do!), here’s how to keep them fresh:
- Cover tightly with plastic wrap or transfer to an airtight container
- Store in the fridge for up to 3 days – the flavors actually improve!
- For longer storage, freeze individual slices wrapped in plastic then foil for up to 2 months
One last pro tip: Let refrigerated slices sit at room temperature for about 15 minutes before serving. That slight softening makes all the difference in texture – trust me on this one!
Apple Crisp Cheesecake Nutrition
Okay, let’s be real – we don’t eat cheesecake for the health benefits. But since you’re curious (and maybe want to plan your indulgences), here’s the nutritional breakdown per slice. Just remember these are estimates – your actual numbers might vary depending on specific ingredients and brands you use.
Per Serving (1 slice):
- Calories: 420 – worth every single one if you ask me!
- Fat: 28g (16g saturated) – that rich, creamy texture has to come from somewhere
- Carbs: 38g (2g fiber, 32g sugar) – mostly from those delicious apples and the crust
- Protein: 6g – surprise protein boost from the eggs and cream cheese
- Sodium: 320mg – not bad for such a decadent dessert
A little disclaimer from my kitchen to yours: These numbers are calculated using standard ingredients, but your favorite brands might differ slightly. That organic butter you splurged on? Different. Those fancy cinnamon sticks you ground yourself? Different. And let’s not even talk about portion sizes – I won’t judge if your “slice” is… generous.
The important thing? This apple crisp cheesecake is meant to be enjoyed in moderation as part of a balanced diet. Or sometimes… not in moderation at all. No shame in going back for seconds when it’s this good!
Frequently Asked Questions
Over the years, I’ve gotten so many questions about this apple crisp cheesecake – and I totally get it! There are always little things that pop up when you’re trying a new recipe. Here are the answers to the ones I hear most often:
Can I use frozen apples? You can, but here’s the deal – thaw them completely and pat them very dry first. Frozen apples release way more liquid than fresh, which can make your crust soggy. Personally? I think fresh apples give better texture, but in a pinch, frozen will work.
How do I prevent a soggy crust? Two words: moisture control! First, bake your crust alone for 8 minutes before adding filling (this seals it). Second, pat those diced apples dry before mixing with sugar. And whatever you do, don’t skip the chilling step – that firm-up time is crucial!
Can I make it ahead? Absolutely! In fact, I often do. Cheesecakes actually taste better after 24-48 hours in the fridge as the flavors develop. Just hold off adding any whipped cream or ice cream until serving. The baked cheesecake keeps beautifully for up to 3 days refrigerated or 2 months frozen.
What are the best apples to use? My golden rule? Firm and tart. Granny Smith is my go-to – they hold their shape and balance the sweetness perfectly. If you prefer sweeter, Honeycrisp or Braeburn work great too. Avoid super soft varieties like Red Delicious unless you want apple mush in your cheesecake!
Final Thoughts
Well, there you have it – my labor of love, my signature dessert, my apple crisp cheesecake! I still remember how nervous I was serving it that first Thanksgiving, and now it’s become one of those recipes that friends and family actually request. There’s just something magical about that first bite – the crisp topping giving way to creamy cheesecake and spiced apples. Pure happiness on a plate!
I hope you’ll give this recipe a try in your own kitchen. Don’t be intimidated if it’s your first cheesecake – just follow the steps, trust the process, and remember that even my early attempts weren’t perfect (we don’t talk about The Great Crumbly Topping Incident of 2019). The beauty is in those little imperfections anyway!
When you do make it, I’d love to hear how it turns out. Tag me on social or leave a comment – nothing makes me happier than seeing your versions of this recipe. Did you add a special twist? Accidentally use pears instead of apples? Forget the sugar (been there!)? Every baking adventure is worth sharing.
You can find more delicious inspiration on Pinterest!
Most importantly? Have fun with it! Baking should be joyful, not stressful. So put on your favorite apron, turn up some good music, and let the heavenly scent of cinnamon and baked apples fill your kitchen. Here’s to many sweet moments and even sweeter desserts ahead!
Print
Irresistible 3-Layer Apple Crisp Cheesecake That Will Amaze
- Total Time: 1 hour 15 minutes
- Yield: 12 servings 1x
- Diet: Vegetarian
Description
A delicious dessert combining the flavors of apple crisp and cheesecake.
Ingredients
- 2 cups graham cracker crumbs
- 1/2 cup melted butter
- 24 oz cream cheese (softened)
- 3/4 cup granulated sugar
- 1 tsp vanilla extract
- 3 large eggs
- 2 medium apples (peeled and diced)
- 1/2 cup brown sugar
- 1 tsp cinnamon
- 1/2 cup rolled oats
- 1/4 cup flour
- 1/4 cup cold butter (cubed)
Instructions
- Preheat oven to 325°F (165°C).
- Mix graham cracker crumbs and melted butter, press into springform pan.
- Beat cream cheese, sugar, and vanilla until smooth.
- Add eggs one at a time, mixing after each.
- Pour filling over crust.
- Combine apples, brown sugar, and cinnamon in bowl.
- Mix oats, flour, and cold butter until crumbly.
- Sprinkle apple mixture over cheesecake, then oat topping.
- Bake for 50-60 minutes until set.
- Cool completely before serving.
Notes
- Chill cheesecake for best texture
- Use tart apples for balanced flavor
- Check doneness with toothpick test
- Prep Time: 20 minutes
- Cook Time: 55 minutes
- Category: Dessert
- Method: Baking
- Cuisine: American
Nutrition
- Serving Size: 1 slice
- Calories: 420
- Sugar: 32g
- Sodium: 320mg
- Fat: 28g
- Saturated Fat: 16g
- Unsaturated Fat: 9g
- Trans Fat: 0.5g
- Carbohydrates: 38g
- Fiber: 2g
- Protein: 6g
- Cholesterol: 120mg