Skip to content
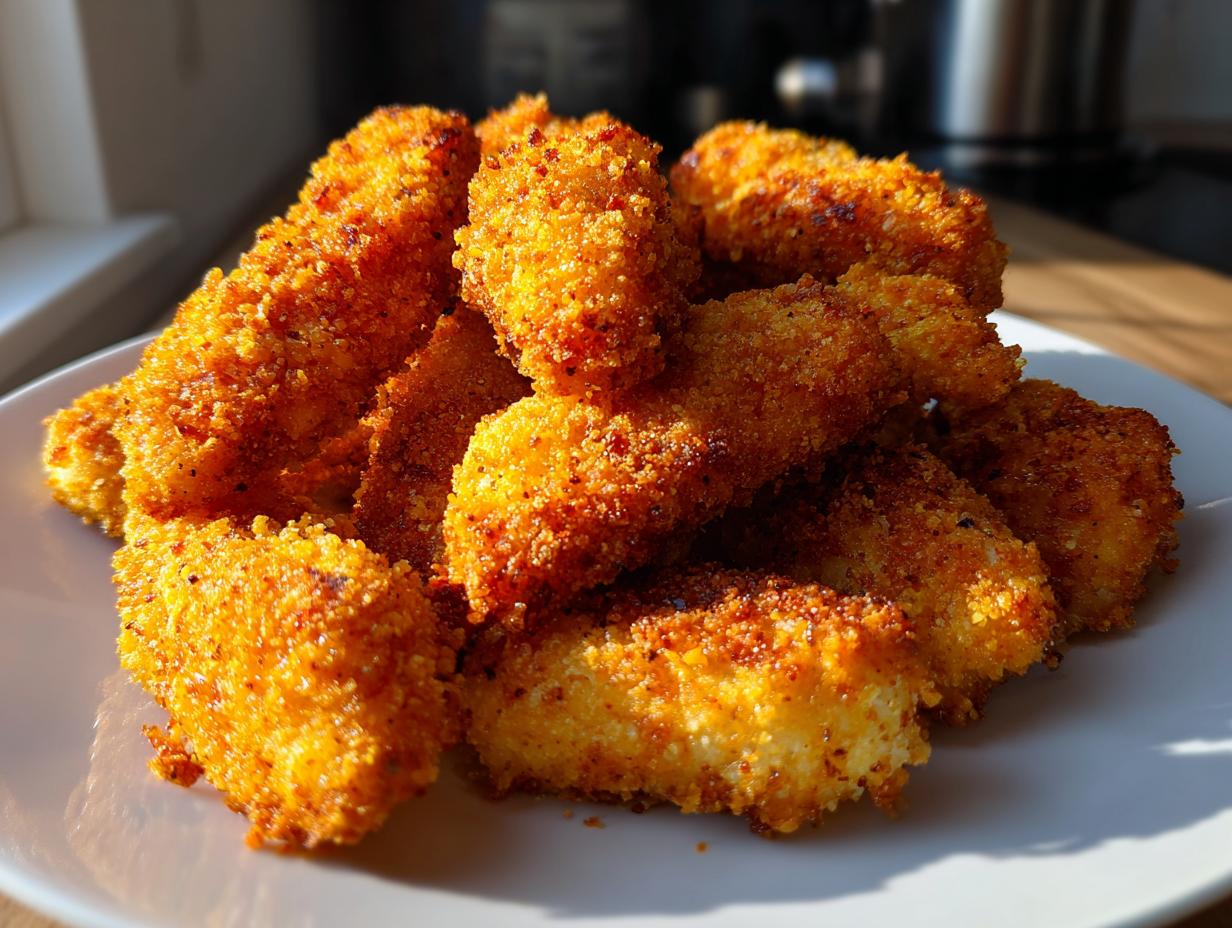
Let me tell you about my latest kitchen obsession – these unbelievably crispy Cauliflower “Chicken” Tenders (oven-baked) that even my meat-loving husband can’t resist! I stumbled upon this magic when trying to sneak more veggies into our meals, and wow, did we hit the jackpot. The secret? That perfect golden crunch giving way to tender cauliflower inside – it’s seriously addictive. What I love most (besides how ridiculously easy they are) is how the Parmesan and spices create this savory flavor that makes you forget you’re eating vegetables. Trust me, these will disappear faster than you can say “seconds please!”

Why You’ll Love These Cauliflower “Chicken” Tenders
Oh, where do I even start? These little golden bites of joy check all the boxes:
- Crispy magic: That perfect crunch gives way to tender cauliflower inside – you won’t believe it’s not chicken!
- Veggie win: Sneaks in nutrients while tasting indulgent (my kids don’t even realize they’re eating cauliflower).
- Quick fix: Ready in under 30 minutes – faster than takeout on busy nights.
- Crowd-pleaser: Even my skeptical uncle asked for thirds at last week’s gathering.
- Versatile: Equally amazing as appetizers, snacks, or the star of your veggie burger.
Ingredients for Cauliflower “Chicken” Tenders
Here’s what you’ll need to make these crispy wonders. I always double-check my pantry before starting – it’s the worst when you’re halfway through and realize you’re out of paprika!
- 1 medium head cauliflower, cut into florets (about 4 cups) – Go for florets about the size of chicken tenders for that perfect bite.
- 1 cup breadcrumbs – Panko works great for extra crunch, but regular breadcrumbs are just fine.
- 1/2 cup packed grated Parmesan cheese – Freshly grated is best, but the pre-grated stuff works in a pinch.
- 1 teaspoon garlic powder – Trust me, this is the magic flavor booster.
- 1 teaspoon paprika – Smoked paprika adds a nice depth if you have it.
1/2 teaspoon salt – Don’t skimp here; it brings out all the flavors.
1/4 teaspoon black pepper – Freshly ground if you’ve got it.
2 eggs, beaten – The glue that holds everything together.
1/4 cup milk – Any kind works, but I usually use whole milk for richness.
1 tablespoon olive oil – A light drizzle helps them crisp up beautifully.
Ingredient Notes & Substitutions
Don’t stress if you’re missing something – here’s how to make it work:
Breadcrumbs: If you’re gluten-free, swap in gluten-free breadcrumbs or crushed cornflakes for the same crunch.
Parmesan: For a dairy-free version, try nutritional yeast. It gives that same cheesy flavor without the dairy.
Milk: Almond milk or oat milk works perfectly if you’re avoiding dairy.
Cauliflower: Pat the florets dry with a paper towel before dipping. Wet cauliflower = soggy tenders, and nobody wants that!
Pro tip: If you’re feeling fancy, add a pinch of cayenne to the breadcrumb mix for a little kick. It’s my secret weapon when I want to spice things up!
How to Make Cauliflower “Chicken” Tenders (oven-baked)
Alright, let’s get these beauties in the oven! I promise it’s easier than you think – just follow these steps, and you’ll have crispy, golden tenders that’ll make you do a happy dance.
- Preheat and prep: Crank that oven to 400°F (200°C) and line your baking sheet with parchment paper. No parchment? A light spray of oil works too. This is your crispy insurance policy!
- Mix your coating: In a shallow bowl, mix together breadcrumbs, Parmesan, garlic powder, paprika, salt, and pepper. I like to give it a quick taste – it should make you go “Mmm!” If not, add a pinch more salt.
- Dip station: In another bowl, whisk eggs and milk until smooth. This is your magic glue that’ll make everything stick.
- Coating time: Now the fun part! Grab a cauliflower floret, dunk it in the egg wash (let excess drip off), then roll it in the breadcrumb mix. Really press those crumbs on there – we want full coverage! I sometimes do a double dip for extra crunch.
- Line ’em up: Place your coated florets on the baking sheet with some breathing room. They shouldn’t be touching – think of them like little sunbathers needing their own space.
- Oil ’em up: Drizzle lightly with olive oil. Not too much – just enough to help them crisp up. A mister bottle works great here if you have one.
- Bake and flip: Pop them in the oven for 10 minutes, then carefully flip each one. This is the secret to even crispiness! Bake another 10-15 minutes until they’re gorgeously golden brown.
- Serve immediately: Get those tenders to the table while they’re hot and crispy. Warning: They disappear fast!
Tips for Crispy Cauliflower Tenders
After making these about a million times (okay, maybe just dozens), here are my hard-earned tips for perfect tenders every time:
Avoid the crowd: Overcrowding is the enemy of crispiness. If your florets are too close, they’ll steam instead of crisp. Use two pans if needed – it’s worth it!
Flip with care: When it’s time to flip, be gentle but quick. A thin spatula works best. If some crumbs stick to the pan, don’t panic – they’ll still taste amazing.
Last-minute broil: If you want that extra crunch, broil for 1-2 minutes at the end. Watch closely though – they can go from golden to overdone in seconds!
Dry is key: Make sure your cauliflower florets are patted dry before coating. Any extra moisture will make your coating slide right off.
Hot sheet trick: For extra crisp bottoms, preheat your baking sheet in the oven for 5 minutes before adding the tenders. Just be careful when placing them on the hot pan!
Serving Suggestions for Cauliflower “Chicken” Tenders
Now for the best part – how to devour these crispy delights! I’ve served these every which way, and here are my absolute favorite pairings that’ll make your taste buds sing:
Dipping sauce heaven:
- Classic ranch (my go-to for that cool, creamy contrast)
- Spicy BBQ sauce (the sweet heat plays so nicely with the Parmesan)
- Honey mustard (my husband’s favorite – just mix equal parts honey and Dijon)
- Buffalo sauce (toss the tenders right in for a fiery twist)
- Garlic aioli (so easy – mayo + minced garlic + lemon juice)
Pro tip: Set up a little dipping station with multiple sauces when guests come over – it’s always a hit!
Meal-worthy sides: When I want to turn these into dinner, here’s what I love to pair them with:
- A big, crunchy kale Caesar salad (the tenders make perfect croutons!)
- Roasted sweet potato wedges (that sweet-savory combo is magic)
- Garlic mashed potatoes (comfort food at its finest)
- Grilled corn on the cob (summer perfection)
- Simple quinoa pilaf (for a lighter option)
Last week I even stuffed them into pitas with tzatziki and veggies – instant veggie gyros!
Game day genius: For parties, I arrange them on a platter with celery sticks, carrot curls, and little bowls of blue cheese dressing. They disappear faster than chicken wings ever did at our gatherings. My football-loving brother didn’t even notice they were vegetarian until I told him!
Storing and Reheating
Now, I’ll be honest – these tenders are best fresh out of the oven when they’re at their crispiest. But life happens, and sometimes you’ve got leftovers (though in my house, that’s rare!). Here’s how to keep them tasting great for round two:
Storing like a pro: Let them cool completely first – no one wants a soggy container from trapped steam. I use an airtight container with a paper towel at the bottom to absorb any extra moisture. They’ll keep for about 3 days in the fridge, though the coating softens a bit over time.
Reheating magic:
- Oven method: My absolute favorite! Spread them on a baking sheet at 375°F for 5-8 minutes. They come back to life with that beautiful crunch.
- Air fryer hack: Even quicker! 3-4 minutes at 375°F does the trick – shake the basket halfway through. It’s like having them fresh again.
Microwave warning: I know it’s tempting, but resist! Microwaving turns them rubbery and sad. Trust me, I learned this the hard way during a late-night snack attack.
Freezer tip: While you can freeze them, the texture changes. The cauliflower gets a bit watery when thawed. If you must, freeze on a sheet pan first, then transfer to bags. Reheat from frozen in the oven – add 5 extra minutes.
Pro tip: Leftovers make amazing wraps! Just tuck cold tenders into a tortilla with greens and sauce – the crunch holds up surprisingly well.
Nutrition Information for Cauliflower “Chicken” Tenders
Okay, let’s talk numbers! I know some folks (like my carb-counting sister) always ask about nutrition. Here’s the scoop on these crispy veggie bites. Remember, these are estimates – your actual values might dance around a bit depending on your exact ingredients and how much coating sticks to each tender (I confess, I sometimes sneak extra breadcrumbs!).
- Serving Size: About 1/4 of the recipe (4-5 tenders)
- Calories: 180 – Not bad for something that tastes this indulgent!
- Total Fat: 7g (Saturated: 2g) – That olive oil and Parmesan doing their thing
- Cholesterol: 55mg – All from those golden egg washes
- Sodium: 420mg – The Parmesan and salt teaming up for flavor
- Total Carbs: 20g – Mostly from the cauliflower and breadcrumbs
- Fiber: 4g – Thanks, cauliflower! Keeping things moving
- Sugar: 3g – Just the natural sweetness of the veg
- Protein: 9g – Between the eggs, cheese, and cauliflower, you’re covered
Now, here’s my two cents: these numbers look great compared to traditional chicken tenders, but honestly? I stopped stressing about counts when my kids started voluntarily eating cauliflower. That’s what I call a nutritional win in my book! The best part? You’re getting all those wonderful vitamins from the cauliflower that regular tenders just can’t match.
Frequently Asked Questions
I get so many questions about these cauliflower tenders – seems like everyone wants to make them perfect! Here are the answers to what folks ask me most:
Can I air-fry these instead of baking?
Absolutely! My air fryer gets almost as much use as my oven these days. Just spray the basket lightly with oil, arrange the coated florets in a single layer (don’t crowd them!), and cook at 375°F for about 15 minutes. Give them a shake halfway through. They come out extra crispy – you might never go back to oven-baking!
Is freezing these tenders a good idea?
Honestly? Not my favorite move. I tried freezing a batch once, and while they were still edible after reheating, the texture wasn’t the same. The cauliflower gets a bit watery when thawed, and the coating loses some of its magic crispiness. If you must freeze them, do it before baking – flash freeze on a tray, then bag. Bake straight from frozen, adding 5 extra minutes.
Help! My coating fell off – what went wrong?
Oh no! Been there. Usually it’s one of two things:
- Your cauliflower was too wet – always pat those florets dry with paper towels first
- You didn’t let the excess egg wash drip off before coating in crumbs – that extra liquid makes everything slide right off
Pro tip: Letting them sit for 5 minutes after coating helps everything adhere better before baking.
Can I make these gluten-free?
You bet! Just swap regular breadcrumbs for gluten-free ones – I like the texture of gluten-free panko best. Crushed cornflakes or even almond flour mixed with Parmesan work great too. All my gluten-free friends go crazy for this version!
What’s the best way to cut the cauliflower?
I aim for florets about the size of chicken tenders – not too big, not too small. Cut the big florets in half lengthwise so they have a flat side to lay on the baking sheet. This helps them crisp up evenly and makes flipping easier. The small bits? Save those for soup or roast them separately as crispy cauliflower crumbles!
Why aren’t my tenders getting crispy?
The oven rack position makes a big difference! Bake them in the upper third of your oven where it’s hottest. Also – and this is crucial – don’t skip flipping them halfway. That double crisp is everything. If they’re still not crunchy enough for you, a quick 1-2 minute broil at the end will do the trick (but watch closely!).
For more delicious recipes and inspiration, check out our Pinterest page: Hiddenrecipes on Pinterest.
Print
Crispy Cauliflower “Chicken” Tenders in 30 Minutes – Irresistible!
- Total Time: 40 minutes
- Yield: 4 servings 1x
- Diet: Vegetarian
Description
Crispy and flavorful cauliflower tenders that mimic the taste and texture of chicken. Perfect for a healthy snack or meal.
Ingredients
- 1 medium head cauliflower, cut into florets
- 1 cup breadcrumbs
- 1/2 cup grated Parmesan cheese
- 1 teaspoon garlic powder
- 1 teaspoon paprika
- 1/2 teaspoon salt
- 1/4 teaspoon black pepper
- 2 eggs, beaten
- 1/4 cup milk
- 1 tablespoon olive oil
Instructions
- Preheat oven to 400°F (200°C). Line a baking sheet with parchment paper.
- In a bowl, mix breadcrumbs, Parmesan cheese, garlic powder, paprika, salt, and pepper.
- In another bowl, whisk eggs and milk together.
- Dip each cauliflower floret into the egg mixture, then coat with the breadcrumb mixture.
- Place coated florets on the baking sheet. Drizzle with olive oil.
- Bake for 20-25 minutes, flipping halfway, until golden and crispy.
- Serve hot with your favorite dipping sauce.
Notes
- For extra crispiness, broil for 1-2 minutes at the end.
- Use gluten-free breadcrumbs if needed.
- Store leftovers in an airtight container for up to 3 days.
- Prep Time: 15 minutes
- Cook Time: 25 minutes
- Category: Appetizer
- Method: Oven-baked
- Cuisine: American
Nutrition
- Serving Size: 1 serving
- Calories: 180
- Sugar: 3g
- Sodium: 420mg
- Fat: 7g
- Saturated Fat: 2g
- Unsaturated Fat: 4g
- Trans Fat: 0g
- Carbohydrates: 20g
- Fiber: 4g
- Protein: 9g
- Cholesterol: 55mg