Skip to content
Oh, the magic of chocolate crinkle cookies! Every December, my kitchen transforms into a powdered sugar wonderland thanks to this HIDDEN RECIPE passed down from my great-aunt Martha. I can still picture her flour-dusted apron and the way she’d wink while handing me a warm cookie fresh from the oven – “Don’t tell your cousins I gave you the first one,” she’d whisper.
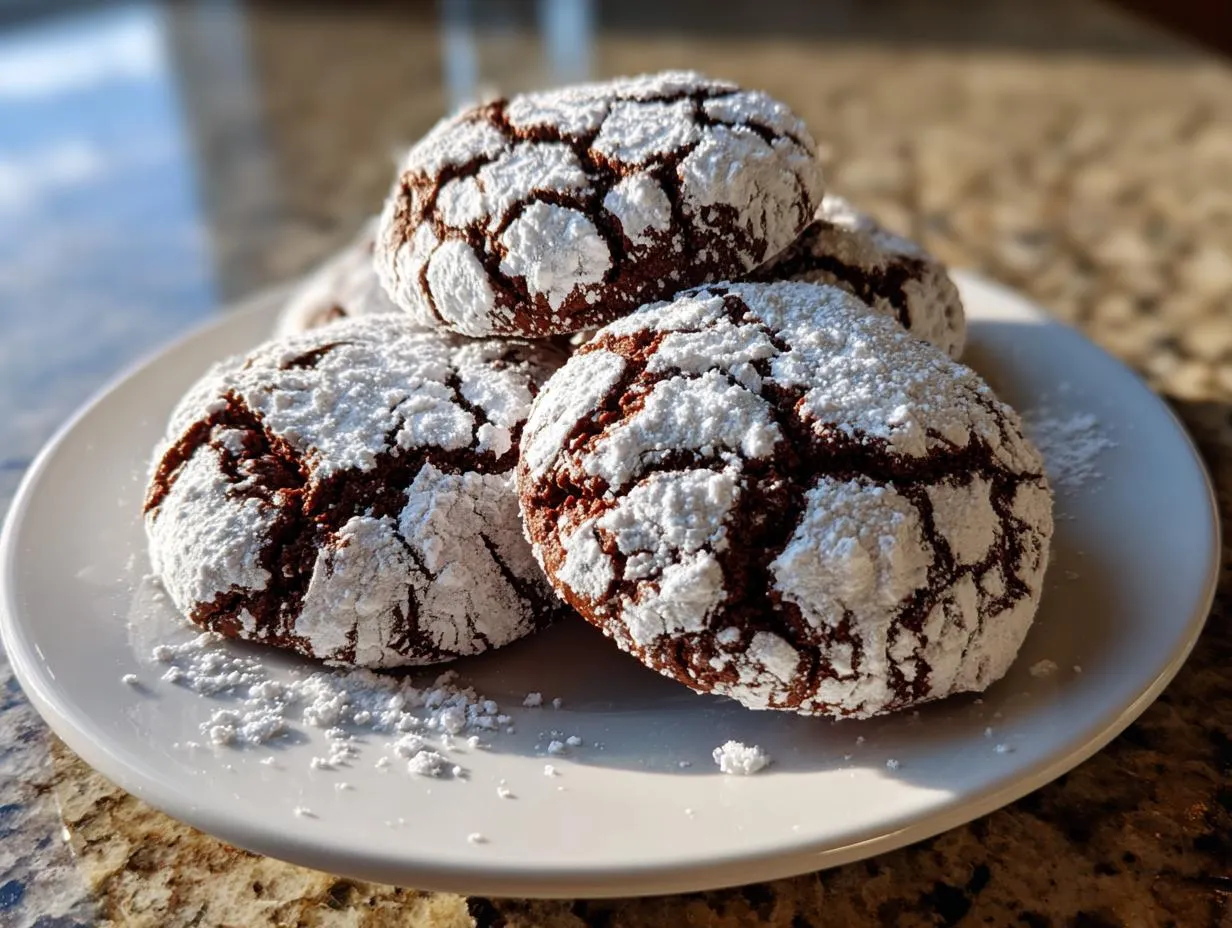
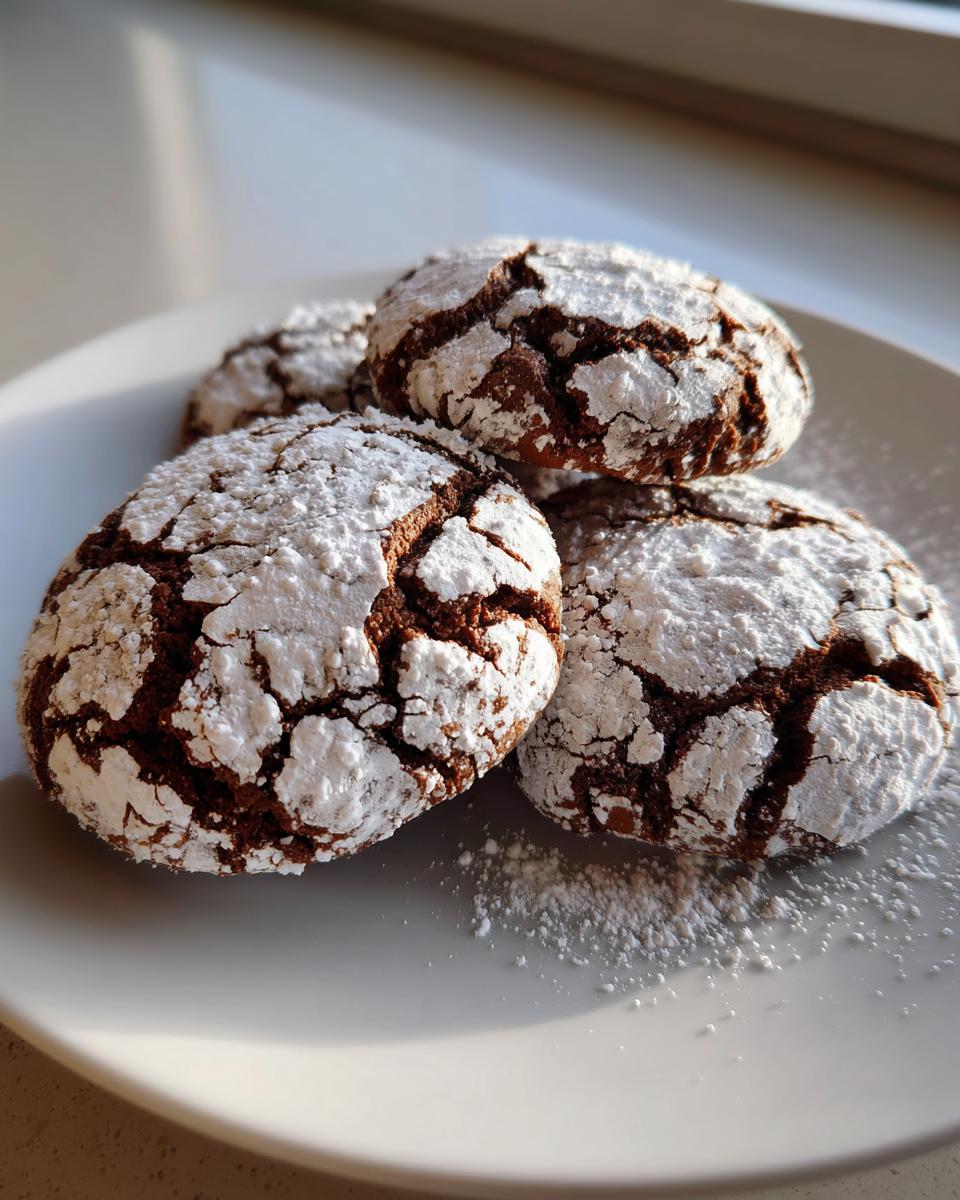
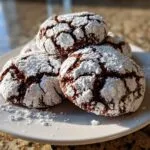
These aren’t just any cookies. They’re little snow-dusted miracles with crackly tops hiding fudgy centers that practically melt in your mouth. What makes them special? That perfect balance between rich chocolate flavor and delicate sweetness, all wrapped up in a festive powdered sugar coat. Whether you’re baking for holiday parties (they disappear FAST at cookie swaps) or just craving something cozy with your afternoon coffee, this recipe never fails to delight.
Funny enough, Aunt Martha called them her “accidental masterpiece” – she’d been trying to recreate a bakery cookie from her childhood when she stumbled upon this version. Now it’s our family’s most requested treat. Let me show you how to make chocolate crinkle cookies that’ll have everyone begging for your secret recipe too!
Why You’ll Love These Chocolate Crinkle Cookies – HIDDEN RECIPE
One bite of these cookies, and you’ll understand why my family guards this recipe like treasure. They’re the perfect combination of nostalgia and chocolatey goodness that turns any day into a celebration. Here’s what makes them so special:
- Fudgy centers that melt in your mouth – The secret? Just enough cocoa powder and oil to create that rich, brownie-like texture without being overly sweet. These aren’t your average dry, crumbly cookies!
- Festive snow-crackle tops – Rolling them in powdered sugar before baking creates that gorgeous cracked look that makes everyone say “wow” when you bring out the cookie tray.
- Simple ingredients, big flavor – No fancy equipment or hard-to-find items here. Just pantry staples that transform into something magical.
- Perfect for gifting – They travel well and look so pretty in holiday tins. I’ve made these for teachers’ gifts every year since my kids were in kindergarten!
- Foolproof baking – Even if you’re not a confident baker, this recipe walks you through each step. The dough tells you when it’s ready!
Trust me, once you make these, you’ll understand why my aunt called them “little pieces of happiness.”
Ingredients for Chocolate Crinkle Cookies – HIDDEN RECIPE
Here’s everything you’ll need to make these little chocolate wonders. I’ve learned through trial and error (and a few cookie disasters!) that quality ingredients make all the difference:
- 1 cup all-purpose flour (spooned and leveled) – No packing the flour! I use the spoon-and-sweep method for perfect measurement every time.
- ½ cup unsweetened cocoa powder (not Dutch-processed) – The natural cocoa gives that deep chocolate flavor we love. Dutch-processed cocoa behaves differently in baking.
- 1 teaspoon baking powder – Our little lift agent! Make sure yours is fresh – I test mine by sprinkling some in hot water to see if it bubbles.
- ¼ teaspoon salt – Just enough to balance the sweetness. I use fine sea salt for even distribution.
- ¾ cup granulated sugar – Regular white sugar works best here. The crystals help create those beautiful cracks.
- ¼ cup vegetable oil – This keeps our cookies moist. I use canola, but any neutral oil works.
- 2 large eggs (room temperature) – Cold eggs don’t mix as well! I leave mine out for 30 minutes before baking.
- 1 teaspoon vanilla extract – Pure vanilla adds warmth. My aunt always used Mexican vanilla – such a lovely floral note!
- ½ cup powdered sugar (for rolling) – The snowy coating! I sift mine to prevent lumps.
Ingredient Notes & Substitutions
Chilled dough is non-negotiable! I know it’s tempting to skip this step, but trust me – that hour in the fridge prevents flat, sad cookies. The cold dough holds its shape better when baking.
Cocoa powder matters: Natural cocoa powder (like Hershey’s) reacts with the baking powder to help our cookies rise. Dutch-processed cocoa won’t give the same result.
Oil alternatives: While vegetable oil works best, you can substitute melted coconut oil (measure after melting) in a pinch. Butter changes the texture too much – these cookies need oil’s moisture.
Sugar swaps: For a deeper flavor, try replacing half the white sugar with light brown sugar. The molasses notes pair beautifully with chocolate!
Equipment You’ll Need
Don’t worry – you don’t need fancy gadgets to make these chocolate crinkle cookies shine! Here’s my go-to list of kitchen tools that make the process smooth (and minimize cleanup!):
- 2 mixing bowls (one large, one medium) – I like glass or stainless steel because they don’t hold onto odors. The large one for dry ingredients, medium for wet.
- Whisk – For properly blending those dry ingredients. A fork works in a pinch, but a whisk gets rid of cocoa lumps faster.
- Rubber spatula – My trusty sidekick for scraping every last bit of dough from the bowl. The curved edge helps fold ingredients gently.
- Cookie scoop (1-inch size) – Worth its weight in gold! Ensures uniform cookies that bake evenly. No scoop? Two spoons work too.
- Parchment paper – Prevents sticking without greasy residue. I buy the pre-cut sheets – so much easier than wrestling with rolls!
- Rimmed baking sheet – The rim keeps any runaway powdered sugar contained. Dark sheets may brown cookies faster.
- Wire rack – Lets cookies cool evenly so bottoms don’t get soggy. I place mine near the oven for easy transfer.
- Small bowl for powdered sugar – Wide enough to roll cookie balls comfortably. I use my cereal bowl – multipurpose!
That’s it! See? No special equipment needed – just basic kitchen tools you probably already have. Now let’s get baking!
How to Make Chocolate Crinkle Cookies – HIDDEN RECIPE
Alright, let’s dive into the magic! Making these cookies is like conducting a little chocolate symphony – each step builds on the last to create something truly special. Follow along carefully, especially when we get to the powdered sugar part (that’s where the real cookie wizardry happens!).
Step 1: Preparing the Dough
First things first – preheat that oven to 350°F (175°C). Trust me, you’ll want it nice and toasty by the time our cookie balls are ready to bake.
Now grab your two bowls – we’re keeping dry and wet ingredients separate at first (this matters!). In your large bowl, whisk together:
- The flour (remember – spooned and leveled!)
- Cocoa powder
- Baking powder
- Salt
Whisk until you don’t see any cocoa lumps – about 30 seconds should do it. Set this aside.
In your medium bowl, mix:
- Sugar
- Oil
- Eggs
- Vanilla
Stir until everything’s completely combined and looks slightly glossy – about 1 minute with a whisk or 2 minutes by hand. Now pour the wet ingredients into the dry ingredients.
Important! Mix just until no dry streaks remain – overmixing makes tough cookies. I count to 30 stirs max with my spatula. The dough will be thick and sticky, almost like brownie batter. Perfect!
Step 2: Chilling & Shaping
Here comes the hard part – patience! Cover your bowl with plastic wrap (press it right onto the dough’s surface to prevent drying) and chill for 1 hour minimum. I know, I know – waiting is torture when you want cookies NOW. But this step is what gives us those perfect domed cookies instead of flat pancakes.
When the hour’s up (I set a timer!), line your baking sheet with parchment paper and pour powdered sugar into a small bowl. Time for the fun part!
Using your cookie scoop (or a tablespoon), portion out dough balls about 1-inch in size. Roll them quickly between your palms – the dough will be firm but still tacky. Now roll each ball heavily in powdered sugar until completely coated (like little snowballs!). Place them 2 inches apart on your baking sheet – they’ll spread a bit.
Pro tip: Wash your hands every few cookies to prevent sticky buildup. Less frustration, more perfect cookies!
Step 3: Baking & Cooling
Pop your tray in the oven’s center rack and bake for 10-12 minutes. At 10 minutes, peek – you want set edges but soft centers that barely hold their shape when nudged. The powdered sugar will crack beautifully!
When done, leave cookies on the baking sheet for 5 minutes – they’re too delicate to move right away. Then transfer to a wire rack to cool completely. Resist eating one immediately (okay, maybe just one…) – they firm up perfectly as they cool.
Watch those faces light up when people bite into these! The contrast between the crisp sugar shell and fudgy center gets me every time. Now you see why Aunt Martha called them her hidden treasure!
Tips for Perfect Chocolate Crinkle Cookies – HIDDEN RECIPE
After making these cookies every Christmas for twenty years (and eating plenty of test batches!), I’ve learned a few secrets to absolute perfection. Here’s how to make sure yours turn out just like Aunt Martha’s:
- Chill that dough like it’s your job – I know it’s tempting to rush, but that full hour in the fridge makes ALL the difference. The cold dough holds its shape and creates those gorgeous cracks we love.
- Work fast when rolling – The dough gets sticky fast at room temperature. Roll a few balls, then pop the bowl back in the fridge for 5 minutes if needed.
- Powdered sugar double-dip – For extra snowy cookies, roll them once, let them sit 2 minutes, then roll again right before baking.
- Underbake slightly – Take them out when centers still look moist. They’ll finish setting as they cool for that perfect fudgy texture.
- Fresh powdered sugar matters – Old, lumpy sugar won’t coat evenly. I always sift mine right before using.
Follow these simple tricks, and you’ll have cookies so good, people will think you bought them from a fancy bakery!
Storing & Freezing Instructions
One of the best things about these chocolate crinkle cookies? They keep beautifully! Here’s how I store them to maintain that perfect texture (and how to stash some away for emergency cookie cravings – not that I’d know anything about those…).
Room temperature storage: Once completely cooled, stack the cookies in an airtight container with parchment between layers. They’ll stay fresh and fudgy for up to 3 days this way. My secret? Tossing in a slice of bread – it absorbs excess moisture and keeps the cookies soft!
Freezing baked cookies: These freeze like a dream! Place cooled cookies in a single layer on a baking sheet to freeze solid (about 1 hour), then transfer to a freezer bag with all the air squeezed out. They’ll keep for 2 months – just thaw at room temperature for 30 minutes before serving.
Freezing dough balls: This is my favorite trick! After rolling the dough balls in powdered sugar, freeze them on a tray until solid (about 2 hours), then transfer to a freezer bag. When cookie cravings strike, bake straight from frozen – just add 1-2 minutes to the baking time. I always keep a batch in my freezer for last-minute guests!
Pro tip: Label your freezer bags with the date and baking instructions. Future-you will thank past-you when you’re craving cookies at midnight!
Nutritional Information
Okay, let’s talk numbers – but remember, these are just estimates based on standard ingredients. Your cookies might vary slightly depending on brands and how generously you coat them in that snowy powdered sugar!
Per cookie (based on 24 cookies per batch):
- Calories: About 120 – perfect for when you just need a little chocolate hug
- Sugar: 12g (but hey, it’s mostly from that powdered sugar coating!)
- Fat: 5g – thanks to that magic combo of oil and eggs
- Carbs: 18g – worth every bite if you ask me
A little disclaimer from my kitchen to yours: These numbers are rough estimates. The actual values can change based on how big you make your cookies (no judgment if you sneak in some extra-large ones!) and the specific brands you use. I calculate mine using the USDA database, but your mileage may vary.
The way I see it? Life’s too short to stress over cookie math. Just enjoy that fudgy goodness and save the calculations for tax season!
FAQs About Chocolate Crinkle Cookies – HIDDEN RECIPE
I’ve gotten so many questions about these cookies over the years – here are the ones that pop up most often, along with the solutions I’ve discovered through (sometimes delicious) trial and error!
Can I use melted butter instead of oil?
Oh honey, I wish! Butter changes the texture completely – we need oil’s moisture for that perfect fudgy crumb. My great-aunt tried butter once in the 80s and said the cookies came out flat and cakey. Vegetable or canola oil works best, though coconut oil (measured after melting) is an okay substitute.
Why did my cookies spread too much?
Three likely culprits: 1) Dough wasn’t chilled enough (that hour is crucial!), 2) Your baking powder might be old (do the hot water test!), or 3) The oven wasn’t fully preheated. Next time, try chilling the dough longer and checking your oven temp with a thermometer – mine runs cool, so I bake at 375°F.
Can I make these gluten-free?
Absolutely! Swap the all-purpose flour for a 1:1 gluten-free blend (I like Bob’s Red Mill). The texture will be slightly more delicate, so handle the dough gently. And guess what? No one at my book club noticed when I made them GF last Christmas!
Why isn’t my powdered sugar coating staying white?
This happens if the dough balls are too sticky when rolled. Make sure to chill thoroughly, and don’t handle them too much. For extra insurance, roll twice – once when cold, then again right before baking. If all else fails, dust with more powdered sugar after baking!
Can I add chocolate chips or nuts?
Aunt Martha would clutch her pearls at this question! But sure, mix in ½ cup mini chocolate chips or finely chopped walnuts after combining wet and dry ingredients. Just know it’ll change the classic texture – the chips melt into lovely pockets though!
Share Your Feedback
You know what makes my day? Hearing how these chocolate crinkle cookies turned out in your kitchen! Did they bring back childhood memories like they do for me? Maybe you discovered a fun twist we should all try? I read every comment and love seeing photos of your powdered sugar-covered triumphs (or even the occasional happy accident – we’ve all been there!).
This recipe has been my family’s little secret for so long, and now it’s yours too. Whether you’re making them for the first time or they’ve become your holiday tradition like mine, I’d love to hear your story. Did your kids sneak dough when you weren’t looking? Did your coworkers go crazy for them at the office party? Spill the chocolatey details!
And if you have questions, ask away! I’ve probably made every mistake possible with these cookies over the years (like that time I forgot the baking powder – oops!), so I’m happy to help troubleshoot. Your feedback helps keep Aunt Martha’s legacy alive in kitchens everywhere.
Secret Chocolate Crinkle Cookies Recipe That Never Fails
- Total Time: 1 hour 27 minutes
- Yield: 24 cookies 1x
- Diet: Vegetarian
Description
Chocolate crinkle cookies are soft, fudgy, and rolled in powdered sugar for a festive look.
Ingredients
- 1 cup all-purpose flour
- 1/2 cup unsweetened cocoa powder
- 1 tsp baking powder
- 1/4 tsp salt
- 3/4 cup granulated sugar
- 1/4 cup vegetable oil
- 2 large eggs
- 1 tsp vanilla extract
- 1/2 cup powdered sugar (for rolling)
Instructions
- Preheat the oven to 350°F (175°C). Line a baking sheet with parchment paper.
- In a bowl, whisk flour, cocoa powder, baking powder, and salt.
- In another bowl, mix sugar, oil, eggs, and vanilla until smooth.
- Combine wet and dry ingredients to form a dough.
- Chill the dough for 1 hour for easier handling.
- Roll dough into 1-inch balls, then coat in powdered sugar.
- Place on the baking sheet, 2 inches apart.
- Bake for 10-12 minutes until the edges set.
- Cool on the baking sheet for 5 minutes before transferring.
Notes
- Dough must be chilled to prevent spreading.
- Use a cookie scoop for even sizes.
- Store in an airtight container for up to 3 days.
- Prep Time: 15 minutes
- Cook Time: 12 minutes
- Category: Dessert
- Method: Baking
- Cuisine: American
Nutrition
- Serving Size: 1 cookie
- Calories: 120
- Sugar: 12g
- Sodium: 45mg
- Fat: 5g
- Saturated Fat: 1g
- Unsaturated Fat: 3g
- Trans Fat: 0g
- Carbohydrates: 18g
- Fiber: 1g
- Protein: 2g
- Cholesterol: 15mg