Skip to content
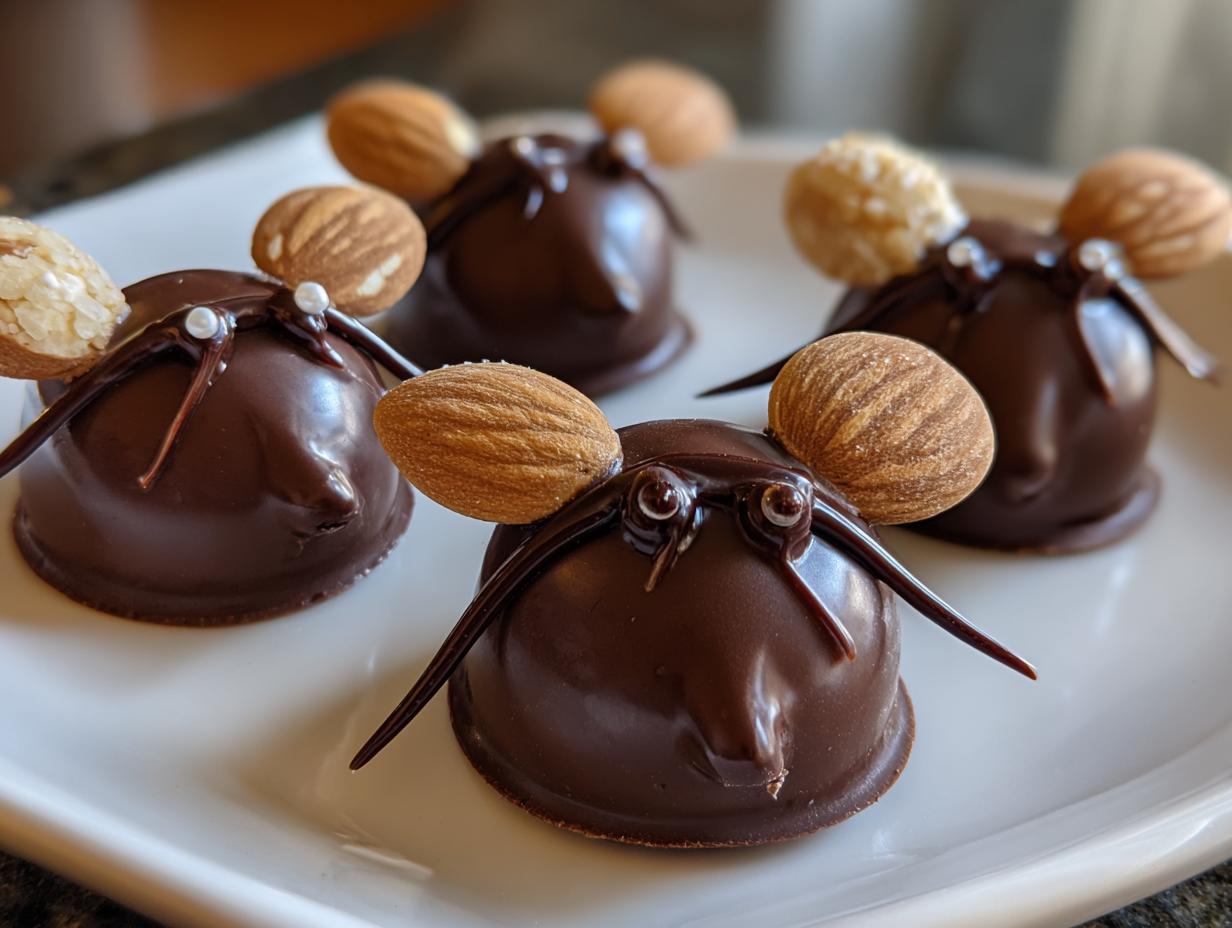
Halloween just isn’t complete without a little edible mischief, and these Chocolate Halloween Mice are my go-to spooky treat every year. I still remember the first time I made them with my niece—her eyes lit up when she saw those tiny almond ears and licorice tails. “They look like real mice!” she squealed (and then promptly gobbled three of them). That’s the magic of these little guys: they’re creepy-cute, ridiculously easy, and vanish faster than a ghost in the night at parties.
After a decade of testing no-bake desserts—from witch finger cookies to marshmallow monsters—I can confidently say these chocolate mice steal the show. They’re the perfect project for baking-phobic folks or last-minute hosts (we’ve all been there). The best part? You probably have most ingredients in your pantry already. Whether you’re crafting with kids or need a showstopper for your Halloween spread, these mice deliver big fun with minimal fuss. Just don’t blame me when your guests start hiding them in napkins to take home!
Why You’ll Love These Chocolate Halloween Mice
These little chocolate mice aren’t just adorable – they’re downright irresistible! Here’s why they’ve become my signature Halloween treat:
- So easy a ghost could make them: Just melt, pour, decorate, and chill. No fancy skills needed!
- Kid-approved fun: Little hands love pressing in the almond ears and arranging the candy eyes.
- Endless creativity: Swap white chocolate for ghosts, add rainbow sprinkles, or use different candies for eyes.
- Party perfect: They’re bite-sized, spooky-cute, and always the first to disappear from dessert trays.
- Pantry-friendly: Made with simple ingredients you likely already have on hand.
Trust me, once you make these Chocolate Halloween Mice, they’ll become your new must-have tradition! The hardest part? Not eating them all before your guests arrive.
Ingredients for Chocolate Halloween Mice
The beauty of these spooky treats? You only need 5 simple ingredients to create a whole mischief of chocolate mice! Here’s exactly what you’ll need:
- 1 cup semi-sweet chocolate chips (I prefer Ghirardelli or Guittard – they melt smoother)
- 1 tbsp coconut oil (solid or liquid both work – it just helps the chocolate set with the perfect snap)
- 24 sliced almonds (these become the adorable little mouse ears – look for uniform slices)
- 24 small candy eyes (the ones labeled “mini” or “black sugar eyes” work best)
- 12 thin licorice strings, each about 1.5 inches long (cut from Twizzlers or Red Vines – black looks extra spooky!)
Pro tip: Make sure your chocolate chips are fresh! Older chocolate can seize up when melting. And don’t skip the coconut oil – it’s the secret to getting that glossy finish and easy release from molds. If you’re doubling the recipe (which I always do because they disappear fast!), just maintain that 1 tbsp coconut oil per cup of chocolate ratio.
Equipment You’ll Need
You won’t need anything fancy – just a few basic kitchen tools to bring these Chocolate Halloween Mice to life! Here’s your simple checklist:
- Microwave-safe bowl (glass works best for even melting)
- Mouse-shaped silicone molds (or parchment paper if going freehand)
- Small spoons (for drizzling and shaping)
- Baking sheet (to hold molds or parchment)
That’s it! No stand mixers or special gadgets required. I’ve even made these in a pinch using a coffee mug and butter knife. Halloween magic doesn’t need complicated tools – just a little creativity!
How to Make Chocolate Halloween Mice
Ready to create your own army of spooky chocolate mice? Follow these simple steps – I promise it’s easier than carving a pumpkin! Just imagine the squeals of delight when you unveil these little guys at your next Halloween bash.
Melting the Chocolate
First things first: we need silky-smooth chocolate. I always use the microwave because it’s fast, but you’ve gotta watch it like a hawk! Here’s how I do it:
- Combine chocolate chips and coconut oil in a microwave-safe bowl (glass works best).
- Microwave for 30 seconds, then STOP and stir well. The chocolate won’t look melted yet – that’s normal!
- Continue microwaving in 15-second bursts, stirring between each, until you can stir it smooth (usually 2-3 intervals total).
Watch out! Burnt chocolate is heartbreaking. If it starts looking thick or grainy, you’ve gone too far. When in doubt, under-microwave – the residual heat will keep melting it as you stir.
Shaping the Mice
Now for the fun part! You’ve got two options:
- Using molds: Spoon chocolate into mouse-shaped silicone molds, filling about 3/4 full. Tap the mold gently on the counter to remove air bubbles.
- Freehand method: Drop teaspoonfuls of chocolate onto parchment paper. Immediately use the back of the spoon to shape them into teardrop forms (pointy end becomes the nose).
Pro tip: If going freehand, work fast! Chocolate starts setting quickly. I like to do batches of 4-5 mice at a time.
Adding Decorations
This is where your mice come to life! Here’s my foolproof decorating sequence:
- While chocolate is still wet, gently press two almond slices at the “head” end for ears.
- Add candy eyes just below the ears (tweezers help for precise placement).
- For tails, wait 2 minutes until chocolate begins to set, then insert licorice pieces into the rounded ends.
Chill in the fridge for 30 minutes until rock solid. Pop them out of molds or peel off parchment – and ta-da! Your chocolate Halloween mice are ready to creep out your guests (in the best way possible).
Tips for Perfect Chocolate Mice
After making hundreds of these little critters (and learning from plenty of chocolatey mishaps), I’ve picked up some foolproof tricks:
- Room temp is your friend: If using molds, let them sit out for 10 minutes before filling. Cold molds make chocolate set too fast and stick like glue!
- Chill those tails: Pop your cut licorice pieces in the freezer for 5 minutes before inserting – they’ll stay straight instead of flopping over.
- The toothpick trick: If your almond ears won’t stay put, dip the tips in melted chocolate first – it acts like edible glue.
- Work quick, rest often: If chocolate thickens while you’re decorating, just microwave for 5 seconds to loosen it back up.
Remember – even “messy” mice look charming! My first batch had lopsided ears and googly eyes, and guests still devoured them.
Variations & Serving Ideas
Why stop at mice when you can create a whole haunted chocolate menagerie? Here are some of my favorite twists on this recipe:
- Ghostly White Chocolate: Swap semi-sweet for white chocolate and skip the ears – just eyes and a tail make adorable floating spirits!
- Sparkly Vampire Mice: Add red sanding sugar “blood” dripping from their mouths before the chocolate sets.
- Harvest Mix: Serve alongside orange jelly pumpkins and green candy corn for a colorful Halloween snack mix.
For parties, I love arranging the mice crawling out of cupcake “cheese” (vanilla cupcakes with yellow frosting) or floating in bowls of punch like they’re swimming. The possibilities are endless – let your Halloween spirit run wild!
Storage & FAQs
Got questions about your Chocolate Halloween Mice? I’ve got answers! Here’s everything you need to know to keep your spooky treats perfect:
- How long do they last? Store in an airtight container in the fridge for up to a week (if they last that long!). The coconut oil helps them stay fresh and snappy.
- Can I freeze them? Absolutely! Freeze on a parchment-lined tray first, then transfer to a freezer bag for up to 2 months. Thaw in the fridge overnight – no microwave or they’ll melt!
- Help! My chocolate seized! Don’t panic! Stir in 1/2 tsp vegetable oil at a time until smooth again. And next time, make sure no water gets in the bowl – even a drop can cause chaos.
- No candy eyes? Use mini chocolate chips pointy-side down or draw eyes with edible marker after they set.
Remember, these no-bake treats are super forgiving – even the “mistakes” taste delicious! My kids still giggle about the year we made one-eyed mutant mice that became party favorites.
Nutritional Information
While these Chocolate Halloween Mice are definitely treats, it’s nice to know what you’re nibbling on! Here’s the breakdown per mouse (based on standard ingredients):
- Calories: 85
- Sugar: 7g
- Fat: 5g
- Carbs: 9g
- Protein: 1g
Note: Nutrition varies based on brands. Values are estimates per mouse – your mileage may vary depending on how big you make them or which candies you use! Now go enjoy that chocolatey goodness guilt-free – it’s Halloween, after all!
Share Your Spooky Creations!
I want to see your creepy-cute chocolate mice! Tag me @SpookyBakes on Instagram when you make these – I live for photos of your Halloween creations! Did you give them pink candy noses? Make a mouse army crawling up cupcakes? Get creative and share the fun! Bonus points if you catch your kids “squeaking” at them before gobbling them up!
Print
5-Ingredient Chocolate Halloween Mice – Spooky & Irresistible
- Total Time: 55 minutes
- Yield: 12 mice 1x
- Diet: Vegetarian
Description
Fun and spooky chocolate mice perfect for Halloween treats.
Ingredients
- 1 cup semi-sweet chocolate chips
- 1 tbsp coconut oil
- 24 sliced almonds (for ears)
- 24 small candy eyes
- 12 thin licorice strings (cut into tails)
Instructions
- Melt chocolate chips and coconut oil in a microwave-safe bowl, stirring every 30 seconds until smooth.
- Pour melted chocolate into small mouse-shaped molds or drop teaspoons onto parchment paper.
- Press two almond slices into each mouse for ears and add candy eyes.
- Insert a licorice string into the back for the tail.
- Refrigerate for 30 minutes until firm.
- Remove from molds or peel off parchment paper and serve.
Notes
- Use white chocolate for a ghostly variation.
- Store in an airtight container in the fridge for up to a week.
- If molds aren’t available, shape freehand with a spoon.
- Prep Time: 20 minutes
- Cook Time: 5 minutes
- Category: Dessert
- Method: No-Bake
- Cuisine: American
Nutrition
- Serving Size: 1 mouse
- Calories: 85
- Sugar: 7g
- Sodium: 5mg
- Fat: 5g
- Saturated Fat: 3g
- Unsaturated Fat: 2g
- Trans Fat: 0g
- Carbohydrates: 9g
- Fiber: 1g
- Protein: 1g
- Cholesterol: 0mg