Skip to content
You know that moment when you bring a dish to a party and suddenly everyone’s hovering around it like moths to a flame? That’s what happens every single time I make this Classic Seven-Layer Dip. I swear, it’s like magic – one minute it’s sitting pretty on the table, the next minute there’s just an empty dish and a bunch of happy, chip-wielding friends asking for the recipe.
What makes this dip so special is how ridiculously simple it is to throw together, yet how impressive it always looks. Seven perfect layers of creamy, crunchy, fresh flavors that somehow taste even better than they look. I’ve been making this version for years – tweaked and perfected through countless game nights, backyard barbecues, and “oh-crap-I-forgot-to-bring-something” emergencies. Trust me, once you try this crowd-pleaser, you’ll never show up to a gathering without it again.
Classic Seven-Layer Dip Ingredients
Okay, let’s talk ingredients – and no, you don’t need anything fancy here! The magic of this dip comes from simple, fresh components that create layers of flavor in every bite. Here’s what you’ll need to grab from the store:
- 1 (16 oz) can refried beans (I like the traditional kind, but black bean version works too)
- 1 cup sour cream (full-fat for maximum creaminess, trust me)
- 1 cup guacamole (homemade if you’re feeling fancy, store-bought in a pinch)
- 1 cup salsa (medium heat is my sweet spot – adjust to your taste)
- 1 cup shredded cheddar cheese (sharp cheddar adds nice bite)
- 1/2 cup sliced black olives (drained well)
- 1/2 cup chopped green onions (both white and green parts)
- 1/2 cup diced tomatoes (pat them dry to prevent sogginess!)
See? Nothing complicated – just good, honest ingredients ready to become the star of your next party spread. Now let’s layer them up right!
How to Make Classic Seven-Layer Dip
Alright, let’s get to the fun part – building this beauty layer by layer! I promise it’s easier than it looks, and there’s something oddly satisfying about creating those perfect strata of deliciousness. Just follow these simple steps:
Layering the Base
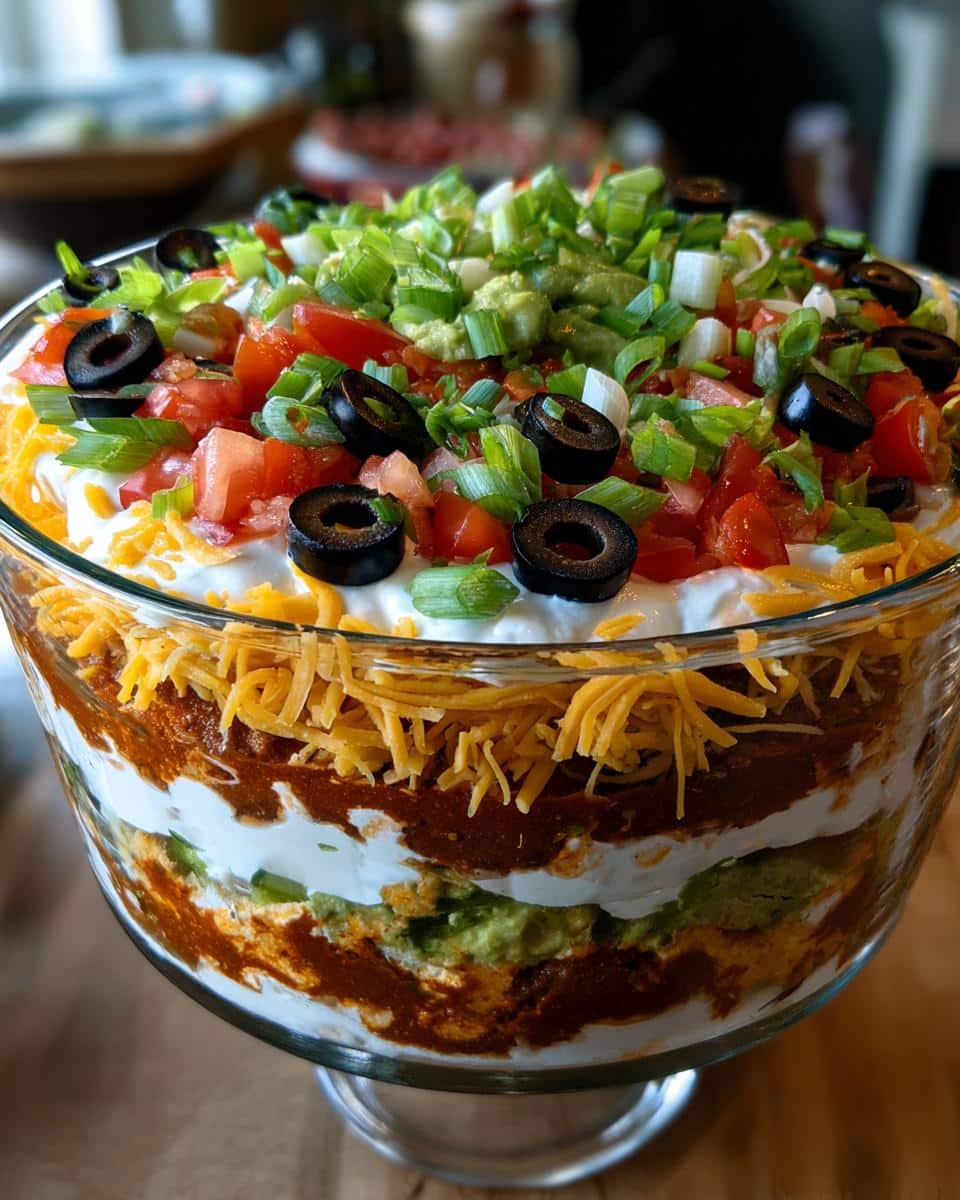
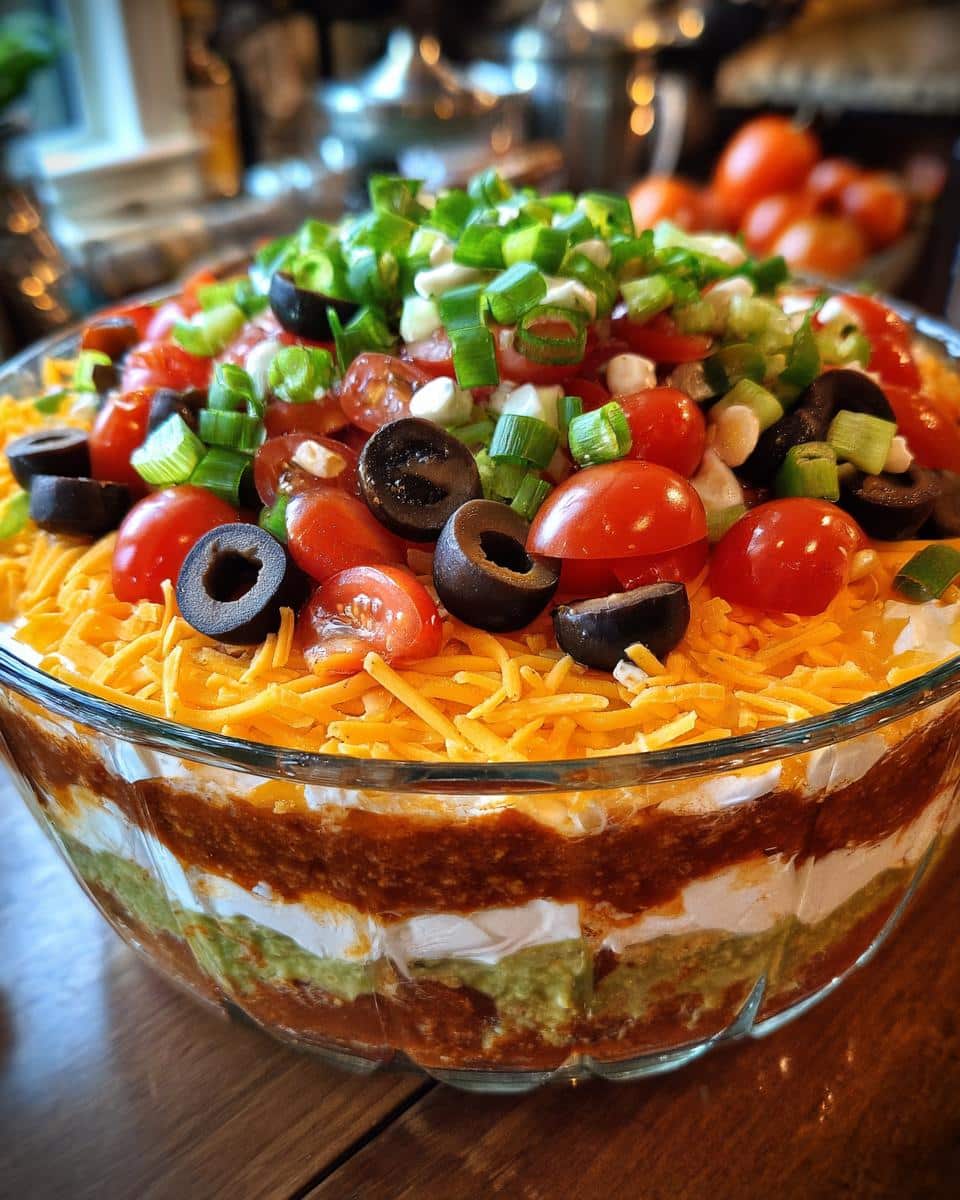
First things first – grab your serving dish. I like using a clear glass baking dish or pie plate so everyone can admire all seven layers (and let’s be honest, it looks super impressive). Spread that can of refried beans evenly across the bottom – about 1/4 inch thick. Pro tip: if your beans seem too thick straight from the can, mix in a tablespoon or two of water to make them more spreadable.
Next comes the sour cream layer. Now, here’s where folks often mess up – they just dollop it on and call it a day. Nope! Take a spoon and gently spread it over the beans in smooth, even strokes. Want it extra pretty? Use the back of the spoon to make little decorative swirls. No one will see them once we add more layers, but you’ll know they’re there.
Adding the Middle Layers
Time for my favorite part – the guacamole! If you’re using store-bought, give it a good stir first to make sure it’s nice and creamy. Spread it carefully over the sour cream layer, trying not to mix the two (a light hand is key). Now the salsa – here’s where I usually use a spoon to drizzle it rather than pour, so it doesn’t make the guacamole layer slide around too much.
Quick confession: sometimes I get lazy and mix my sour cream with taco seasoning before layering – adds a nice little flavor kick! But that’s totally optional – the classic version is perfect as-is.
Finishing Touches
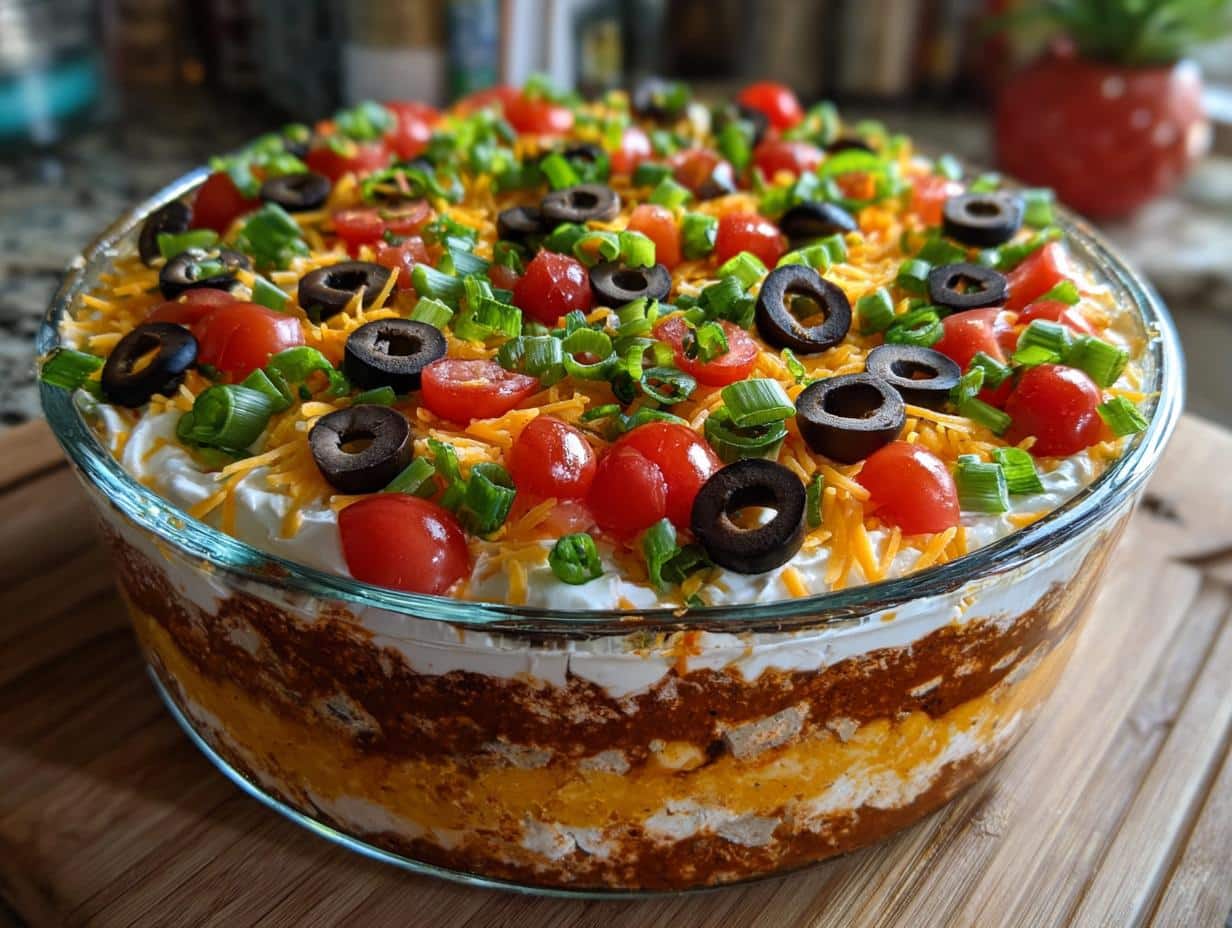
Almost there! Sprinkle that shredded cheese evenly across the top – I like to go right to the edges for maximum coverage. Then artfully arrange your olives, green onions, and tomatoes. Try to distribute them evenly so every chip dip gets some of each topping.
Here’s the hardest part – resist the urge to dive in immediately! Pop the whole thing in the fridge for at least 30 minutes (I know, torture). This chill time lets the flavors mingle and makes slicing cleaner. Trust me, it’s worth the wait!
Why You’ll Love This Classic Seven-Layer Dip
Listen, I could list a million reasons why this dip is my go-to, but let me hit you with the big ones that keep me coming back:
- Easiest party trick ever: No cooking, no fancy techniques – just layer and chill!
- Totally customizable: Swap out ingredients based on what you’ve got or what your crowd loves.
- Make-ahead magic: Throw it together in the morning and it’s actually better by party time.
- Crowd-pleaser supreme: From picky kids to foodie friends, everyone digs in with zero complaints.
- Looks fancy with zero effort: Those colorful layers make it look like you slaved all day.
Seriously, this dip checks all the boxes – easy, delicious, and always the first thing to disappear at any gathering. What’s not to love?
Ingredient Notes & Substitutions
Listen, I’m all about making recipes work with what you’ve got! Here are my tried-and-true swaps for when you’re in a pinch:
- Sour cream alternatives: Greek yogurt works beautifully – just drain any excess liquid. For dairy-free, try coconut yogurt (the plain, unsweetened kind).
- Guacamole freshness tip: If making ahead, press plastic wrap directly on the surface to prevent browning. A squeeze of extra lime juice helps too!
- Cheese options: Vegan shreds melt surprisingly well, or go wild with pepper jack for some heat. Crumbled cotija makes a delicious authentic twist.
- Bean variations: Black bean dip or even hummus can stand in for refried beans in a pinch – just watch the texture.
The beauty of this dip? It’s endlessly adaptable to what’s in your fridge or your dietary needs. Get creative!
Tips for the Perfect Classic Seven-Layer Dip
Want pro-level results every time? Here are my hard-earned secrets for dip perfection:
- Drain everything wet: Pat those tomatoes dry and let salsa sit in a strainer for 5 minutes – soggy dip is the enemy!
- Chop uniform: Keep all your veggies similarly sized so they distribute evenly (no rogue tomato chunks stealing the show).
- Cold guac is best: Chill your guacamole before layering – it spreads smoother and holds its shape better.
- Sharp edges: Wipe the dish rim clean between layers for those Instagram-worthy sides.
Bonus tip: Make extra – because this disappears faster than you can say “more chips please!”
Serving Suggestions for Classic Seven-Layer Dip
Now for the best part – digging in! I love serving this dip with a big basket of sturdy tortilla chips – the thick restaurant-style ones hold up best. For healthier options, crisp veggie sticks like bell peppers and cucumbers work great. And if you’re feeling extra? Pile it onto warm nachos for the ultimate game day feast. This dip makes any potluck instantly better – just be prepared to share the recipe a dozen times!
Storage & Reheating
Here’s the good news – this dip actually tastes even better after chilling overnight! Just cover tightly with plastic wrap (press it right against the surface to prevent browning) and it’ll keep beautifully in the fridge for up to 3 days. No reheating needed – serve chilled with your favorite dippers. Fair warning though: freezing turns the layers into a sad, watery mess, so I don’t recommend it. Trust me, it never lasts long enough to freeze anyway!
Classic Seven-Layer Dip FAQs
Got questions? I’ve got answers! After years of making this dip (and fielding all the queries from curious party guests), here are the most common things people ask:
Can I add meat to this seven-layer dip?
Absolutely! Browned ground beef or turkey with taco seasoning makes a fantastic addition. Just layer it right above the refried beans – you’ll have an eight-layer dip that’ll make meat lovers swoon.
How do I keep my dip from getting soggy?
The secret is in the prep! Always drain your salsa and pat those diced tomatoes dry with paper towels. And don’t skip the chilling time – that 30 minutes in the fridge helps all the layers set up perfectly.
Can I make this ahead for a party?
You bet! I actually prefer making it the night before – the flavors meld together beautifully. Just add the fresh toppings (tomatoes, green onions) right before serving to keep them crisp.
What’s the best way to serve this at a potluck?
Grab a serving dish with high sides to contain all those layers, and bring extra chips – this dip disappears fast! I like to set out small spoons so guests can scoop perfect portions onto their plates.
Help! My guacamole layer turned brown overnight!
No worries! Just press plastic wrap directly on the guacamole layer next time – the air is what causes browning. A little extra lime juice helps too. If it’s already brown, give it a quick stir before serving – it’ll still taste amazing.
Nutritional Information
Just a heads up – these nutritional estimates can vary based on your specific ingredients and brands. The Classic Seven-Layer Dip is all about fresh flavors rather than counting calories, but if you’re curious, each serving packs plenty of protein and fiber to balance out the delicious creaminess!
Print
Irresistible 7-Layer Dip That Vanishes in Minutes
- Total Time: 45 minutes
- Yield: 8 servings 1x
- Diet: Vegetarian
Description
A classic seven-layer dip that’s perfect for parties and gatherings. It’s easy to make and always a crowd-pleaser.
Ingredients
- 1 (16 oz) can refried beans
- 1 cup sour cream
- 1 cup guacamole
- 1 cup salsa
- 1 cup shredded cheddar cheese
- 1/2 cup sliced black olives
- 1/2 cup chopped green onions
- 1/2 cup diced tomatoes
Instructions
- Spread refried beans evenly in the bottom of a serving dish.
- Layer sour cream over the beans.
- Spread guacamole over the sour cream.
- Pour salsa over the guacamole.
- Sprinkle shredded cheddar cheese evenly.
- Top with black olives, green onions, and diced tomatoes.
- Chill for 30 minutes before serving.
Notes
- Use homemade guacamole for better flavor.
- Serve with tortilla chips or fresh veggies.
- Can be made a day ahead and stored covered in the fridge.
- Prep Time: 15 minutes
- Cook Time: 0 minutes
- Category: Appetizer
- Method: No-Cook
- Cuisine: Mexican
Nutrition
- Serving Size: 1/8 of recipe
- Calories: 220
- Sugar: 2g
- Sodium: 480mg
- Fat: 15g
- Saturated Fat: 6g
- Unsaturated Fat: 7g
- Trans Fat: 0g
- Carbohydrates: 15g
- Fiber: 4g
- Protein: 7g
- Cholesterol: 25mg