Skip to content
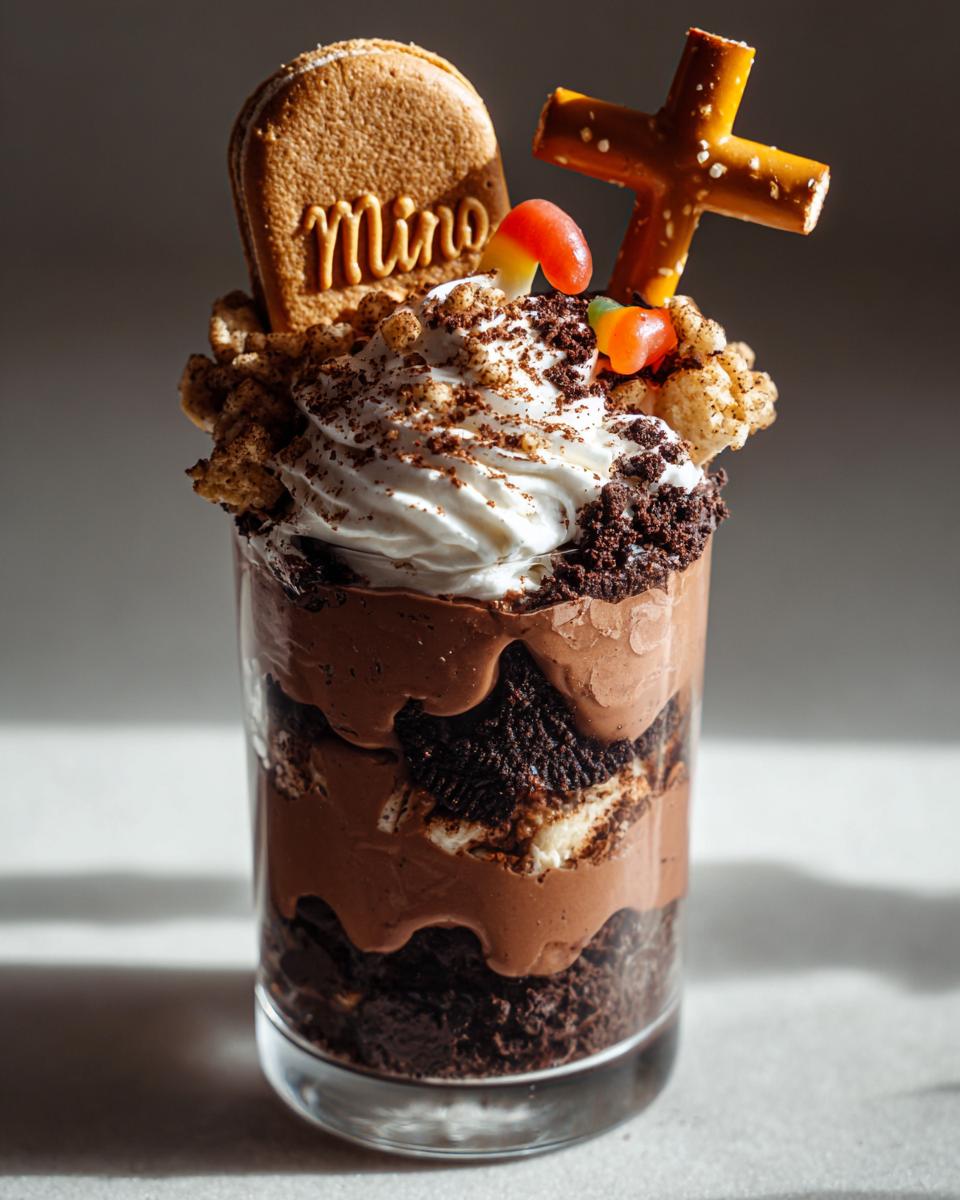
Every Halloween, my kitchen turns into a spooky dessert lab, and these graveyard dirt cups are always the star of the show. I first made them for my nephew’s costume party years ago—now they’re a must-have tradition. The best part? They’re ridiculously easy to throw together. Just layer chocolate pudding, crushed cookies, and whipped cream, then top with cookie “tombstones” and gummy worms for that perfect graveyard vibe. Kids go wild for them (adults too—trust me, I’ve caught my neighbors sneaking seconds). No baking, no fuss, just pure Halloween fun in a cup.
Graveyard Dirt Cups Ingredients
Here’s what you’ll need to create these spooky treats (measurements matter – I learned the hard way that eyeballing it leads to cookie avalanches!):
- 2 cups prepared chocolate pudding (I use instant but homemade works too)
- 1 cup finely crushed chocolate cookies (Oreos are perfect – cream filling and all)
- 1/2 cup fresh whipped cream (the kind that holds its shape, not the runny stuff)
- 6 Milano cookies (or any oblong tea biscuits for tombstones)
- 6 small pretzel sticks (broken in half for crosses)
- Handful of gummy worms (because what’s a graveyard without worms?)
Ingredient Substitutions
No stress if you’re missing something! Swap in gluten-free cookies for dietary needs, sugar-free pudding to cut sweetness, or coconut whipped cream for dairy-free. Once I even used Nilla wafers when Milano cookies sold out – still adorable!
How to Make Graveyard Dirt Cups
Okay, let’s get our hands dirty—literally! Here’s my foolproof method for creating these spooky cups (learned through many messy trial runs):
- Make your pudding base first – Follow package directions for instant pudding, or whip up homemade if you’re fancy. Pro tip: Let it chill for 5 minutes to thicken slightly so your layers hold shape better.
- Crush those cookies like a gravedigger – Toss whole cookies in a zip-top bag and roll with a rolling pin until they’re fine crumbs, but leave a few bigger chunks for texture. The cream filling makes them extra moist!
- Layer like you’re burying treasure – Start with pudding, then cookie “dirt,” then pudding again. Leave about 1/2 inch at the top for whipped cream clouds. I use clear cups because watching kids’ faces when they see the layers is priceless.
- Chill out – Pop them in the fridge for at least 1 hour—this lets the flavors meld and prevents soggy cookies. (Patience is hard when they look this cute, I know!)
- Top with whipped cream – Pipe or dollop it on right before serving so it stays fluffy. Don’t skip this – it’s the “freshly dug earth” look!
Decorating Tips
Here’s where the magic happens! Press Milano cookies vertically into the whipped cream as tombstones. Use a food-safe marker to write “RIP” or funny epitaphs (“Here lies Mr. Chocolate Chip”). Break pretzel sticks into crosses and tuck them beside tombstones. Bury gummy worms halfway – some peeking out, some completely submerged for maximum creepy effect!
Why You’ll Love These Graveyard Dirt Cups
Listen, I’ve made a lot of Halloween treats over the years, and these dirt cups always steal the show. Here’s why they’re absolute perfection:
- No-bake magic – When you’re already wrestling with costumes and decorations, the last thing you need is a hot oven. These come together in minutes with zero baking.
- Kid-approved fun – Little hands can help crush cookies or place the gummy worms. (My niece once made a whole “worm family” storyline with hers!)
- Endlessly customizable – Swap in vanilla pudding, use cinnamon graham crackers instead of chocolate, or add green food coloring to the whipped cream for extra creep factor.
- Party-ready cuteness – They look like you spent hours, but we’ll keep our little 20-minute secret between us.
Seriously – the only scary thing about these is how fast they disappear!
Graveyard Dirt Cups Variations
Don’t be afraid to play with this recipe—half the fun is making it your own spooky masterpiece! For extra crunch, mix in some Oreo crumbs with the regular cookie dirt. Swap chocolate pudding for butterscotch or vanilla if you prefer (I once did half-and-half layers for a “haunted earth” effect). Want to freak people out? Add a few drops of black food coloring to the pudding—it makes the “dirt” look terrifyingly real! My friend even topped hers with crushed peppermint sticks for “zombie bones” last year. The possibilities are endless, just like a good ghost story.
Serving and Storage
These graveyard dirt cups taste best chilled, so don’t skip that crucial hour in the fridge—it makes all the difference! Serve them straight from the refrigerator for the perfect cool, creamy texture. If you’ve got leftovers (a rare occurrence in my house), just cover them tightly and store in the fridge for up to 2 days. The cookies might soften a bit, but the worms will still be delightfully creepy!
Graveyard Dirt Cups Nutritional Information
Just so you know, these numbers are estimates (*actual results may vary depending on your ingredients). Each spooky serving packs about:
- 250 calories (mostly from all that delicious chocolate!)
- 20g sugar (the worms are the sweetest part)
- 10g fat (worth every creamy bite)
Not exactly health food – but hey, it’s Halloween! Everything’s allowed in moderation, right?
Frequently Asked Questions
Can I make these dirt cups ahead of time?
Absolutely! Assemble everything except the whipped cream and decorations up to 24 hours in advance. Store them covered in the fridge, then add the whipped cream and tombstone cookies right before serving. This keeps your “dirt” from getting too soggy and your “gravestones” crisp.
Are there vegan options for this recipe?
You bet! Use dairy-free pudding mix with almond milk, coconut whipped cream, and vegan cookies (check labels—some “cream-filled” ones have dairy). Gummy worms can be tricky, but Swedish Fish work great as creepy crawlers!
How do I prevent the cookie tombstones from getting soggy?
Here’s my trick: Insert the Milano cookies just before serving. If you really need to prep ahead, store them separately in an airtight container. I once used a tiny dab of melted chocolate to “glue” them to the cup’s rim—worked like a charm!
Can kids with nut allergies enjoy these?
Of course! Just skip any nut-containing cookies (some tea biscuits have almonds) and stick with brands like Oreos that are made in nut-free facilities. Always check labels—safety first, even with spooky treats!
What’s the best way to transport these to a party?
Pack them in a shallow box with crumpled paper towels between cups to prevent sliding. Bring decorations in separate baggies and assemble on-site—your “graveyard” will arrive picture-perfect!
Final Thoughts
Now it’s your turn to bring this graveyard to life! Tag me in your photos when you make these—I live for seeing your creative spins (last year someone added edible glitter “ghosts” and I’m still obsessed). Whether you’re hosting a party or just craving something fun, these dirt cups never disappoint. Happy haunting!
Print
“Spooky Graveyard Dirt Cups Kids Love in 20 Minutes!”
- Total Time: 20 minutes
- Yield: 6 servings 1x
- Diet: Vegetarian
Description
Spooky and fun dessert perfect for Halloween parties. These graveyard dirt cups are easy to make and look like little graves.
Ingredients
- 2 cups chocolate pudding
- 1 cup crushed chocolate cookies
- 1/2 cup whipped cream
- 6 Milano cookies
- 6 small pretzel sticks
- Gummy worms for decoration
Instructions
- Prepare chocolate pudding according to package instructions.
- Layer pudding and crushed cookies in small cups.
- Top with whipped cream.
- Insert Milano cookies as gravestones.
- Add pretzel sticks as crosses.
- Decorate with gummy worms.
Notes
- Chill for at least 1 hour before serving.
- Use gluten-free cookies for a gluten-free version.
- Adjust sweetness by reducing sugar in pudding.
- Prep Time: 15 minutes
- Cook Time: 5 minutes
- Category: Dessert
- Method: No-Bake
- Cuisine: American
Nutrition
- Serving Size: 1 cup
- Calories: 250
- Sugar: 20g
- Sodium: 180mg
- Fat: 10g
- Saturated Fat: 4g
- Unsaturated Fat: 5g
- Trans Fat: 0g
- Carbohydrates: 35g
- Fiber: 2g
- Protein: 3g
- Cholesterol: 15mg