Skip to content
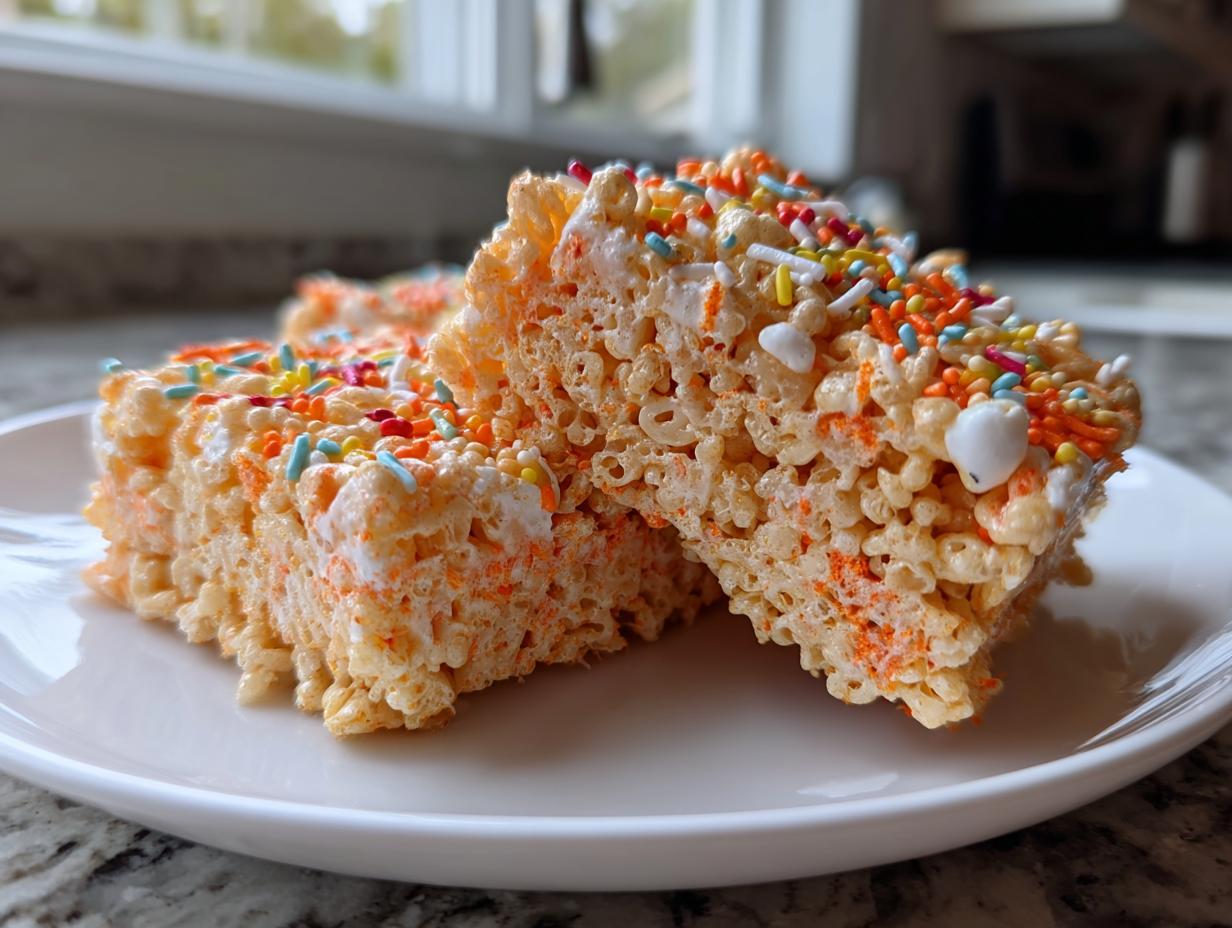
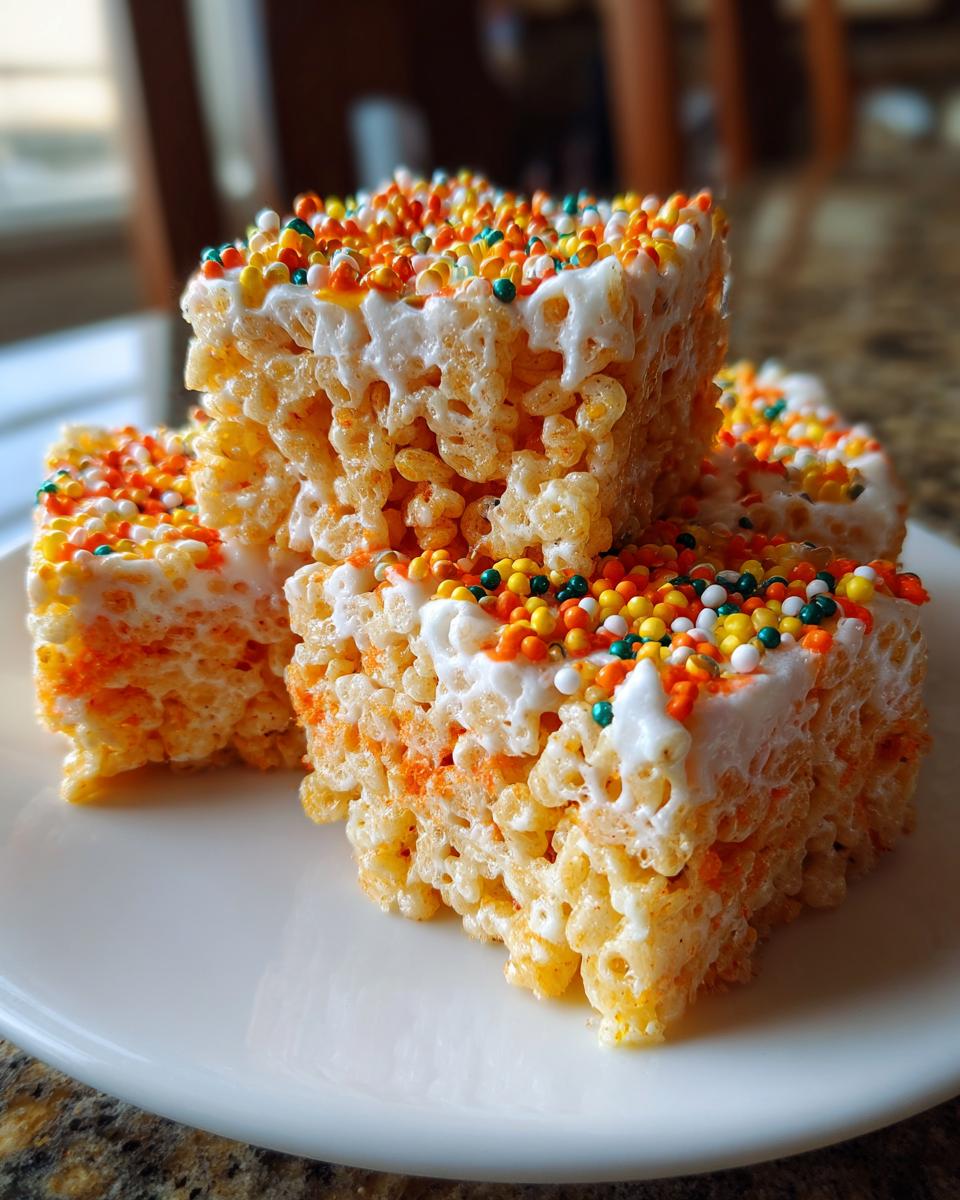
Listen, if there’s one thing that gets my kids more excited than trick-or-treating, it’s helping me make these ridiculously fun Halloween Rice Krispie treats. The moment I pull out that giant bag of marshmallows, they come running like little ghosts to the kitchen. There’s something magical about how three simple ingredients transform into these sticky-sweet squares of joy, ready to be covered in orange goo and haunted sprinkles.
I’ve been making these since my oldest was in preschool (she’s now convinced she’s a Rice Krispie treat expert at age 9). What I love is how even on the craziest Halloween nights—between costume disasters and last-minute pumpkin carving—we can whip up a batch in 15 minutes flat. The snap-crackle-pop of the cereal still makes me smile after all these years, just like it did when my mom let me lick the spoon back in the ’90s.
Why You’ll Love These Halloween Rice Krispie Treats
Let me tell you why these treats are absolute Halloween magic:
- Faster than a ghost disappearing: Seriously, 15 minutes from start to finish—even with little “helpers” scattering cereal everywhere.
- Messy hands approved: Kids can squish, decorate, and lick fingers to their hearts’ content (unlike frosting that ends up on my walls).
- Customizable spookiness: Orange food coloring? Check. Bat-shaped sprinkles? Go wild. We once made “mummy wraps” with white chocolate drizzle!
- The smell of childhood: That buttery marshmallow aroma will have everyone hovering around the kitchen like hungry little goblins.
The best part? No oven means more time for costume parades and haunted house setups!
The Simple Magic Behind Our Spooky Treats
Here’s the beautiful thing about these Halloween Rice Krispie treats – you probably have most of these ingredients in your pantry right now! But let me tell you exactly what makes my version extra special:
- 3 tablespoons butter (unsalted): I always use real butter – it gives that rich flavor you just can’t get with margarine
- 1 package (10 oz) marshmallows: Fresh mini marshmallows melt faster, but the big puffy ones work too if that’s what you’ve got
- 6 cups Rice Krispies cereal: That satisfying snap is key – store brands work, but the name brand really does have that perfect crispness
- Orange gel food coloring (optional): A few drops makes that perfect pumpkin hue – liquid works but can make the treats soggy
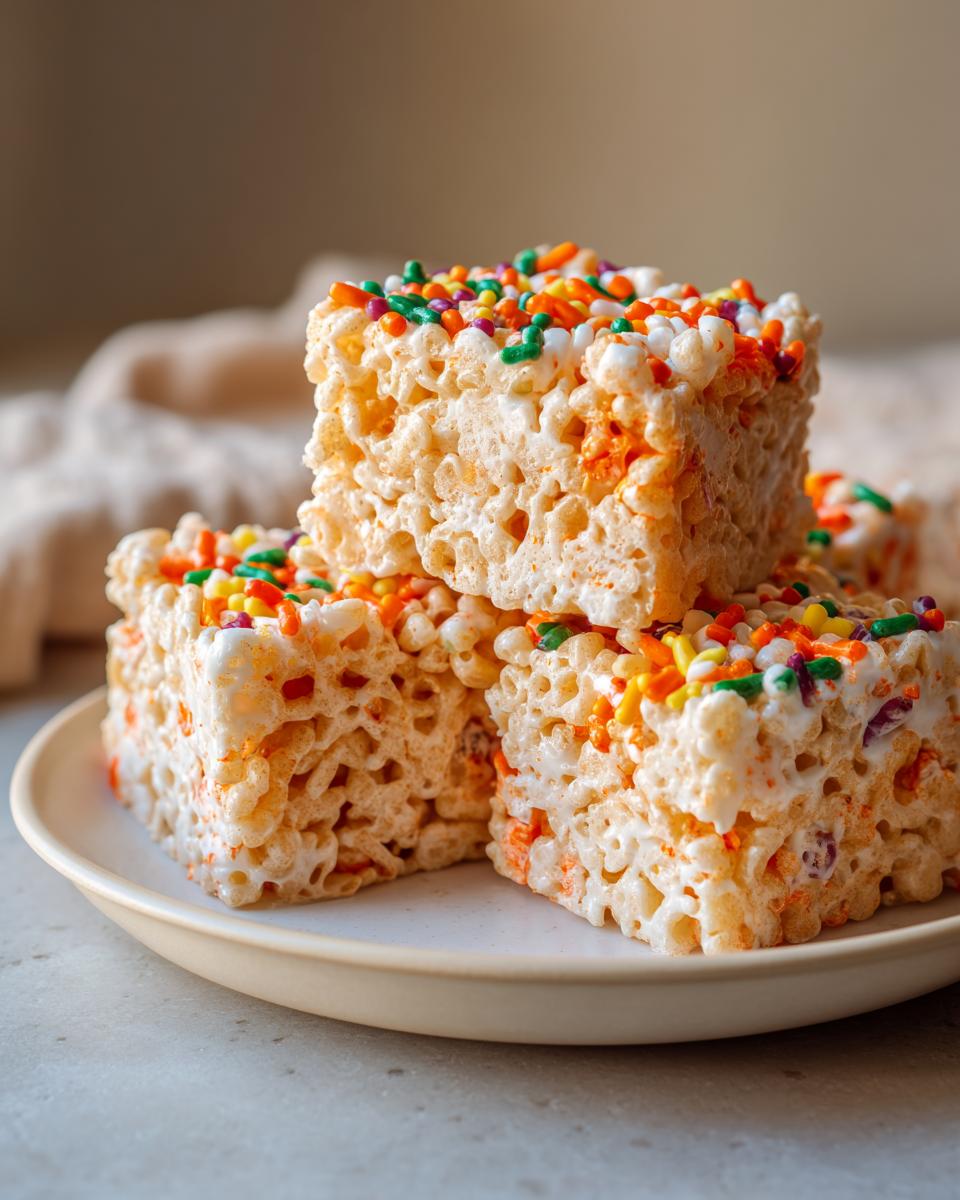
- Halloween sprinkles (optional): The kids love picking these – we’re partial to the mix with tiny bats and ghosts!
See? Nothing fancy – just good old-fashioned ingredients with a spooky twist. The magic happens when they all come together!
Equipment You’ll Need
Don’t worry – no fancy gadgets required here! You’ll just need:
- A large pot (trust me, you want extra room for stirring!)
- A sturdy spatula – marshmallow goo is sticky business
- A greased 9×13″ baking pan
- A buttered spoon (my secret weapon for pressing without sticking)
That’s it – now let’s get messy!
How to Make Halloween Rice Krispie Treats
Okay, let’s get down to the gooey, spooky business! Follow these steps and you’ll have perfect Halloween Rice Krispie treats before you can say “boo!”
Step 1: Melt the Butter and Marshmallows
First, melt your butter in that large pot over LOW heat – I’m serious about the low part! Burnt marshmallow smells like regret, not Halloween magic. Once the butter’s melted, dump in all those marshmallows and stir constantly with your spatula. They’ll go from little white pillows to a glossy, lava-like goo in about 3 minutes. Resist the urge to turn up the heat – patience makes perfect here!
Step 2: Add Color and Cereal
Now for the fun part! Take the pot off the heat and stir in your orange food coloring (if using). A few drops at a time until you get that perfect pumpkin shade – gel coloring gives the brightest color without making everything soggy. Then quickly dump in all the Rice Krispies and stir like crazy! You want every single crispy piece coated in that marshmallow goodness before it starts to set.
Step 3: Press and Decorate
Pour your orange mixture into the greased pan and press firmly with your buttered spoon (this prevents sticking disasters). Here’s my trick: place a piece of parchment paper on top and press with your hands – no sticky fingers! While still warm, shower those treats with Halloween sprinkles so they stick. Let cool completely before cutting – about 30 minutes if you can resist!
Tips for Perfect Halloween Rice Krispie Treats
Want Rice Krispie treats that’ll impress even the pickiest little monsters? Here are my hard-earned secrets:
- Fresh marshmallows are non-negotiable: Stale ones won’t melt properly and leave your treats tasting like cardboard ghosts.
- Butter those hands! When shaping extras into balls or bats, rub butter on your palms to prevent the stickiest situation this side of a haunted house.
- Work fast: That marshmallow mixture sets quicker than you’d think – have your sprinkles and food coloring ready to go.
- Press don’t smash: Firm pressure keeps squares neat, but over-packing makes them dense as a witch’s spellbook.
Follow these, and you’ll be the Halloween treat hero!
Spooky Swaps and Twists to Try
These treats are like costumes – meant to be dressed up however you like! Here are my favorite ways to mix things up:
- Dairy-free? Coconut oil or vegan butter work beautifully – the marshmallows still give that perfect chew.
- Gluten-sensitive ghosts? Most crispy rice cereals are gluten-free these days (just check the box!).
- Extra creepy shapes: Use cookie cutters for tombstones or free-form ghost blobs (pro tip: chill 10 minutes before cutting).
- Black magic version: Swap orange for black food coloring and add licorice bits for spider legs!
The only limit is your imagination – and how much glitter glue you’re willing to clean up afterwards!
Serving and Storing Halloween Rice Krispie Treats
Here’s the deal – as tempting as it is to dig in immediately, let these bad boys cool completely before cutting (about 30 minutes). I store mine in an airtight container with parchment between layers – they’ll stay fresh for 3 days, if they last that long! For parties, I arrange them on a platter with plastic spider rings stuck on top – the kids go wild for the “extra treat.” Pro tip: If your kitchen runs warm, pop them in the fridge for 10 minutes before serving to help them hold their shape.
Halloween Rice Krispie Treats Nutritional Info
Now, I’m no nutritionist, but here’s the scoop on what’s in these sweet little squares (based on my standard recipe cut into 12 pieces): Each one packs about 150 calories with 12g of sugar – basically the same as two mini candy bars, but way more fun to make! The sprinkles might add a gram or two extra, but hey, it’s Halloween – live a little! Remember, these values can change if you use different brands or go wild with the decorations.
FAQs About Halloween Rice Krispie Treats
Spooky season brings spooky questions – let me tackle the ones I get most about these Halloween treats:
Can I use store-brand cereal instead of Rice Krispies?
Absolutely! The generic crispy rice cereals work fine in a pinch, though I find name-brand has that perfect snap. The real magic is in the marshmallow-to-cereal ratio – just keep it to 6 cups total no matter what brand you use.
How do I make them extra sticky?
Two tricks: 1) Use fresh marshmallows (stale ones lose their glue-like power), and 2) Add an extra tablespoon of butter when melting. Some folks swear by a splash of corn syrup, but I find that makes them too chewy.
Why did my treats turn out hard?
Overcooking the marshmallows is usually the culprit! They should just melt, not bubble. Also, pressing too firmly squashes all the air out – gentle but firm pressure gives that perfect balance between holding shape and staying soft.
Can I make these ahead of time?
You bet! They’ll keep fresh in an airtight container for 3 days. If decorating with sprinkles, I suggest waiting until the day of serving so they don’t get soggy. For longer storage, freeze them undecorated – just thaw at room temperature before adding your spooky touches!
Share Your Spooky Creations!
Now I want to see your haunted masterpieces! Tag me @SpookyTreatsQueen when you post photos of your Halloween Rice Krispie treats – bonus points for creative costumes in the background. Nothing makes me happier than seeing your little ghosts and goblins enjoying these treats as much as mine do!
For more fun recipes and inspiration, check out our Pinterest page!
Print
15-Minute Halloween Rice Krispie Treats Every Kid Adores
- Total Time: 15 mins
- Yield: 12 squares 1x
- Diet: Vegetarian
Description
Easy and fun Halloween Rice Krispie treats that are perfect for parties. These no-bake treats are quick to make and loved by kids.
Ingredients
- 3 tablespoons butter
- 1 package (10 oz) marshmallows
- 6 cups Rice Krispies cereal
- Halloween sprinkles (optional)
- Orange food coloring (optional)
Instructions
- Melt butter in a large pot over low heat.
- Add marshmallows and stir until fully melted.
- Remove from heat and stir in food coloring (if using).
- Add Rice Krispies cereal and mix well.
- Press mixture into a greased baking pan.
- Decorate with Halloween sprinkles while still warm.
- Let cool, then cut into squares and serve.
Notes
- Use fresh marshmallows for best texture.
- Butter the back of a spoon to press mixture easily.
- Store in an airtight container for up to 3 days.
- Prep Time: 10 mins
- Cook Time: 5 mins
- Category: Dessert
- Method: No-Bake
- Cuisine: American
Nutrition
- Serving Size: 1 square
- Calories: 150
- Sugar: 12g
- Sodium: 120mg
- Fat: 4g
- Saturated Fat: 2.5g
- Unsaturated Fat: 1g
- Trans Fat: 0g
- Carbohydrates: 28g
- Fiber: 0g
- Protein: 1g
- Cholesterol: 10mg