Skip to content
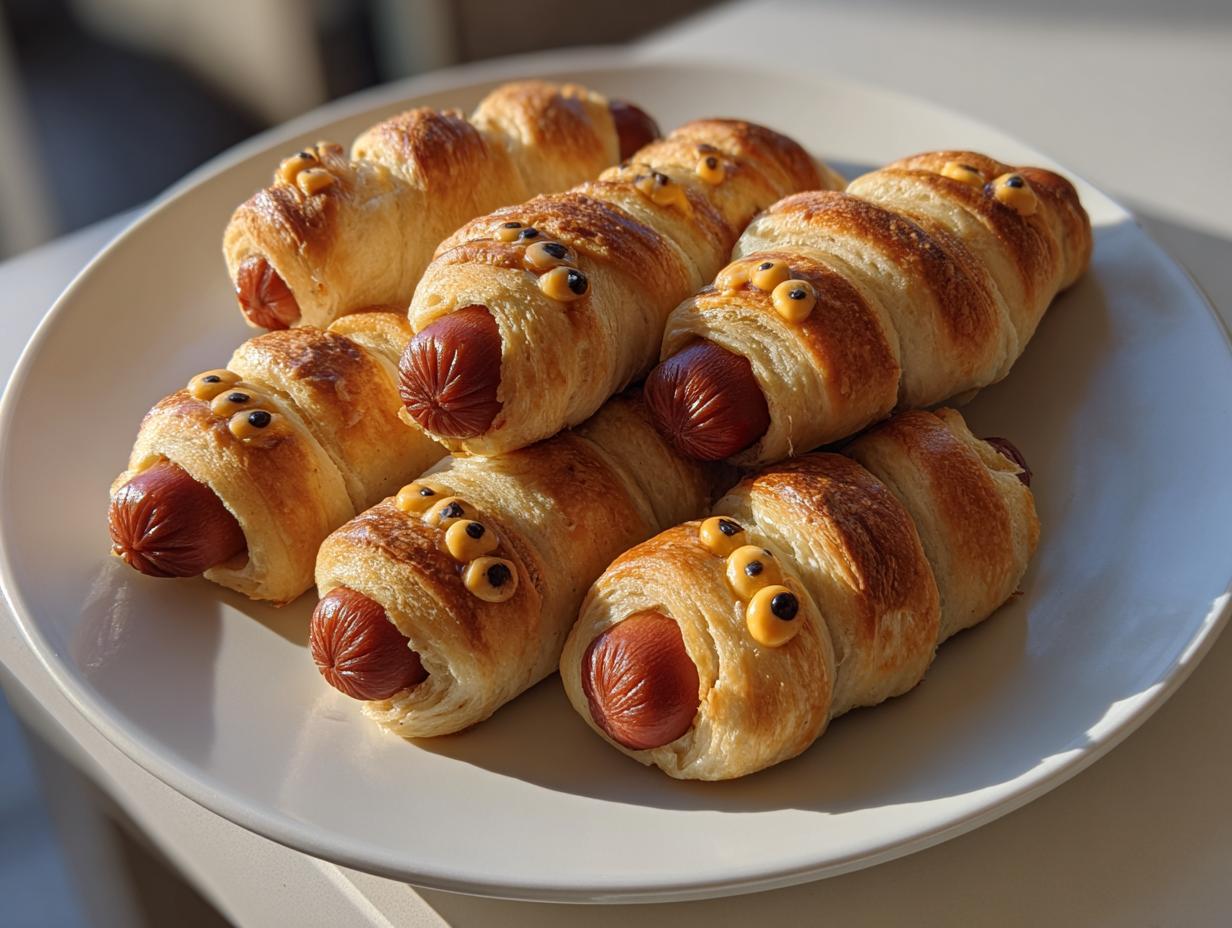
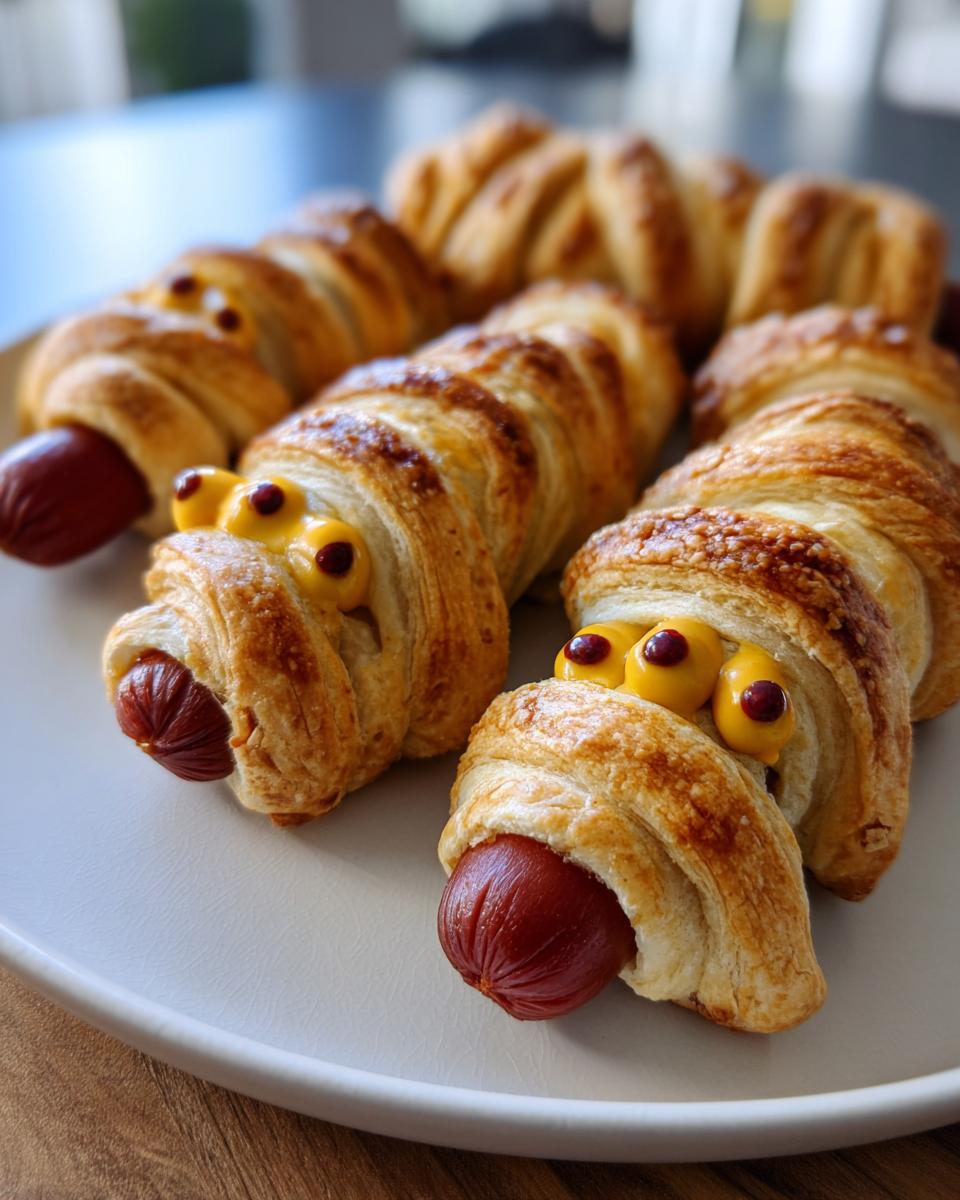
Picture this: It’s Halloween night, the house is buzzing with tiny ghosts and goblins, and you need a snack that’s as fun as it is easy. Enter mummy dogs—the cutest, spookiest twist on hot dogs you’ve ever seen! I first made these for my nephew’s monster-themed birthday party, and let me tell you, the kids went wild. They couldn’t decide whether to eat them or keep them as edible trophies (spoiler: they vanished in minutes).
The best part? You only need three ingredients and about 25 minutes. Crescent dough wraps around hot dogs like little bandages, leaving just enough space for mustard or ketchup eyes to peek through. It’s the kind of recipe that makes you look like a kitchen wizard with zero stress. Trust me, if I can pull these off during the chaos of a costume party, anyone can!
Why You’ll Love These Mummy Dogs
These adorable mummy dogs aren’t just tasty—they’re practically a party trick! Here’s why they’ll become your new go-to for any spooky gathering:
- Super quick to make – From fridge to table in under 30 minutes! Perfect when you’re juggling costumes, decorations, and excited kids.
- Halloween magic in every bite – The wrapped dough transforms ordinary hot dogs into edible mummies that steal the show at any creepy celebration.
- Kid-approved fun – My niece still giggles when she “unwraps” her mummy dog one bandage at a time (before inevitably devouring it in two bites).
- Endlessly customizable – Use different doughs, add spicy mustard “bloodshot eyes,” or even make vegan versions—they’re like edible craft projects!
Seriously, these little guys are impossible not to love. They’re the edible equivalent of that perfect Halloween costume that’s equal parts clever and cute!
Ingredients for Mummy Dogs
Here’s the beautiful part – you only need three simple ingredients to create these adorable edible mummies! I always keep these basics on hand for last-minute Halloween emergencies (or when my kids beg for a “spooky snack night” in July).
- 8 hot dogs – Standard size works best, though I’ve used jumbo ones for dramatic effect (just add more dough!)
- 1 can (8 oz) refrigerated crescent roll dough – The sheets work better than perforated rolls, but either will do in a pinch
- 1 tablespoon mustard or ketchup – For those all-important mummy eyes peeking through the “bandages”
Pro tip: Unroll your dough about 10 minutes before using – it’s much easier to work with when slightly softened but still cold. And when cutting strips, aim for about 1/4 inch wide – skinny enough to look like real wrappings but sturdy enough to handle!
Ingredient Substitutions
Don’t stress if you’re missing something! This recipe is crazy flexible:
- No crescent dough? Puff pastry makes an elegant (and extra flaky) mummy wrapping. Just roll it slightly thinner before cutting strips.
- Vegan or vegetarian? Plant-based hot dogs work perfectly – I’ve had great luck with the carrot dog version too!
- Mustard haters? Try cream cheese for ghostly white eyes or sriracha mayo for a spicy wink.
The beauty of mummy dogs is how they adapt to what you’ve got. As my daughter says when we improvise: “Mummies don’t judge!”
How to Make Mummy Dogs
Alright, let’s bring these little mummies to life! Don’t let the adorable finished product fool you – this is one of the easiest recipes in my Halloween arsenal. I’ve made these with kids as young as four helping (messy hands and all), and they always turn out perfectly creepy-cute.
Step 1: Prep the Dough
First things first – preheat that oven to 375°F (190°C). While it’s heating up, unroll your crescent dough on a lightly floured surface. Here’s my secret: use a pizza cutter or sharp knife to slice the dough into about 1/4-inch strips. They don’t need to be perfect – uneven strips actually make the “bandages” look more authentic! If the dough gets too sticky, pop it in the fridge for 5 minutes.
Step 2: Wrap the Hot Dogs
Now the fun part! Take a strip of dough and start wrapping it diagonally around a hot dog, leaving about 1 inch uncovered at one end for the mummy’s face. Overlap the strips slightly as you go – just like real mummy wrappings! Pro tip: start wrapping from the middle and work toward both ends to prevent sliding. If a strip breaks? No worries! Just press it back together – mummies aren’t perfect!
Step 3: Bake and Decorate
Arrange your wrapped mummy dogs on a parchment-lined baking sheet (trust me, cleanup is way easier this way). Bake for 12-15 minutes until golden brown. While they’re still warm (but not piping hot), use a toothpick to dot mustard or ketchup eyes on the bare hot dog ends. For extra creepy fun, make one eye bigger than the other or add drippy “blood” with sriracha!
The hardest part? Waiting for them to cool enough that little hands don’t burn themselves grabbing them! These disappear faster than a ghost in sunlight at my house.

Tips for Perfect Mummy Dogs
After making approximately a zillion of these adorable mummy dogs (okay, maybe just hundreds), I’ve picked up some tricks that take them from “cute” to “Halloween showstopper” status. Here are my fail-proof secrets:
Chill your dough between steps
That crescent dough can get sticky fast, especially when little hands are helping. I keep a plate in the freezer and pop my wrapped mummy dogs on it for 5 minutes before baking. The cold helps the dough hold its shape and gives you those perfect golden “bandages” instead of puffy blobs.
Get creative with the eyes
Mustard dots are classic, but for next-level mummy faces, try these fun twists:
- Use black edible marker on a tiny square of white cheese for googly eyes
- Press mini pepperoni slices into melted cheese for bloodshot zombie eyes
- Dab cream cheese with a toothpick for ghostly white orbs
My personal favorite? Olive slices with pimento “pupils” – they look eerily realistic!
Vary your wrapping style
Random crisscrosses are great, but sometimes I like to switch it up:
- Spiral wrap for an “ancient artifact” look
- Leave one arm unwrapped like the mummy’s breaking free
- Make some with neat, even strips for “newly wrapped” mummies
Pro tip: The messier kids wrap them, the better they look – like they’ve been in tombs for centuries!
Double your batch (trust me!)
The first time I made these, I thought “eight mummy dogs will be plenty.” Famous last words! They disappear faster than candy corn at a Halloween party. Now I always make at least two batches – one to devour immediately, and one to stash in the fridge for midnight monster cravings.
Serving Suggestions
These mummy dogs practically beg to be the star of your spooky snack spread! Here’s how I love to serve them for maximum Halloween impact:
Set up a “mad scientist lab” station with different dipping sauces – ketchup becomes “blood,” mustard transforms into “toxic ooze,” and a green herb dip makes perfect “slime.” For sides, I do mini “graves” (tombstone-shaped tea sandwiches) and “witches’ fingers” (breadstick sticks with almond nails). The kids go nuts arranging everything into spooky scenes before eating!
For adult parties, I pair them with a creepy-cute cheese board featuring “eyeball” mozzarella balls and “bone” breadsticks. A bowl of pumpkin soup makes everything feel extra festive. Pro tip: Use black serving platters and plastic spiders scattered around for instant Halloween vibes!
Storage & Reheating
Here’s the spooky truth – these mummy dogs taste best fresh from the oven, but if you’ve got leftovers (rare in my house!), they store surprisingly well! Just let them cool completely first – nobody wants a soggy mummy.
Keeping your mummies fresh
Pop them in an airtight container in the fridge, and they’ll stay delicious for up to 3 days. I like to separate layers with parchment paper so the “bandages” don’t stick together. Pro tip: Wait to add the eyes until you’re ready to serve – mustard can bleed into the dough overnight and give your mummies a weird zombie rash!
The secret to reviving your mummies
When you’re ready to bring them back to life, skip the microwave – it makes the dough rubbery. Instead, spread them on a baking sheet and pop in a 350°F (175°C) oven for about 5 minutes. The heat crisps up the crescent dough beautifully, almost like they’re fresh-baked. If you’re feeling fancy, a quick spritz of water before reheating helps restore that just-baked texture.
Fun fact: My kids actually prefer them cold straight from the fridge sometimes – apparently it makes them taste “more like real mummies” (kids are weird). Either way, they never last long enough to worry about storage in my house!
Nutritional Information
Okay, let’s be real – we’re not eating mummy dogs for their health benefits (though I did once convince my nephew the carrots in hot dogs count as vegetables…). But in case you’re curious about what you’re serving up, here’s the nutritional breakdown per mummy dog. Remember, these are estimates – your exact numbers might vary slightly depending on your hot dog brand and how generous you are with the dough!
- Calories: 180 – Perfect for a fun party snack!
- Fat: 12g (4g saturated) – Blame the buttery crescent dough wrapping
- Sodium: 480mg – Consider low-sodium dogs if you’re watching this
- Carbs: 12g – The dough gives it that perfect golden crunch
- Protein: 6g – Not bad for something so adorable
A little tip from my nutritionist friend: Pair these with veggie sticks or fruit to balance things out. Or, you know, lean into the Halloween spirit and enjoy them with extra mustard “eyes” – life’s about balance, right?
FAQs About Mummy Dogs
After years of making these for every Halloween party under the sun (or should I say moon?), I’ve gotten all sorts of questions about mummy dogs. Here are the most common ones – with all my hard-earned answers!
Can I make mummy dogs ahead of time?
Absolutely! These little guys are surprisingly party-friendly. You’ve got two great options:
- Wrap & refrigerate: Assemble them up to 8 hours before baking – just keep them covered in the fridge. The dough might puff slightly, but they’ll bake up perfectly.
- Bake & reheat: Fully cooked mummy dogs keep well for 3 days in the fridge. Reheat in a 350°F oven for 5 minutes to bring back the crunch!
Just wait to add the eyes until serving time – nobody wants smeary mummy vision!
Are there gluten-free options?
You bet! My gluten-free friends love these just as much as anyone else. Simply swap the crescent dough for:
- Gluten-free puff pastry (check brands like Schär)
- Pre-made gluten-free pizza dough rolled thin
- Even strips of gluten-free tortillas brushed with butter!
Same adorable mummy look, none of the gluten worries. Just be sure your hot dogs are GF too – some brands sneak in wheat.
Can I use something besides hot dogs?
Oh, the possibilities are endless! Some of my favorite variations:
- Cheese sticks: Kids go nuts for “mummy mozzarella” (wrap quickly before baking!)
- Sausages: Little smokies make perfect baby mummies
- Veggie dogs: For plant-based partygoers
- Pretzel rods: Sweet or savory – drizzle with chocolate or cheese after baking
Honestly, if you can wrap it in dough and give it eyes, it can be a mummy!
Help! My dough strips keep breaking!
Don’t panic – even experienced mummy-makers (mummifiers?) deal with this! Try these tricks:
- Let refrigerated dough sit 10-15 minutes to soften slightly
- Roll strips between your palms like play-doh snakes before wrapping
- If a strip breaks, just press the ends together – mummies aren’t perfect!
- Too sticky? Dust your hands with flour (but go easy – too much makes dough tough)
Remember: Patchy bandages just make them look authentically ancient!
Can I freeze mummy dogs?
Yes! They freeze beautifully either before or after baking. Here’s how:
- Unbaked: Freeze wrapped dogs on a tray first, then transfer to a bag. Bake straight from frozen, adding 3-5 extra minutes.
- Baked: Cool completely, then freeze. Reheat in a 375°F oven for about 8 minutes.
They’ll keep for 2 months frozen – perfect for sudden Halloween cravings in July!
Got more mummy mysteries? Just ask – I’ve probably made every mistake so you don’t have to! Happy haunting… I mean, baking!
Print
25-Minute Mummy Dogs That’ll Haunt Your Taste Buds
- Total Time: 25 minutes
- Yield: 8 servings 1x
- Diet: Low Lactose
Description
A fun and easy twist on traditional hot dogs, perfect for Halloween or any themed party. These mummy dogs are wrapped in strips of dough to resemble mummies.
Ingredients
- 8 hot dogs
- 1 can refrigerated crescent roll dough
- 1 tablespoon mustard or ketchup (for eyes)
Instructions
- Preheat oven to 375°F (190°C).
- Unroll the crescent dough and cut into thin strips.
- Wrap the strips around each hot dog, leaving a small space uncovered for the eyes.
- Place on a baking sheet and bake for 12-15 minutes until golden brown.
- Use mustard or ketchup to dot eyes on the uncovered part of the hot dog.
- Serve warm.
Notes
- You can use puff pastry instead of crescent dough.
- For a spookier effect, add more “bandages” by overlapping the dough strips.
- Prep Time: 10 minutes
- Cook Time: 15 minutes
- Category: Appetizer
- Method: Baking
- Cuisine: American
Nutrition
- Serving Size: 1 mummy dog
- Calories: 180
- Sugar: 2g
- Sodium: 480mg
- Fat: 12g
- Saturated Fat: 4g
- Unsaturated Fat: 6g
- Trans Fat: 0g
- Carbohydrates: 12g
- Fiber: 0g
- Protein: 6g
- Cholesterol: 20mg