Skip to content
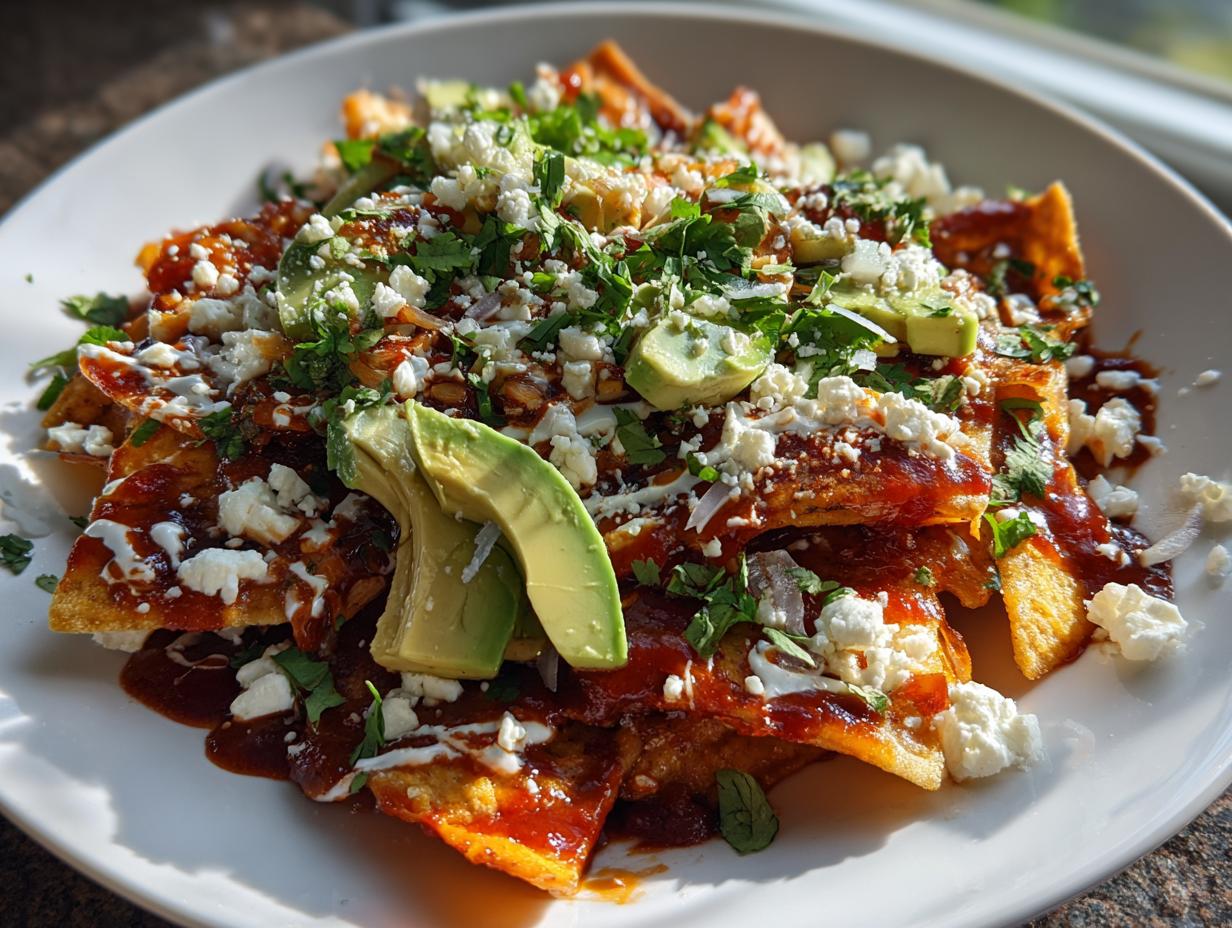
There’s nothing quite like waking up to the smell of sizzling tortillas and rich salsa wafting through the kitchen – that’s how my abuela taught me breakfast should be. Chilaquiles were our family’s weekend treat, the dish that turned lazy mornings into celebrations. I can still picture her moving effortlessly between stove and table, layering crispy chips with that perfect salsa that somehow made everything better.
After years of testing (and yes, a few soggy chip disasters), I’ve perfected my version of this classic Mexican breakfast. The secret? Balancing textures – you want chips that soften just enough while keeping some crunch, all swimming in that glorious salsa. Whether you’re nursing a hangover or just craving something special, these chilaquiles deliver comfort in every bite. They’re quicker than you’d think too – ready in about 25 minutes from pantry to plate.
Why You’ll Love These Chilaquiles
Listen, if you’ve never had chilaquiles before, you’re in for the best kind of breakfast surprise. And if you have? Well, get ready to fall in love all over again. Here’s why this dish has been my go-to weekend breakfast for years:
- Quick magic: From fridge to table in 25 minutes flat—faster than most brunch spots can seat you!
- Flavor bomb: Crispy-tender tortillas soaked in that tangy salsa, topped with cool crema and salty cheese? Absolute perfection.
- Your rules: Want them spicy? Add more salsa. Extra protein? Throw on an egg or some shredded chicken. Vegetarian? Already covered.
- Authentic taste: These aren’t some watered-down version—they taste just like the chilaquiles I grew up eating at my abuela’s table.
The best part? Even when I’m half-asleep on Sunday morning, I can whip these up without thinking. Trust me, once you try homemade chilaquiles, there’s no going back to boring toast.
Chilaquiles Ingredients
Here’s everything you’ll need to make my favorite chilaquiles – I promise it’s all simple stuff you can find at most grocery stores (or maybe already have in your kitchen!):
- 8 corn tortillas, cut into triangles (day-old works best!)
- 2 cups red or green salsa (homemade or store-bought – I’ll never tell)
- 1/4 cup vegetable oil for frying (or enough to coat your pan)
- 1/2 cup crumbled queso fresco (that salty, crumbly magic)
- 1/4 cup Mexican crema (the cooling yin to salsa’s yang)
- 1/4 cup chopped white onion (for that fresh crunch)
- 1/4 cup chopped cilantro (don’t skip this – it makes everything pop)
- 2 large eggs (optional, but oh-so-good when runny yolk mixes in)
Ingredient Notes & Substitutions
Okay, let’s talk ingredients because I know you might have questions (I did when I first started making these!):
Queso fresco vs. cotija: Both work beautifully, but they’re different! Queso fresco is milder and moister, while cotija is saltier and drier. I prefer queso fresco for chilaquiles because it melts slightly into the warm chips. But if all you can find is cotija, no worries – just use a lighter hand since it’s saltier.
Crema alternatives: Can’t find Mexican crema? Sour cream thinned with a splash of milk or lime juice makes a decent substitute. Greek yogurt works in a pinch too, though it’s tangier.
Salsa options: This is where you can really make the dish yours! For red chilaquiles, I love a smoky chipotle salsa. Green? Roasted tomatillo salsa verde all the way. And hey – if store-bought is what you’ve got, I won’t judge. My secret? I doctor up jarred salsa with a squeeze of lime and pinch of cumin.
Bonus tip: Corn tortillas are naturally gluten-free, making this dish perfect for friends with dietary restrictions (just check your salsa ingredients too!).
How to Make Perfect Chilaquiles
Okay, let’s get cooking! Making chilaquiles is honestly easier than you think – it’s just about nailing a few key steps. I’ve burned (and drowned) enough tortilla chips in my day to know exactly what works. Follow along and you’ll have the most amazing chilaquiles ready before your coffee even finishes brewing!
Preparing the Tortilla Chips
First things first – we need crispy golden chips. Here’s how I do it:
Heat about 1/4 cup vegetable oil in a large skillet over medium heat. You’ll know it’s ready (around 350°F if you’re using a thermometer) when a small piece of tortilla sizzles immediately when dropped in. Now, here’s where I messed up at first – don’t overcrowd the pan! Fry the tortilla triangles in batches, about 1-2 minutes per side until they’re golden and crispy. They’ll keep cooking a bit after you take them out, so don’t wait until they’re brown.
Use tongs to transfer them to a paper towel-lined plate to drain. Sprinkle with just a tiny pinch of salt while they’re still hot. This step makes all the difference – properly fried chips won’t get mushy when we add the salsa later.
Simmering the Chilaquiles
Now for the magic part! Pour off all but about 1 tablespoon of oil from your skillet (keep it over medium heat) and add your salsa. If it’s super thick, I sometimes add 1/4 cup of water or broth to thin it slightly – you want it pourable but not watery.
Let the salsa simmer for about 2 minutes to really wake up the flavors, then gently stir in your fried tortilla chips. Here’s the trick: you want every chip coated in salsa, but don’t stir too much or they’ll break! Simmer for about 3-5 minutes total – the chips should soften slightly but still have some crunch when you bite into them. Think of the perfect nacho texture – that’s what we’re going for.
Assembling Your Chilaquiles
Time for the fun part – toppings! Transfer your saucy chips to serving plates immediately (they keep cooking if left in the hot pan). I like to layer:
- Chips and salsa first (obviously)
- A generous sprinkle of queso fresco – it’ll get slightly melty from the heat
- Drizzles of crema in zigzags (use a spoon or squeeze bottle)
- A handful of chopped onion and cilantro for freshness
If you’re adding eggs, fry them sunny-side up in the same skillet while the chips simmer. The runny yolk mixing with the salsa? Absolute heaven. Just slide them right on top when everything’s ready.
Pro tip: Have all your toppings prepped before you start cooking. Chilaquiles wait for no one, and you’ll want to eat them the second they’re assembled!
Pro Tips for the Best Chilaquiles
After countless batches (and a few “learning experiences”), I’ve picked up some tricks that take chilaquiles from good to “oh-my-god-I-need-seconds” amazing:
- Stale is your friend: Day-old tortillas fry up crispier and absorb salsa better without turning to mush. No stale tortillas? Spread fresh ones on a baking sheet and pop them in a 250°F oven for 10 minutes to dry them out.
- Heat control: Salsa too spicy? Stir in a teaspoon of honey or sugar to balance it. Not spicy enough? Add diced jalapeños or a dash of hot sauce when simmering.
- Toppings matter: Keep your crema, onion, and cilantro chilled until the last second—that contrast of cool toppings with warm chilaquiles is everything.
- The golden rule: Serve immediately! Chilaquiles wait for no one—they’re at their perfect texture for about 5 minutes after assembling.
Oh, and one last thing—always make extra. Trust me, you’ll want seconds.
Chilaquiles Variations
One of my favorite things about chilaquiles? They’re like a blank canvas waiting for your personal touch! Here are the variations I make most often when I’m feeling creative (or just cleaning out the fridge):
- Protein power: Shredded chicken is classic – just stir in about 1 cup of cooked, shredded chicken when you add the salsa. Leftover carnitas or chorizo work amazingly too!
- Salsa switcheroo: Try mole sauce for rich depth, or a fruity mango-habanero salsa for sweet heat. My weird-but-wonderful combo? Half red salsa, half green – we call it “divorciados” style.
- Vegan magic: Swap queso fresco for crumbled tofu with nutritional yeast, or that amazing cashew “queso” that’s all over Instagram. Just don’t tell my abuela I suggested it!
The possibilities are endless – once you master the basic recipe, you’ll be dreaming up new versions all week!
Serving Suggestions for Chilaquiles
Chilaquiles are a meal all by themselves, but if you’re feeding a crowd (or just extra hungry), here’s how I love to round out the plate?
For a true Mexican breakfast spread, serve them with creamy refried beans on the side – the cool creaminess balances the salsa’s heat perfectly. A mug of café de olla (that spiced Mexican coffee) cuts through the richness beautifully. And don’t forget fresh fruit! My grandma always served orange slices or watermelon wedges – their sweetness is the perfect palate cleanser between bites of those addictive chilaquiles.
Sunday brunch pro tip: Set up a toppings bar with extra crema, sliced radishes, avocado, and lime wedges so everyone can customize their plate!
Storing and Reheating Chilaquiles
Let’s be real – chilaquiles are absolutely best eaten fresh, when the chips still have that perfect balance of crisp and tender. But life happens! Maybe you got carried away and made a double batch (smart move), or the kids suddenly decided they wanted pancakes instead (rude). Here’s how to handle leftovers without ending up with a soggy mess:
Storing Components Separately
The key is keeping everything apart until you’re ready to eat again. I learned this the hard way after storing fully assembled chilaquiles once – the next day, I had what can only be described as “salsa soup with floating chip bits.” Not ideal.
- Fried chips: Let them cool completely, then store in an airtight container at room temperature for up to 2 days. No fridge – the moisture will make them stale faster.
- Salsa: In a separate container in the fridge for 3-4 days. The flavors actually deepen overnight!
- Toppings: Keep crema, cheese, and chopped veggies in their own containers in the fridge.
Reheating Like a Pro
When those chilaquiles cravings hit again (they will), here’s how to bring everything back to life:
For the chips: Spread them on a baking sheet and pop in a 350°F oven for 3-5 minutes to crisp back up. Watch closely – they go from perfect to burnt fast!
For the salsa: Warm it gently in a saucepan over medium-low heat, adding a splash of water if it’s thickened up in the fridge. Once it’s simmering, proceed exactly like you’re making fresh chilaquiles – add the warmed chips, simmer briefly, then top and serve immediately.
Microwave warning: I know it’s tempting, but nuking assembled chilaquiles leads to sad, rubbery chips. If you absolutely must microwave, do it in 30-second bursts and accept that the texture won’t be the same.
Honestly? Your best bet is just making a fresh batch – it’s so quick anyway! But if you must store leftovers, this method keeps them as delicious as possible.
Chilaquiles Nutrition Information
Now, let’s be honest – when you’re diving into a plate of chilaquiles, you’re probably not counting calories. But since some folks like to know (or maybe you’re just curious), here’s the nutritional breakdown for my version. Remember, these values change based on your exact ingredients – especially how much oil gets absorbed during frying and what kind of salsa you use!
- Serving Size: About half the recipe (trust me, you’ll want the whole thing)
- Calories: Around 450 per serving
- Fat: 25g (that glorious combo of frying oil, cheese, and crema)
- Carbs: 45g (mostly from those delicious corn tortillas)
- Fiber: 6g (thank you, corn tortillas and salsa veggies!)
- Protein: 12g (boost it to 20g if you add both eggs)
Important note: Nutrition values are estimates. Actual values may vary based on ingredients used. I mean, if you go wild with the queso fresco (no judgment here), those numbers will climb! Same if you opt for a lighter hand with the oil or use low-fat crema.
My philosophy? Chilaquiles are meant to be enjoyed, not stressed over. They’re packed with real, wholesome ingredients – corn, tomatoes, onions, cilantro. That’s basically a salad, right? (Okay, maybe not, but let’s just enjoy our delicious Mexican breakfast without guilt!)
Frequently Asked Questions
After years of making (and eating!) chilaquiles, I’ve heard every question under the sun about this dish. Here are the ones that come up most often, along with my hard-won answers:
Can I bake instead of fry tortillas?
Absolutely! My abuela would clutch her pearls, but I’ll let you in on my baked chip secret. Spread tortilla triangles on a baking sheet, spray lightly with oil, and bake at 375°F for 8-10 minutes, flipping halfway. They won’t be quite as rich as fried, but they’ll still work beautifully in chilaquiles. Just make sure to use day-old tortillas – fresh ones dry out too much when baked.
How to make chilaquiles less soggy?
Ah, the eternal chilaquiles struggle! Here’s what I’ve learned: 1) Fry your chips until they’re truly golden (pale chips turn mushy fast), 2) Don’t drown them in salsa – you want enough to coat but not swim, and 3) Serve immediately! Those chips keep absorbing liquid the longer they sit. My trick? I always make the salsa a tiny bit thicker than I think it should be – it thins out when it hits the hot chips.
Best salsa for chilaquiles?
This is like asking someone to pick a favorite child! For red chilaquiles, I adore a smoky chipotle salsa or a classic roasted tomato version. Green? Tomatillo salsa verde all the way – bonus points if it’s homemade. The key is using a salsa you’d happily eat with a spoon! If using store-bought, I always jazz it up with extra garlic, a squeeze of lime, and sometimes a pinch of cumin. Pro tip: Blend your salsa smooth if you dislike big chunks interfering with that perfect chip coverage.
Can I make chilaquiles ahead?
You can prep components ahead (fried chips keep 2 days in an airtight container, salsa keeps 3-4 days refrigerated), but assemble just before serving. I tried freezing assembled chilaquiles once – let’s just say it was a tragic waste of good tortillas. The texture turns into something resembling wet cardboard. Not recommended!
Are chilaquiles breakfast or dinner food?
Yes! In Mexico, we eat them whenever the craving hits. Breakfast chilaquiles often come with eggs, while dinner versions might include shredded chicken or beef. My personal rule? If the sun’s up, add a fried egg. If it’s dark out, maybe some leftover carnitas. Either way, you win!
Print
Perfect Chilaquiles Recipe Ready in Just 25 Minutes
- Total Time: 25 minutes
- Yield: 2 servings 1x
- Diet: Vegetarian
Description
Chilaquiles are a traditional Mexican breakfast dish made with fried tortilla chips simmered in salsa and topped with cheese, crema, and other garnishes.
Ingredients
- 8 corn tortillas, cut into triangles
- 2 cups red or green salsa
- 1/4 cup vegetable oil
- 1/2 cup crumbled queso fresco
- 1/4 cup Mexican crema
- 1/4 cup chopped white onion
- 1/4 cup chopped cilantro
- 2 fried eggs (optional)
Instructions
- Heat oil in a skillet over medium heat.
- Fry tortilla triangles until crispy, about 3 minutes per side.
- Drain excess oil and add salsa to the skillet.
- Simmer for 5 minutes until tortillas soften slightly.
- Top with queso fresco, crema, onion, and cilantro.
- Add fried eggs if desired.
- Serve immediately.
Notes
- Use day-old tortillas for best results.
- Adjust salsa spiciness to your preference.
- Add shredded chicken for a heartier version.
- Prep Time: 10 minutes
- Cook Time: 15 minutes
- Category: Breakfast
- Method: Stovetop
- Cuisine: Mexican
Nutrition
- Serving Size: 1/2 recipe
- Calories: 450
- Sugar: 5g
- Sodium: 800mg
- Fat: 25g
- Saturated Fat: 8g
- Unsaturated Fat: 15g
- Trans Fat: 0g
- Carbohydrates: 45g
- Fiber: 6g
- Protein: 12g
- Cholesterol: 220mg