Skip to content
Ah, childhood! Those were the days when the world seemed as vast as the sky and as sweet as a candy store. I remember spending countless summer afternoons in my grandmother’s cozy kitchen, where the air was always filled with the comforting aroma of freshly baked treats. One of my fondest memories is of her Rice Krispie treats, which she made with a twinkle in her eye and a sprinkle of love. The crackling sound of the cereal as it met the gooey marshmallow was like music to my ears. It was a symphony of sweetness that danced on my taste buds and left me craving more. As a child, I would often sneak into the kitchen, hoping to catch a glimpse of the magic happening. My grandmother would smile knowingly, handing me a spoonful of the sticky mixture. It was pure bliss! Those moments were more than just about the treats; they were about the warmth, the laughter, and the stories shared over a simple yet delightful dessert. Little did I know, these cherished memories would later inspire a culinary adventure of my own.
The Inspiration for Rice Krispie Ice Cream
Fast forward to a few years ago, when I found myself reminiscing about those delightful Rice Krispie treats. I wanted to recreate that joy, but with a twist that would surprise and delight my family. That’s when the idea of Rice Krispie Ice Cream was born. It was a lightbulb moment, like a spark of creativity that ignited my passion for experimenting in the kitchen. I imagined the crispy, chewy texture of the Rice Krispie treats blending harmoniously with the creamy, smoothness of ice cream. It was a match made in dessert heaven! I set out on a mission to bring this vision to life, armed with my grandmother’s recipe and a scoop of imagination. The result was a delightful concoction that captured the essence of my childhood memories while adding a modern twist. Creating Rice Krispie Ice Cream became more than just a recipe; it was a journey back in time, a way to relive those precious moments with my grandmother. Each bite is a reminder of the love and joy that filled her kitchen, and now, I get to share that with my own family and friends. So, welcome to my kitchen, where every scoop of Rice Krispie Ice Cream is a celebration of sweet memories and new beginnings.
Ingredients for Rice Krispie Ice Cream

Main Ingredients
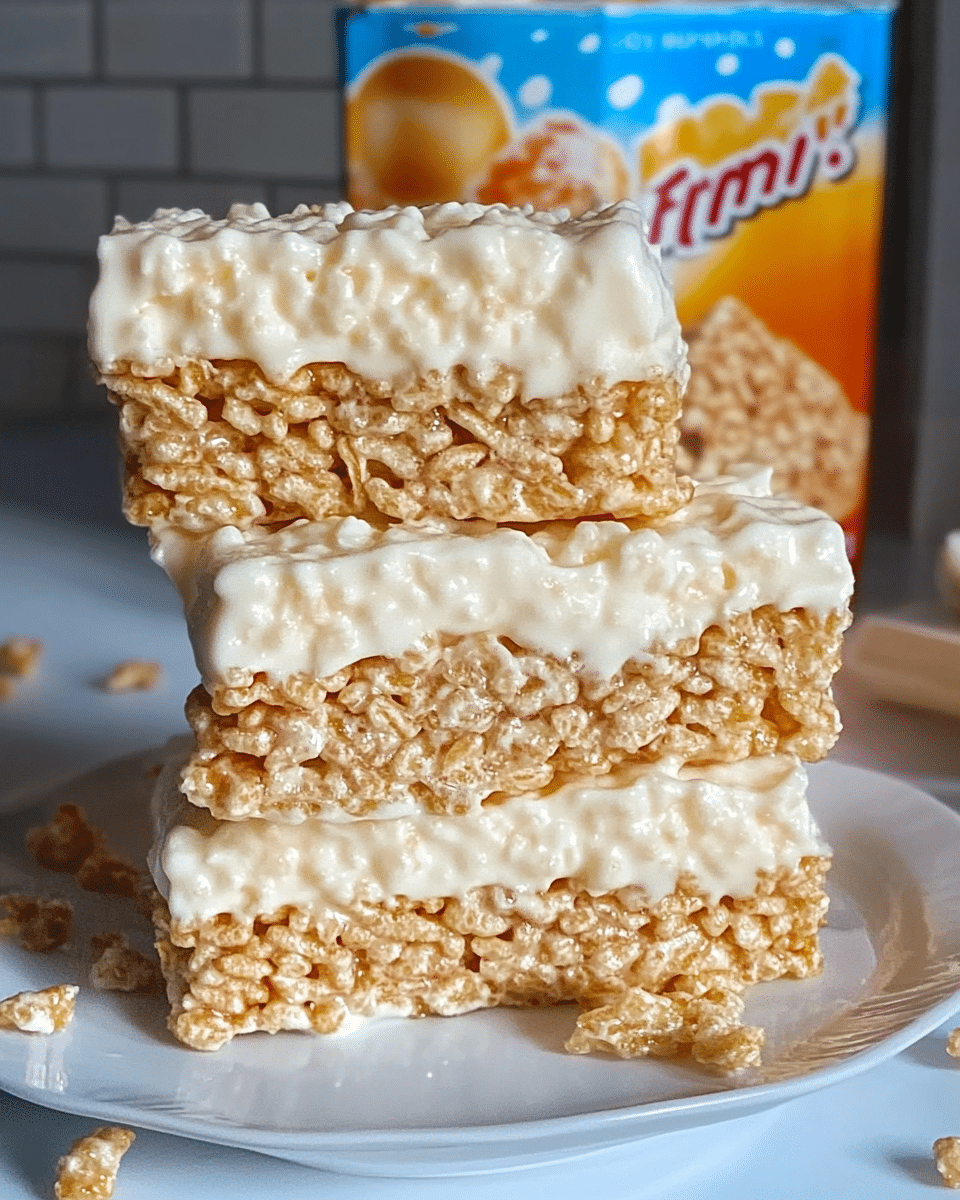
When it comes to crafting the perfect Rice Krispie Ice Cream, the ingredients are like the cast of a beloved play, each playing a crucial role in the final performance. First, you’ll need the star of the show: Rice Krispies cereal. Its light, crispy texture is the foundation of our dessert. Next, gather some marshmallows, those fluffy clouds of sweetness that will bind everything together. You’ll also need a generous scoop of vanilla ice cream, the creamy canvas upon which our masterpiece will be painted. Lastly, a touch of butter will add a rich, velvety finish to the mix. Here’s a quick list to keep you on track: – **Rice Krispies cereal**: 3 cups – **Marshmallows**: 1 bag (10 oz) – **Vanilla ice cream**: 1 quart – **Butter**: 3 tablespoons These ingredients are the heart and soul of our Rice Krispie Ice Cream, each one bringing its own unique flavor and texture to the table.
Optional Add-ons
Now, if you’re anything like me, you love to add a little extra flair to your creations. Optional add-ons are like the sprinkles on a cupcake, adding a dash of personality and pizzazz. Consider tossing in some chocolate chips for a touch of decadence, or perhaps a handful of chopped nuts for a delightful crunch. If you’re feeling adventurous, a swirl of caramel or a sprinkle of sea salt can elevate your ice cream to new heights. Here are some ideas to get your creative juices flowing: – **Chocolate chips**: 1/2 cup – **Chopped nuts**: 1/2 cup (almonds or pecans work well) – **Caramel sauce**: 1/4 cup – **Sea salt**: a pinch These add-ons are like the cherry on top, allowing you to customize your Rice Krispie Ice Cream to suit your taste buds. Whether you keep it classic or go wild with flavors, the choice is yours.
How to Prepare Rice Krispie Ice Cream

Step 1: Preparing the Rice Krispie Base
Alright, let’s dive into the fun part—making the Rice Krispie base! Picture this: a pot on the stove, butter melting like a golden sunset, and marshmallows slowly transforming into a gooey, sweet cloud. Start by melting the butter in a large saucepan over low heat. Once it’s melted, add the marshmallows and stir until they’re completely melted and blended with the butter. The aroma will transport you back to those childhood days, I promise! Next, remove the saucepan from the heat and gently fold in the Rice Krispies cereal. Stir until every piece is coated in the marshmallow mixture. It’s like giving each cereal piece a warm, sugary hug. Spread this mixture evenly into a greased baking dish and let it cool. This will be the crunchy, chewy foundation of our ice cream adventure.
Tips for Step 1
– **Low and Slow**: Keep the heat low to prevent the marshmallows from burning. – **Grease is Key**: Grease your spatula or hands to prevent sticking when spreading the mixture. – **Even Spread**: Press the mixture evenly in the dish for a uniform base.
Step 2: Creating the Ice Cream Mixture
Now, onto the creamy dream! Take your vanilla ice cream out of the freezer and let it soften a bit. You want it to be scoopable but not melted. In a large mixing bowl, combine the softened ice cream with any optional add-ons you fancy. Imagine the chocolate chips and nuts swirling in like a delicious dance party. Mix until everything is well combined, and the add-ons are evenly distributed.
Tips for Step 2
– **Softening Time**: Let the ice cream sit out for about 10 minutes to soften. – **Mix Gently**: Use a spatula to fold in add-ons to keep the ice cream fluffy. – **Taste Test**: Sneak a taste to ensure the flavors are just right!
Step 3: Combining and Freezing
Here’s where the magic happens! Take your cooled Rice Krispie base and break it into bite-sized pieces. Gently fold these pieces into the ice cream mixture, ensuring they’re evenly distributed. It’s like creating a mosaic of flavors and textures. Once combined, transfer the mixture into a freezer-safe container, smoothing the top with a spatula. Pop the container into the freezer and let it freeze for at least 4 hours, or until firm. The anticipation is part of the fun, like waiting for a surprise gift!
Tips for Step 3
– **Even Distribution**: Ensure Rice Krispie pieces are spread throughout for consistent texture. – **Freezing Time**: Allow ample time for the ice cream to set properly. – **Cover Up**: Use a lid or plastic wrap to prevent freezer burn.
With these steps, you’re well on your way to creating a delightful batch of Rice Krispie Ice Cream. Each step is a chance to infuse a bit of your personality into the dessert, making it uniquely yours. So, roll up your sleeves, embrace the mess, and enjoy the process. After all, the best part of cooking is the journey, not just the destination!
FAQ About Rice Krispie Ice Cream
Can I use store-bought ice cream for this recipe?
Absolutely! Using store-bought ice cream is a fantastic shortcut that saves time without sacrificing flavor. I often opt for a high-quality vanilla ice cream as the base. It provides a creamy canvas that pairs beautifully with the crispy Rice Krispie pieces. If you’re feeling adventurous, try experimenting with different flavors like chocolate or caramel swirl. The key is to let the ice cream soften slightly before mixing in the Rice Krispie base and any add-ons. This ensures everything blends smoothly, creating a harmonious dessert that’s both convenient and delicious.
How long can I store Rice Krispie Ice Cream in the freezer?
Rice Krispie Ice Cream can be stored in the freezer for up to two weeks. To maintain its delightful texture and flavor, make sure to keep it in an airtight container. This prevents freezer burn and keeps the ice cream fresh. I like to label the container with the date it was made, so I know exactly how long it’s been in the freezer. While it might be tempting to keep it longer, the best flavors and textures are enjoyed within that two-week window. Trust me, once you take a bite, it won’t last that long anyway!
What are some variations I can try with this recipe?
The beauty of Rice Krispie Ice Cream lies in its versatility. You can customize it to suit your taste buds or the occasion. For a chocolate lover’s dream, add cocoa powder to the marshmallow mixture or use chocolate-flavored Rice Krispies. If you’re a fan of fruity flavors, mix in some freeze-dried strawberries or blueberries. For a nutty twist, try adding peanut butter to the marshmallow mixture or sprinkle in some crushed peanuts. The possibilities are endless, and each variation offers a new adventure for your taste buds. Let your imagination run wild and create a version that’s uniquely yours!
Is there a way to make this recipe dairy-free?
Yes, indeed! Making a dairy-free version of Rice Krispie Ice Cream is easier than you might think. Simply swap out the regular butter for a plant-based alternative, and use dairy-free marshmallows. For the ice cream, there are plenty of delicious non-dairy options available, such as coconut milk or almond milk-based ice creams. These alternatives provide a creamy texture and rich flavor that pairs perfectly with the Rice Krispie base. With these simple substitutions, you can enjoy a delightful, dairy-free treat that everyone can savor.
Print
Rice Krispie Ice Cream: Discover a Sweet Childhood Twist!
- Total Time: 4 hours 20 minutes
- Yield: 8 servings
- Diet: Vegetarian
Description
Rice Krispie Ice Cream is a delightful twist on a classic childhood treat, combining the crispy, chewy texture of Rice Krispie treats with the creamy smoothness of vanilla ice cream.
Ingredients
Rice Krispies cereal: 3 cups
Marshmallows: 1 bag (10 oz)
Vanilla ice cream: 1 quart
Butter: 3 tablespoons
Optional: Chocolate chips: 1/2 cup
Optional: Chopped nuts: 1/2 cup (almonds or pecans work well)
Optional: Caramel sauce: 1/4 cup
Optional: Sea salt: a pinch
Instructions
1. Melt butter in a large saucepan over low heat. Add marshmallows and stir until melted and blended with butter.
2. Remove from heat and fold in Rice Krispies cereal until coated. Spread mixture into a greased baking dish and let cool.
3. Soften vanilla ice cream slightly. In a large bowl, combine softened ice cream with optional add-ons.
4. Break cooled Rice Krispie base into pieces and fold into ice cream mixture. Transfer to a freezer-safe container.
5. Freeze for at least 4 hours or until firm.
Notes
Keep the heat low to prevent marshmallows from burning.
Grease your spatula or hands to prevent sticking when spreading the mixture.
Let the ice cream sit out for about 10 minutes to soften before mixing.
Ensure Rice Krispie pieces are spread throughout for consistent texture.
Store in an airtight container to prevent freezer burn.
- Prep Time: 10 minutes
- Cook Time: 10 minutes
- Category: Dessert
- Method: No-Bake
- Cuisine: American
Nutrition
- Serving Size: 1 serving
- Calories: 250
- Sugar: 20g
- Sodium: 150mg
- Fat: 12g
- Saturated Fat: 7g
- Unsaturated Fat: 3g
- Trans Fat: 0g
- Carbohydrates: 32g
- Fiber: 1g
- Protein: 3g
- Cholesterol: 30mg