Skip to content
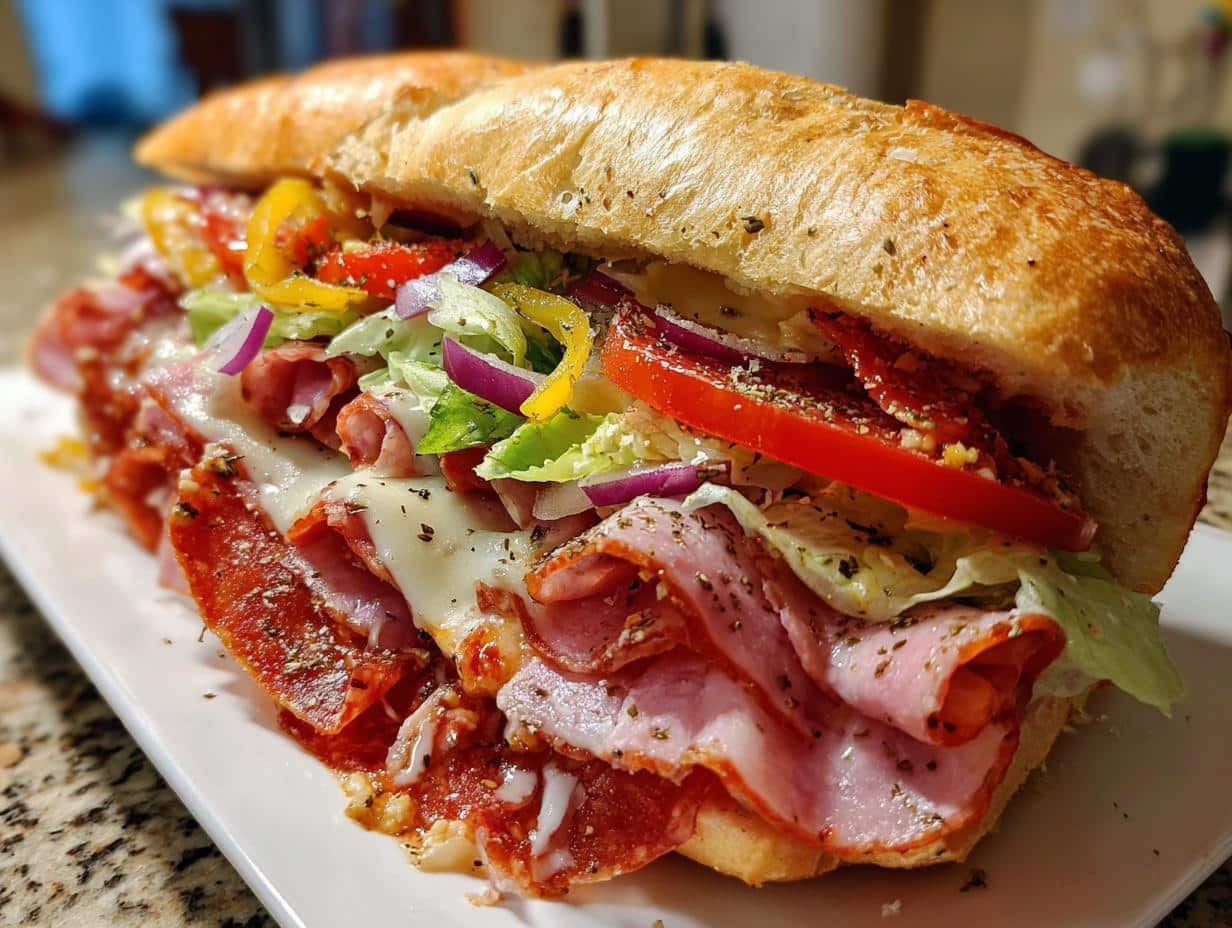
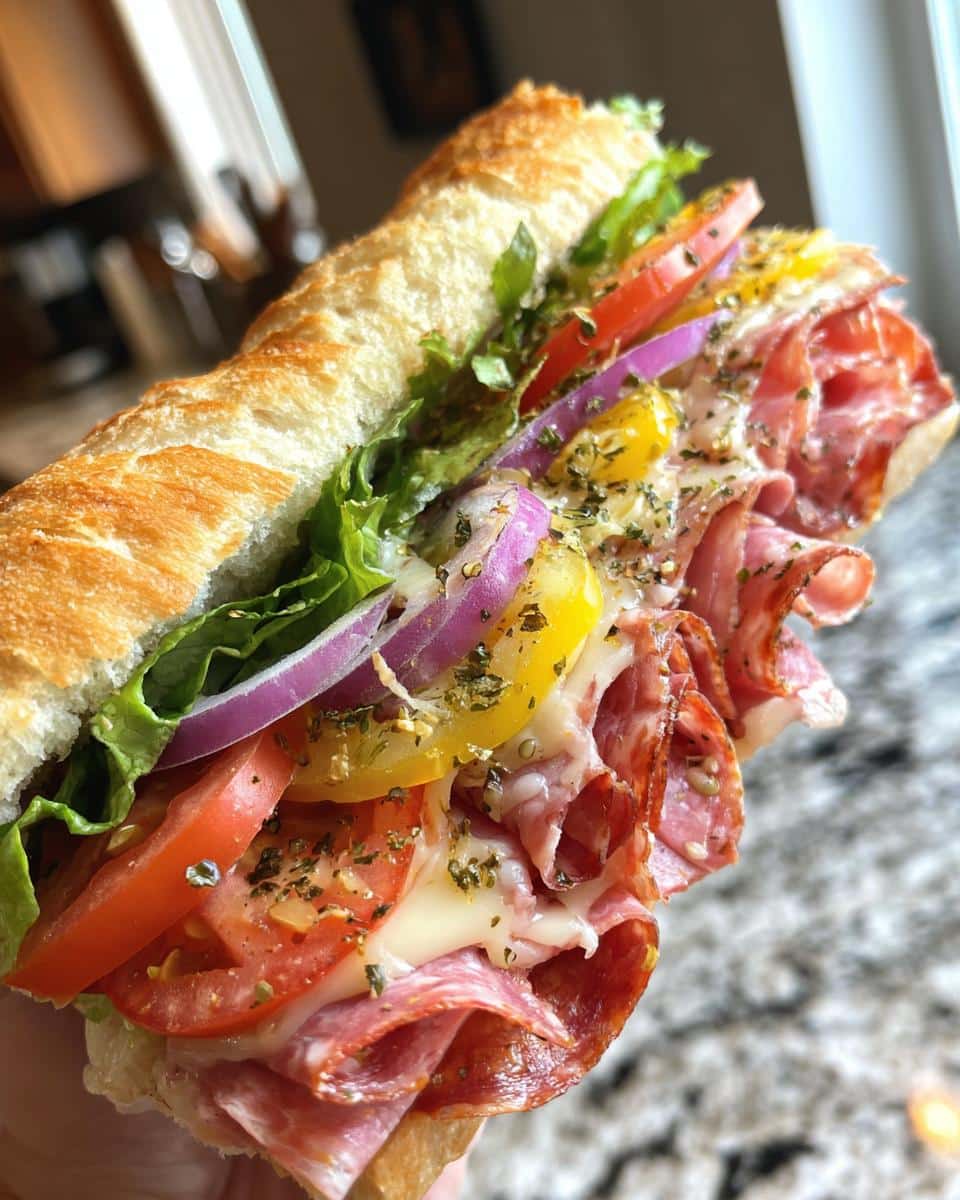
I still remember the first time I bit into a truly great Italian grinder sandwich – it was love at first taste! Back in college, my roommate dragged me to this tiny deli near campus that smelled like heaven. The counter guy piled on meats with this dramatic flair, pressing everything together with his hands wrapped in deli paper. When he handed me that sandwich wrapped in parchment, the juices were already soaking through in the most tantalizing way. One bite and I was hooked – the perfect balance of salty meats, creamy cheese, and that tangy dressing cutting through it all.
Now, after years of perfecting my own version (and eating way too many test sandwiches), I can confidently say this Italian grinder sandwich recipe captures that magic. As someone who’s worked in Italian delis and tested countless variations, I know exactly what makes the ultimate grinder – from the bread crispness to how thin you slice those peppers. Trust me, once you try this loaded masterpiece, you’ll never look at cold cuts the same way again!
Why You’ll Love This Italian Grinder Sandwich
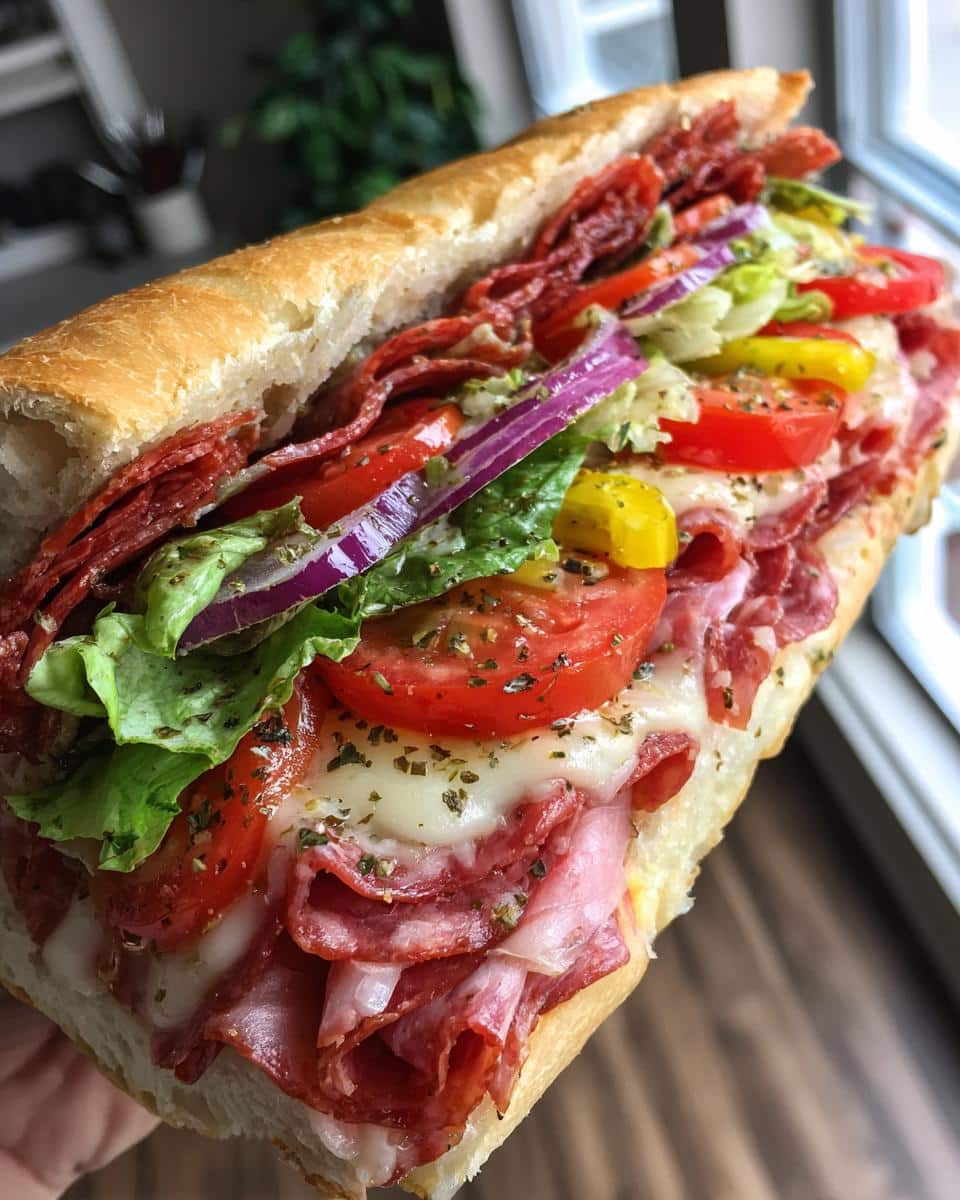
Oh my goodness, where do I even start? This Italian grinder sandwich is everything you want in a meal – easy enough for a quick lunch but impressive enough to serve at parties. First off, it’s ridiculously simple to make. No cooking required, just layer and go! But don’t let that fool you – the flavors are absolutely authentic. That perfect combo of salty meats, creamy provolone, and tangy dressing will make you feel like you’re in a New York deli.
And here’s the best part – it feeds a crowd without breaking the bank. I make these for game days, picnics, or whenever I need to feed hungry teenagers. The ingredients are flexible too. Out of banana peppers? Use roasted reds instead. Want it spicier? Add some hot capicola. Every bite delivers that perfect crunch from the fresh veggies against the soft bread. Seriously, this sandwich never disappoints!
Ingredients for the Ultimate Italian Grinder Sandwich
Listen, I know what you’re thinking – “It’s just a sandwich, how complicated can the ingredients be?” But trust me, the magic is in the details here. Every item matters when you’re building the ultimate Italian grinder. I learned this the hard way after one too many sad, soggy sandwiches in my early cooking days!
The Meats (Your Flavor Foundation)
You’ll want 1/4 pound each of three key meats – and yes, they must be sliced thin at the deli counter (none of that pre-packaged stuff!). My holy trinity:
- Salami (get the good Italian kind with that perfect marbling of fat)
- Ham (I prefer Black Forest for its slightly smoky taste)
- Pepperoni (for that little kick of spice in every bite)
The Cheese That Brings It All Together
Don’t skimp here – 1/4 pound of real provolone is non-negotiable. Ask for it sliced medium-thick so it doesn’t disappear among the other ingredients. The creaminess balances all those salty meats beautifully.
Fresh Veggies (The Crunch Factor)
- 1/2 cup shredded iceberg lettuce (it stays crisp longer than other types)
- 1/2 cup thinly sliced tomatoes (remove the seeds so your bread doesn’t get soggy)
- 1/4 cup red onions sliced paper-thin (soak them in cold water for 5 minutes to tame the bite)
- 1/4 cup banana peppers (these tangy guys are the secret weapon!)
The Sauces and Seasonings
This is where personality comes in! You’ll need:
- 3 tablespoons mayonnaise (spread on both sides to create a moisture barrier)
- 2 tablespoons zesty Italian dressing (I use homemade, but store-bought works in a pinch)
- 1 teaspoon dried oregano (rub it between your fingers to wake up the flavor)
- 1/2 teaspoon freshly ground black pepper
The Bread – Your Edible Plate
One 12-inch loaf of fresh Italian bread – and I mean bakery-fresh, still-warm-if-possible bread. The crust should crackle when you squeeze it, with a soft interior that won’t fight your teeth. This is literally the foundation holding your masterpiece together – never compromise here!
Equipment You’ll Need
Here’s the beautiful thing about making an Italian grinder sandwich – you don’t need any fancy gadgets! Just grab these basic kitchen tools that you probably already have:
- A serrated bread knife (trust me, trying to cut fresh Italian bread with a regular knife is a recipe for squashed disaster)
- A sturdy cutting board (preferably one with a juice groove to catch any drips)
- A small spoon for hollowing out the bread (I use my favorite teaspoon that’s seen more sandwich action than I can count)
- Measuring spoons for those perfect seasoning amounts (though I’ll admit, I often eyeball the oregano after years of making this)
- Parchment paper or deli wrap for serving (because presentation matters, and nobody likes a sandwich that falls apart in their hands!)
That’s it! No special presses or machines required – just good old-fashioned sandwich assembly. Though I will say, having a bread box helps keep your Italian loaf fresh if you’re not using it right away. But really, who can resist digging in immediately?
How to Make the Ultimate Italian Grinder Sandwich
Okay, sandwich artists – this is where the magic happens! Making the perfect Italian grinder is all about technique, and after years of trial and error (and many messy failed attempts), I’ve nailed down the foolproof method. Follow these steps and you’ll have sandwich magic in minutes!
Preparing the Bread
First things first – let’s get that bread ready to be the star of the show. Take your fresh Italian loaf and slice it lengthwise with your serrated knife, but don’t cut all the way through! Leave about 1/4 inch connected so it opens like a book. Now, here’s my secret: use a small spoon to gently remove some of the soft interior bread (save it for breadcrumbs!). You want to create a shallow “boat” – this prevents the sandwich from being too bready and makes room for all those delicious fillings.
Layering Meats and Cheeses
Time to build our flavor foundation! Spread 1 1/2 tablespoons of mayonnaise on each side of the bread – this creates a protective moisture barrier. Now the fun part: start layering your meats in this specific order:
- Salami first (its fat content helps it stick nicely to the bread)
- Ham next (fold each slice loosely for texture)
- Pepperoni last (the spice shines through this way)
Top your meat mountain with the provolone cheese slices – I like to slightly overlap them so every bite gets cheesy goodness. Press down gently but firmly with your palms to compact everything slightly.
Adding Vegetables and Seasonings
Now for the fresh crunch! Layer on your veggies in this order:
- Shredded lettuce first (it acts as a bed for other toppings)
- Thin tomato slices (remember – seed side down to prevent sogginess!)
- Those paper-thin red onion slices (they should be translucent)
- Banana peppers scattered evenly
Drizzle the Italian dressing across the top, then sprinkle with oregano and black pepper. Here’s my pro tip: let the sandwich sit for 10 minutes before cutting – this lets the flavors mingle and the bread soak up just enough dressing without getting soggy.
Pro Tips for the Perfect Italian Grinder Sandwich
After making approximately a million of these sandwiches (okay, maybe a slight exaggeration), I’ve picked up some game-changing tricks that take an Italian grinder from good to “Oh my goodness, give me the recipe!” levels of delicious. Here are my can’t-live-without secrets:
Bread Freshness is Everything
I can’t stress this enough – your sandwich is only as good as your bread! That Italian loaf should be so fresh it practically sings when you squeeze it. My test? The crust should crackle and the inside should spring back when pressed. If your bread feels at all stale, revive it by spritzing with water and popping in a 350°F oven for 5 minutes. And whatever you do, don’t refrigerate the bread – that’s the fast track to sad, rubbery texture!
The Art of the Press
Here’s where most people go wrong – they’re too gentle! After layering, I wrap my sandwich tightly in parchment paper and give it a firm (but not Hulk-smash) press with my palms. This helps all the flavors marry together. Then I place a heavy skillet on top for 2-3 minutes. That gentle pressure makes every bite cohesive without squishing the life out of your beautiful layers. Pro move: if you’re packing these for later, the weight helps everything stay put!
Let It Rest (If You Can Wait)
I know it’s tempting to dive right in, but trust me – giving your sandwich 10 minutes to rest makes all the difference. This short wait allows the dressing to mingle with the meats, the cheese to get slightly melty from contact, and the bread to absorb just enough flavor without getting soggy. It’s like letting a steak rest! I use this time to wipe down the counter (okay, who am I kidding – I use this time to stare hungrily at my creation). The flavor transformation in those few minutes is honestly magical.
Variations and Substitutions
Look, I get it – sometimes you don’t have every ingredient on hand, or maybe you want to put your own spin on this Italian grinder masterpiece. That’s the beauty of sandwich artistry! Over the years, I’ve tried countless variations (some more successful than others – let’s not talk about the avocado incident). Here are my favorite swaps that still deliver amazing flavor:
Meat Swaps That Actually Work
Not a fan of ham? No problem! Try these alternatives:
- Turkey (go for smoked for extra depth)
- Capicola (if you want that lovely spicy kick)
- Mortadella (for a subtle nutty flavor)
- Chicken cutlets (breaded and sliced thin for crunch)
And if you’re feeling fancy, prosciutto adds incredible richness – just drape it delicately over the other meats rather than layering thickly.
Cheese Alternatives
While provolone is classic, these cheeses shine too:
- Mozzarella (fresh or smoked)
- Sharp cheddar (for a bolder taste)
- Fontina (melts beautifully)
- Swiss (that nutty flavor pairs well)
Just steer clear of super soft cheeses like brie – they’ll disappear into the sandwich.
Vegetable Variations
The veggie mix is where you can really get creative:
- Roasted red peppers instead of banana peppers (so good!)
- Shaved fennel for crunch with a licorice hint
- Pickled jalapeños if you like more heat
- Cucumber slices for extra crunch
- Spinach or arugula instead of lettuce
My golden rule? Keep veggies crisp and sliced thin so they don’t dominate.
Sauce Twists
The dressing can change the whole personality of your sandwich:
- Pesto mayo (just mix 2 tbsp pesto into your mayo)
- Balsamic glaze drizzle instead of Italian dressing
- Garlic aioli for serious flavor
- Hot honey for sweet heat
Just remember – the sauce should enhance, not drown your ingredients!
Bread Options
In a pinch, you can use:
- Ciabatta (though it’s denser)
- French bread (close cousin to Italian)
- Hoagie rolls (for individual portions)
- Focaccia (cut thick slices horizontally)
Whatever you choose, make sure it’s sturdy enough to hold all those glorious fillings without falling apart at first bite!
Serving and Storing Your Italian Grinder Sandwich
Okay, here’s the moment we’ve been working toward – sandwich time! But wait, don’t just slap this masterpiece on any old plate. After perfecting every layer, you want to serve your Italian grinder with the same care you put into making it. And if (miraculously) you have leftovers, I’ll share my tricks for keeping them tasty.
The Right Way to Serve
First rule: serve this baby immediately after assembling! That crisp bread and fresh veggies are at their prime in those first glorious minutes. I like to wrap the whole sandwich snugly in parchment paper – not only does it look deli-authentic, but it keeps everything together when cutting. Use that serrated knife to slice diagonally into portions (the angled cuts just look fancier!). Pro tip: have napkins ready – this sandwich loves to drip its deliciousness!
Presentation Matters
For parties, I arrange the slices on a wooden board with the fillings facing up so everyone can see those beautiful layers. Toss some extra banana peppers and olives around for color, maybe a small bowl of extra dressing on the side for dippers. If it’s just for me? Well… let’s be honest, I’ve been known to skip the plate entirely and eat over the parchment like a true sandwich savage!
Storing Leftovers (If Any!)
Now, I’ll be shocked if you actually have leftovers, but just in case: wrap any remaining sandwich tightly in plastic wrap or foil and refrigerate for up to 24 hours. The bread will soften, but here’s my revival trick – pop it in a 375°F oven for 5 minutes to crisp up again. The veggies won’t be quite as fresh, so I sometimes add new ones when reheating. Fair warning: the longer it sits, the more the dressing soaks in, so next-day sandwiches have a different (but still delicious) texture.
Make-Ahead Strategy
Want to prep for a party? Here’s what works: assemble everything except the dressing and veggies up to 8 hours ahead. Wrap tightly and refrigerate. Right before serving, add your fresh toppings and dressing. This keeps the bread from getting soggy while still letting you do most of the work in advance. Smart, right?
Nutritional Information
Okay, let’s talk numbers – but before we dive in, remember this is just a general guide! Exact nutrition values can vary based on your specific ingredients (like how thick your cheese slices are or which brand of salami you use). That said, here’s what one quarter of this glorious Italian grinder sandwich typically provides:
- Calories: About 520 (but honestly, who’s counting when it tastes this good?)
- Protein: 25g (all those tasty meats really add up!)
- Carbs: 42g (mostly from that delicious Italian bread)
- Fiber: 3g (thank you, fresh veggies!)
- Sugar: 4g (mostly natural from the tomatoes and dressing)
- Fat: 28g (10g saturated – that’s the cheese and meats doing their thing)
- Sodium: 1280mg (it’s a salty sandwich – maybe drink extra water!)
- Cholesterol: 65mg
A little disclaimer from your friendly neighborhood sandwich enthusiast: these figures are estimates based on standard ingredients. If you use low-sodium meats, fat-free cheese, or whole wheat bread, your numbers will change. The same goes if you load up on extra banana peppers or go light on the mayo. The most important thing? Enjoy every delicious bite!
Frequently Asked Questions
Can I make the Italian grinder sandwich ahead of time?
Oh, I get this question all the time! Here’s the deal – you can sort of prep ahead, but with some smart tricks. Assemble the meats, cheese and mayo on the bread up to 8 hours in advance, wrap tightly in plastic, and refrigerate. But wait to add the veggies and dressing until right before serving! This keeps your bread from turning into a sad, soggy mess. Trust me, I learned this the hard way after bringing a fully-assembled sandwich to a picnic once. Let’s just say… it wasn’t pretty!
What’s the best bread substitute if I can’t find Italian bread?
Okay, first – try really hard to find proper Italian bread! But if you’re truly stuck, these alternatives work in a pinch: a good crusty French baguette (slightly denser but similar), ciabatta rolls (great for individual portions), or even sturdy hoagie rolls. The key is something crusty on the outside with enough structure to hold all those fillings without collapsing. Whatever you do, avoid soft sandwich bread – it’ll absolutely disintegrate under all those delicious layers!
Are there good vegetarian options for this sandwich?
Absolutely! My vegetarian friends go crazy for this version: replace the meats with grilled portobello mushrooms (slice them thick!), roasted red peppers, and marinated artichoke hearts. For the cheese, I love smoked provolone or fresh mozzarella. The banana peppers and dressing stay the same – they’re already veggie-friendly! You could even add some sliced avocado (just don’t tell my Italian grandmother I suggested that). It’s shockingly satisfying – even my meat-loving husband steals bites of my veggie version!
Ready to Make Your Ultimate Italian Grinder Sandwich?
Well, my sandwich-loving friend, you’re officially armed with all my hard-earned Italian grinder wisdom! I can practically smell that perfect combination of crusty bread, garlicky salami, and tangy dressing from here. Whether you’re making this for a crowd or just treating yourself (no judgment – I’ve definitely eaten a whole one by myself), I know it’s going to be amazing.
When you take that first glorious bite, close your eyes and listen – you might just hear the sounds of a bustling New York deli in the background. Or at least the sound of your own satisfied chewing! This sandwich has brought so much joy to my family’s table, and I’d love to hear how it turns out for you. Did you add extra peppers? Try a different cheese? However you make it your own, I hope it becomes a regular in your recipe rotation like it is in mine.
One last tip before you go – make two. Trust me. Because once people taste this, they’ll be begging for your “secret” recipe. And hey, if you’ve got any leftover meats and cheeses? That’s just tomorrow’s lunch sorted. Happy sandwich-making! For more recipe ideas, check out our Pinterest page.
Print
Irresistible Ultimate Italian Grinder Sandwich Recipe You’ll Crave
- Total Time: 15 minutes
- Yield: 4 servings 1x
- Diet: Low Lactose
Description
A delicious Italian grinder sandwich packed with flavorful meats, cheeses, and fresh vegetables.
Ingredients
- 1 loaf Italian bread (12 inches)
- 1/4 lb sliced salami
- 1/4 lb sliced ham
- 1/4 lb sliced pepperoni
- 1/4 lb sliced provolone cheese
- 1/2 cup shredded lettuce
- 1/2 cup sliced tomatoes
- 1/4 cup sliced red onions
- 1/4 cup banana peppers
- 3 tbsp mayonnaise
- 2 tbsp Italian dressing
- 1 tsp oregano
- 1/2 tsp black pepper
Instructions
- Slice the Italian bread lengthwise and hollow out some of the soft interior.
- Spread mayonnaise on both sides of the bread.
- Layer salami, ham, and pepperoni on the bottom half.
- Add provolone cheese on top of the meats.
- Top with lettuce, tomatoes, red onions, and banana peppers.
- Drizzle Italian dressing and sprinkle oregano and black pepper.
- Close the sandwich and press lightly.
- Cut into 4 portions and serve immediately.
Notes
- For best results, use fresh Italian bread.
- Add more banana peppers for extra spice.
- Let the sandwich sit for 10 minutes before cutting to let flavors meld.
- Prep Time: 15 minutes
- Cook Time: 0 minutes
- Category: Sandwich
- Method: No-Cook
- Cuisine: Italian-American
Nutrition
- Serving Size: 1/4 sandwich
- Calories: 520
- Sugar: 4g
- Sodium: 1280mg
- Fat: 28g
- Saturated Fat: 10g
- Unsaturated Fat: 15g
- Trans Fat: 0g
- Carbohydrates: 42g
- Fiber: 3g
- Protein: 25g
- Cholesterol: 65mg