Skip to content

There’s something magical about the first crisp autumn morning when I pull out my mixing bowls for pumpkin cheesecake season. The scent of cinnamon and nutmeg swirling through my kitchen instantly transports me back to childhood – standing on a stool next to my mom as she taught me to fold pumpkin puree into the creamy cheesecake filling. This velvety pumpkin cheesecake became our family’s edible autumn hug, with its rich spiced crust giving way to the silkiest pumpkin-spice filling you’ll ever taste. After years of tweaking (and countless Thanksgiving taste tests), I’ve perfected the balance of sweet, spicy, and tangy that makes this dessert disappear faster than fallen leaves in a strong wind.
Why You’ll Love This Pumpkin Cheesecake
This isn’t just any pumpkin cheesecake—it’s the one you’ll crave all season. Here’s why:
- Creamy dreamy texture: The perfect balance of velvety cheesecake and spiced pumpkin that melts on your tongue
- Foolproof method: No fancy techniques—just straightforward steps anyone can follow
- Holiday showstopper: That gorgeous orange hue makes it the centerpiece of any fall gathering
- Make-ahead magic: Tastes even better after chilling overnight (if you can wait that long!)
- Nostalgia in every bite: The cozy flavors of autumn wrapped up in one perfect dessert
Trust me, this is the pumpkin cheesecake recipe you’ll come back to year after year. It’s already become my family’s most-requested fall treat!
Ingredients for Pumpkin Cheesecake
Gather these simple ingredients – I promise you probably have most in your pantry already! The magic happens when these humble items come together:
- 1 1/2 cups graham cracker crumbs (about 10 full sheets, finely crushed – I use a ziplock bag and rolling pin)
- 1/4 cup granulated sugar (for that perfect crust sweetness)
- 1/2 tsp ground cinnamon (the secret warmth in every bite)
- 1/4 tsp ground nutmeg (freshly grated if you’re feeling fancy!)
- 1/3 cup melted butter (salted or unsalted both work – I use what’s in my fridge)
- 2 (8 oz) packages cream cheese, softened (this is CRUCIAL – more on that below)
- 1 cup granulated sugar (yes, more sugar – trust the process)
- 1 tsp vanilla extract (the good stuff if you have it)
- 3 large eggs, room temperature (they incorporate so much better this way)
- 1 cup canned pumpkin puree (not pumpkin pie filling – big difference!)
- 1 tsp pumpkin pie spice (or make your own blend if you’re ambitious)
Ingredient Notes & Substitutions
Baking is science, but I’ve learned some flexibility through trial and error (and a few cheesecake flops!). Here’s my hard-earned wisdom:
Crust options: No graham crackers? Try digestive biscuits or ginger snaps for extra spice. Need gluten-free? Any GF cookie crumb works great – I’ve even used gluten-free Oreos with fantastic results.
Room temperature is non-negotiable for cream cheese and eggs. Cold ingredients = lumpy filling. I take mine out 2 hours before baking. In a pinch? Microwave cream cheese at 50% power for 15-second intervals until slightly soft.
Pumpkin puree: While canned is easiest (Libby’s is my go-to), homemade works too – just drain excess liquid in cheesecloth first. One small sugar pumpkin yields about 1 cup puree.
Spice swaps: No pumpkin pie spice? Mix 1/2 tsp cinnamon, 1/4 tsp ginger, 1/8 tsp nutmeg, and 1/8 tsp allspice. Your kitchen will smell like autumn magic!
Equipment You’ll Need for Pumpkin Cheesecake
Don’t worry – you don’t need fancy gadgets for this pumpkin cheesecake! Here’s the short list of essentials that’ll make the process smooth (and your cleanup easier):
- 9-inch springform pan – My trusty sidekick for cheesecakes! The removable sides make serving so much prettier. If you don’t have one, a regular pie pan works in a pinch.
- Stand mixer or hand mixer – My grandmother swore by her wooden spoon, but I’ll admit I cheat with my electric mixer for that perfectly smooth filling.
- Mixing bowls – One large for the filling, one medium for crust prep. Glass or stainless steel – nothing too lightweight.
- Measuring cups and spoons – Because eyeballing ingredients leads to cheesecake heartbreak.
- Spatula – For scraping every last bit of that delicious batter into the pan (no wasting a single drop!).
- Aluminum foil – Only if you’re doing a water bath (my secret for crack-free tops!).
That’s it! No fancy equipment – just the basics any baker likely has on hand. Now let’s get mixing!
How to Make Pumpkin Cheesecake
Ready to create pumpkin cheesecake magic? Follow these simple steps – I’ve included all my little tricks to ensure yours turns out as dreamy as mine always does!
Preparing the Crust
First, let’s make that heavenly spiced crust that’ll cradle our creamy filling. Preheat your oven to 325°F (165°C) – this ensures even baking right from the start. While it heats, grab your graham cracker crumbs and mix them with sugar, cinnamon, and nutmeg in a medium bowl. Drizzle in the melted butter and stir until every crumb is coated – it should feel like wet sand when you press it between your fingers.
Now, the fun part: dumping this mixture into your springform pan! Press it firmly into the bottom and about 1 inch up the sides using the bottom of a glass or measuring cup. This compacting prevents crumbling later. Pop it in the oven for exactly 10 minutes – no more, no less! You’ll know it’s ready when your kitchen smells like cinnamon toast.
Making the Filling
While the crust cools, let’s whip up that silky pumpkin filling. In your stand mixer or large bowl, beat the softened cream cheese until completely smooth – about 2 minutes on medium speed. Scrape down the sides! Then add sugar and vanilla, mixing until fluffy. Here’s my golden rule: add eggs one at a time, mixing just until each disappears before adding the next. Overbeating incorporates too much air and leads to cracks!
Finally, gently fold in the pumpkin puree and spices with a spatula. The batter should be smooth as satin with no streaks. Pour it over your cooled crust, smoothing the top with an offset spatula or butter knife.
Baking and Cooling
Bake for 45-50 minutes – the edges should be set but the center should still jiggle slightly when you gently shake the pan. This “wobbly but not liquid” stage is crucial! Turn off the oven, crack the door open, and let it cool gradually for 1 hour inside. This prevents sudden temperature changes that cause cracks.
After its oven nap, transfer the cheesecake to a wire rack to cool completely. Then – and this is the hardest part – refrigerate uncovered for at least 4 hours, though overnight is ideal. The wait is torture, but trust me, it’s worth it for that perfect firm-yet-creamy texture!
Tips for the Perfect Pumpkin Cheesecake
After years of pumpkin cheesecake trials (and a few delicious errors), I’ve collected all my best tricks to guarantee your cheesecake turns out bakery-perfect every time:
- Room temp is key: I can’t stress this enough – cold cream cheese equals lumpy filling. Take everything out 2 hours before baking or use my microwave trick (15-second bursts at 50% power).
- Water bath magic: Wrap your springform pan bottom with foil and place in a roasting pan with 1 inch of hot water. The steam prevents cracks and gives that ultra-creamy texture we all love.
- Don’t overmix the eggs: After adding each egg, mix just until incorporated – about 15 seconds max. Overbeating = too much air = cracks during baking.
- The jiggle test: When edges are set but the center still wobbles like Jell-O when nudged, it’s done. It’ll firm up while cooling.
- Cool it slow: That hour in the turned-off oven with the door cracked? Non-negotiable. Sudden temperature drops are a cheesecake’s worst enemy.
- Chill time matters: I know it’s hard to wait, but that 4-hour minimum chill (overnight is better) makes all the difference in texture and flavor.
- Knife trick: Run a thin knife around the edge after cooling to prevent sticking, but wait to remove the springform ring until fully chilled.
- Slice clean: For picture-perfect pieces, dip your knife in hot water and wipe it clean between each slice.
My biggest tip? Don’t stress the small stuff. Even if it cracks (and all my early ones did!), it’ll still taste incredible – just cover it with whipped cream and call it “rustic!”
Serving Suggestions for Pumpkin Cheesecake
Now for the best part – dressing up your gorgeous pumpkin cheesecake! Here are my favorite ways to serve it that’ll have everyone begging for seconds:
- Classic dollop: A cloud of freshly whipped cream with a dusting of cinnamon or nutmeg. My grandma always said “whipped cream makes everything better,” and she wasn’t wrong!
- Caramel drizzle: Warm caramel sauce zig-zagged over the top adds gorgeous shine and buttery sweetness that complements the pumpkin perfectly.
- Pecan praline crunch: Toasted pecans tossed with brown sugar and butter make an irresistible crispy topping.
- Bourbon-spiked whipped cream: For adult gatherings, fold a tablespoon of bourbon into your whipped cream – it’ll make the spices sing!
- Simple elegance: Sometimes just a light sprinkle of powdered sugar lets the cheesecake shine on its own.
Presentation tip: Let refrigerated cheesecake sit at room temperature for 15 minutes before slicing – it cuts cleaner and the flavors bloom beautifully. I love serving mine on my grandmother’s vintage cake stand with a few cinnamon sticks and fall leaves scattered around for that perfect autumnal touch.
Pro tip: Save any extra pumpkin puree to thin with heavy cream for an impromptu sauce – just sweeten lightly and warm gently on the stove. Drizzle it around each plate for restaurant-worthy plating!
Storing and Reheating Pumpkin Cheesecake
Here’s the beautiful thing about pumpkin cheesecake—it actually gets better with time! The flavors deepen and the texture becomes even more velvety after a day or two. My family always argues whether it’s better fresh or on day three (I’m team day two, personally). Here’s how to keep it tasting its absolute best:
Refrigerator Storage
Once fully cooled, cover your cheesecake tightly with plastic wrap or aluminum foil. I like to press the wrap directly onto the surface to prevent any condensation from forming. Store it in the coldest part of your fridge (usually the back of the bottom shelf) for up to 5 days. Pro tip: Place it in an airtight container if you’ve already sliced it – the exposed edges will stay fresh longer this way.
Freezing for Future Cravings
Yes, you can freeze pumpkin cheesecake! I always make an extra for unexpected guests (or, let’s be honest, for myself on random Tuesday nights). Here’s my foolproof method:
- Whole cheesecake: Freeze uncovered for 1 hour until firm, then wrap tightly in plastic wrap followed by aluminum foil. It’ll keep for up to 2 months this way.
- Individual slices: Place slices on a parchment-lined baking sheet, freeze until solid (about 1 hour), then transfer to freezer bags with parchment between slices.
To serve, thaw overnight in the fridge. The texture stays perfect – no one will guess it was frozen!
Reviving Leftovers
While I think cold cheesecake is divine, some folks prefer it slightly warmed. For that just-baked experience, microwave individual slices for 10-15 seconds. Or place a slice on an oven-safe dish in a 300°F oven for 5-7 minutes. The edges will get slightly warm while the center stays cool and creamy – absolute heaven!
One last storage tip: If you notice any condensation after refrigeration, gently blot with a paper towel before serving. And never, ever store cheesecake at room temperature for more than 2 hours – that cream cheese needs to stay chilled for food safety!
Pumpkin Cheesecake FAQs
I’ve gotten so many questions about this pumpkin cheesecake over the years – here are the answers to the ones that pop up most often in my kitchen and inbox!
Can I use fresh pumpkin instead of canned?
Absolutely! Roast a small sugar pumpkin at 375°F for about an hour until fork-tender, then scoop out the flesh and puree in a food processor. But here’s my tip: drain it overnight in cheesecloth to remove excess moisture. Fresh pumpkin has more water than canned, which can make your cheesecake soggy if you skip this step.
Why did my cheesecake crack?
Oh honey, we’ve all been there! The top three culprits are:
- Overmixing the eggs (creates too much air)
- Rapid temperature changes (always cool gradually!)
- Overbaking (remember – it should jiggle slightly when done)
But here’s my secret: cracks don’t affect the taste one bit. Just cover them with whipped cream and call it “rustic charm!”
Can I make this gluten-free?
You bet! Swap the graham crackers for gluten-free cookies (I love gluten-free gingersnaps for extra spice). Just make sure all your other ingredients are certified GF. The filling is naturally gluten-free as is!
How do I know when it’s done baking?
Do the jiggle test: gently shake the pan. The edges should be set, but the center should wobble like Jell-O – about the size of a silver dollar. It’ll firm up as it cools. And remember: better slightly under than over!
Can I freeze pumpkin cheesecake?
Yes! See my detailed freezing tips above, but the short answer is: freeze whole or sliced for up to 2 months. Thaw overnight in the fridge, and it tastes just as amazing as the day you made it!
Nutritional Information
Now, let’s talk numbers – because even though this pumpkin cheesecake tastes like pure indulgence, I like knowing what I’m enjoying! Here’s the breakdown for one generous slice (about 1/12th of the cheesecake):
- Calories: 320
- Fat: 18g (10g saturated)
- Carbohydrates: 32g
- Fiber: 1g
- Sugar: 22g
- Protein: 5g
- Sodium: 280mg
- Cholesterol: 95mg
A quick disclaimer: these are estimates calculated using standard ingredients – your exact numbers might vary slightly based on specific brands or any substitutions you make. I always say one slice is a serving… but between us, I won’t judge if you sneak a second sliver with your afternoon coffee!
Fun fact: The pumpkin actually boosts the nutritional profile with vitamin A and fiber, making this feel slightly less indulgent than traditional cheesecake. That’s my story, and I’m sticking to it!
Share Your Pumpkin Cheesecake Experience
Nothing makes me happier than hearing about your pumpkin cheesecake adventures! Did your family go wild for it at Thanksgiving? Did you add your own special twist with extra spices or toppings? I want to hear all about it – the triumphs, the kitchen mishaps (we’ve all been there!), and everything in between.
Leave a comment below to tell me how it turned out – did yours have that perfect creamy texture? What toppings did you choose? Your tips might help fellow bakers too! And if you snapped a photo of your masterpiece (or your “rustic” cracked cheesecake – no judgment here!), tag me on Instagram @PumpkinSpiceQueen so I can cheer you on.
This recipe has been years in the making, passed down through my family with love. Now it’s your turn to make memories with it – I can’t wait to hear your stories! Happy baking, friends!
Print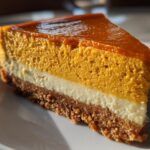
Velvety 2-Layer Pumpkin Cheesecake: Autumn Bliss In Every Bite
- Total Time: 5 hours 10 minutes (including cooling)
- Yield: 1 (9-inch) cheesecake 1x
- Diet: Vegetarian
Description
A creamy and rich pumpkin cheesecake with a spiced crust. Perfect for fall gatherings or holiday desserts.
Ingredients
- 1 1/2 cups graham cracker crumbs
- 1/4 cup granulated sugar
- 1/2 tsp ground cinnamon
- 1/4 tsp ground nutmeg
- 1/3 cup melted butter
- 2 (8 oz) packages cream cheese, softened
- 1 cup granulated sugar
- 1 tsp vanilla extract
- 3 large eggs
- 1 cup canned pumpkin puree
- 1 tsp pumpkin pie spice
Instructions
- Preheat oven to 325°F (165°C).
- Mix graham cracker crumbs, sugar, cinnamon, nutmeg, and melted butter.
- Press the mixture into a 9-inch springform pan.
- Bake the crust for 10 minutes, then let it cool.
- Beat cream cheese, sugar, and vanilla until smooth.
- Add eggs one at a time, mixing well after each addition.
- Stir in pumpkin puree and pumpkin pie spice.
- Pour the filling over the crust.
- Bake for 45-50 minutes or until the center is set.
- Let it cool, then refrigerate for at least 4 hours.
Notes
- Use room-temperature cream cheese for smoother mixing.
- Do not overbake—the center should still jiggle slightly when done.
- For best results, refrigerate overnight.
- Prep Time: 20 minutes
- Cook Time: 50 minutes
- Category: Dessert
- Method: Baking
- Cuisine: American
Nutrition
- Serving Size: 1 slice
- Calories: 320
- Sugar: 22g
- Sodium: 280mg
- Fat: 18g
- Saturated Fat: 10g
- Unsaturated Fat: 6g
- Trans Fat: 0g
- Carbohydrates: 32g
- Fiber: 1g
- Protein: 5g
- Cholesterol: 95mg