Skip to content
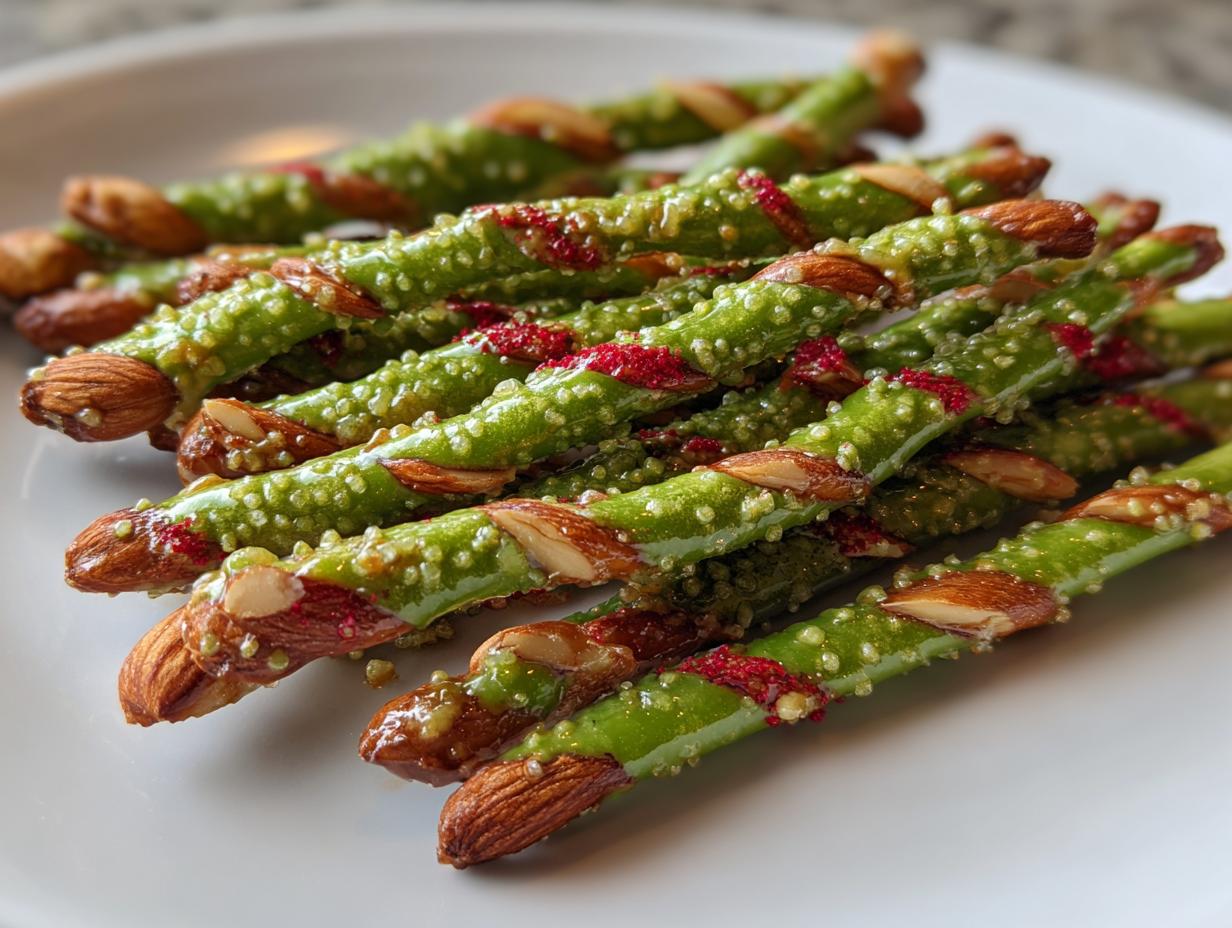
Every Halloween, my kitchen turns into a mad scientist’s lab—complete with bubbling cauldrons and, most importantly, these delightfully creepy Witch Finger Pretzels! I’ll never forget the year I served them at a party and watched grown adults gasp before realizing they were edible (my proudest moment). The best part? These spooky snacks come together in about 20 minutes with just four ingredients.
What makes them magic? Pretzel rods transform into bony fingers with a dip in green candy coating, almond slices become gnarly nails, and a swipe of red icing creates that perfect “freshly plucked from a witch” effect. They’re so simple my 8-year-old niece helps make them now, yet impressive enough to be the star of any Halloween spread. Whether you’re hosting a monster mash or just want to surprise the kids after school, these Witch Finger Pretzels deliver maximum fright with minimal effort—exactly how Halloween treats should be!
Why You’ll Love These Witch Finger Pretzels
These creepy-crawly snacks are total crowd-pleasers for so many reasons:
Easy and Fun to Make
You only need 20 minutes and four ingredients—my kind of recipe! The kids go wild helping dip the pretzels and add the icky details. Even the mess is part of the fun (just ask my green-stained countertops).
Perfect for Halloween Gatherings
They steal the show every time at our annual monster mash. Last year, I arranged them crawling out of a hollowed-out pumpkin—cue the shrieks!
Customizable Spook Level
Go full horror with jagged almond nails and blood drips, or keep it PG with neat fingernails. I like to make some extra-gruesome ones just to watch people’s reactions!
Ingredients for Witch Finger Pretzels
Gather these simple ingredients—you might already have some in your pantry! The magic happens when they come together:
- 1 package pretzel rods (about 20 rods) – look for the straightest ones you can find
- 1 cup almond slices (for those creepy fingernails!)
- 1 cup green candy melts (or white candy melts with a few drops of green food coloring)
- 1 tbsp red icing gel (for the perfect bloody touch—I like the squeeze tube kind for control)
That’s it! Four humble ingredients transform into the spookiest snack you’ll make this Halloween.
Equipment You’ll Need
No fancy gadgets required—just a few basics from your kitchen will do the trick (or treat!):
- Microwave-safe bowl: For melting those candy melts in quick 30-second bursts—trust me, slow and steady wins the race here.
- Parchment paper: Your trusty drying station. No sticking, no mess, just perfect little witch fingers ready to haunt your platter.
- Spoon or small spatula: I use a teaspoon for better control when coating the pretzels, but whatever gets that creepy green coating on there works!
See? Told you it was easy. Now let’s make some magic—the spooky kind!
How to Make Witch Finger Pretzels
Ready to turn ordinary snacks into something gloriously gruesome? Follow these simple steps—your Halloween party guests will scream (in the best way)!
Step 1: Melt the Candy Coating
First, dump those green candy melts into a microwave-safe bowl. Here’s my secret: microwave in 30-second bursts, stirring well between each one. I learned the hard way that high heat makes the candy seize up—nobody wants lumpy witch fingers! When it’s smooth as a witch’s cackle, you’re ready.
Step 2: Dip and Coat the Pretzels
Hold each pretzel rod at the uncoated end and dunk about 3/4 of it into the melted candy. Twist as you pull it out to let excess drip off—this prevents those annoying candy puddles at the base. Work quickly before the coating sets!
Step 3: Add the Almond Nails
While the coating’s still wet, press an almond slice onto the dipped end at a slight angle. Gently now—you want it to look like a real witch’s gnarly nail, not like it’s about to fall off! Pro tip: use broken almond pieces for extra-creepy jagged edges.
Step 4: Create Bloody Details
Once the coating firms up (about 5 minutes), squeeze thin red icing lines near the “nail” and let them drip slightly. My favorite touch? Drawing little knuckle wrinkles with the icing gel—it makes them look eerily real. Let them dry completely (15 minutes) before serving or your guests will get sticky fingers instead of witch fingers!
Tips for the Creepiest Witch Finger Pretzels
Want to take your witch fingers from cute to absolutely terrifying? Here are my tried-and-true tricks:
- Go jagged: Break almond slices unevenly for that “just clawed through dirt” look—the messier, the better!
- Play with blood: Make some drips long and ominous, others just speckled. I even dab red gel under the nails like real gunk.
- Store smart: Keep them in a single layer separated by parchment in an airtight container. They’ll stay crisp and creepy for 3 days (if they last that long!).
The secret? Have fun with the gross-out factor—Halloween’s your excuse to play with your food!
Storing and Serving Suggestions
These witchy treats stay frightfully fresh in an airtight container for up to 3 days—if they survive that long between sneaky snackers! For maximum spook impact, arrange them crawling out of a hollowed-out pumpkin or pile them on a black platter labeled “Witches’ Fingers.” I love surrounding them with dry ice for an eerie smoke effect that makes kids squeal with delight!
Witch Finger Pretzels Nutrition Information
Okay, let’s be real—these are Halloween treats, not health food! But since folks always ask, here’s the nutritional breakdown per creepy finger (remember, these are estimates and can vary based on your specific ingredients):
- Calories: About 120 per pretzel
- Carbs: 18g (mostly from that delicious candy coating!)
- Fat: 5g (thank those almond nails for the good fats)
My philosophy? On Halloween, calories don’t count if they come with screams of delight. Just don’t eat the whole cauldron-full in one sitting—unless you’re channeling your inner cookie monster, in which case I totally understand!
FAQs About Witch Finger Pretzels
Got questions about these ghoulish goodies? I’ve got answers—straight from my years of terrifying taste-testers with these creepy creations!
Can I Use White Chocolate Instead?
Absolutely! White chocolate chips or bark work great—just add a few drops of green food coloring while melting. The flavor’s slightly sweeter than candy melts, which I actually prefer. Pro tip: If it’s too thick, stir in a teaspoon of coconut oil for perfect dipping consistency.
How Far in Advance Can I Make These?
These keep their creepy charm for 3 days when stored properly (airtight container, parchment between layers). Honestly though? They’re best within 24 hours—the pretzels stay extra crisp and the “blood” details stay vivid. I always make them the morning of my Halloween party for maximum fright factor!
Any Nut-Free Alternatives?
For nut-free witch fingers, use sunflower seeds or pumpkin seeds as nails—they give the same eerie look! Or get creative with white chocolate chips pressed pointy-side up. One year I even used sliced dried apricots cut into nail shapes (bonus: they look extra witchy with the skin texture!).
Print
Creepy 20-Minute Witch Finger Pretzels to Haunt Your Halloween
- Total Time: 20 mins
- Yield: 20 pretzels 1x
- Diet: Vegetarian
Description
Spooky and fun witch finger pretzels perfect for Halloween parties. These creepy snacks are easy to make and will impress your guests.
Ingredients
- 1 package pretzel rods
- 1 cup almond slices
- 1 cup green candy melts
- 1 tbsp red icing gel
Instructions
- Melt the green candy melts in a microwave-safe bowl.
- Dip each pretzel rod into the melted candy, coating about three-quarters of it.
- Press an almond slice onto the coated end to create a fingernail.
- Use red icing gel to draw blood drips or knuckle lines.
- Let the pretzels dry on parchment paper before serving.
Notes
- Store in an airtight container for up to 3 days.
- For extra creepiness, use broken almond slices for uneven nails.
- Prep Time: 15 mins
- Cook Time: 5 mins
- Category: Dessert
- Method: No-Bake
- Cuisine: American
Nutrition
- Serving Size: 1 pretzel
- Calories: 120
- Sugar: 8g
- Sodium: 150mg
- Fat: 5g
- Saturated Fat: 2g
- Unsaturated Fat: 2.5g
- Trans Fat: 0g
- Carbohydrates: 18g
- Fiber: 1g
- Protein: 2g
- Cholesterol: 0mg